
Installation manual


26
System Set Up
5
Setting the Main Controller
After the power has been connected to the outdoor and cylinder units (See chap-
ter 4.6) the initial system settings can be entered via the main controller.
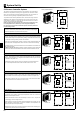
1. Power supply
i. Check all breakers and other safety devices are correctly installed and turn
on power to the system.
ii. Main controller will automatically start up.
Wait approximately 2 mins whilst the control menus load.
2. Controller settings
When the controller is ready a blank screen with a line running across the top
will be displayed.
i. Press button E (Power)
If this is the fi rst time the controller has been switched on you will automati-
cally be directed to the Initial settings menu.
* When the system is off, freeze stat. function is not performed.
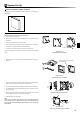
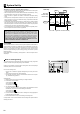
Initial Settings
From the initial settings menu the installer can set the language, date/time, tem-
perature unit (°C/°F), emergency contact number, room sensor setting, and dis-
play options.
1. Use buttons F1 and F2 to move scroll through the menu list. When the title is
highlighted press CONFIRM to edit.
2. Use function buttons appropriate to edit each setting then press CONFIRM to
save the setting.
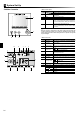
3. For room sensor setting it is important to choose the correct room sensor de-
pending on the heating or cooling mode the system will operate in.
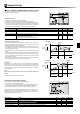
Control option (p22) Corresponding initial settings room sensor
A Room RC1-8 (only 1 can be selected)
B TH1
C N/A (Option C uses a thermostat with off/on signal only,
temperature is not detected by FTC3)
D Main controller
NOTE
If you wish to operate in time/zone mode please select this from the room sen-
sor setting menu then edit the schedule under ‘Select Time/Zone’ to refl ect which
room sensor you want operational for the given time period.
Once the controller initial settings are complete, settings for the main modes can
be entered. To return to the main settings menu screen from the initial settings
screen, press the BACK button.
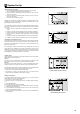
Main Settings Menu
The main settings menu can be accessed by pressing the MENU button. To re-
duce the risk of untrained end users altering the settings accidentally there are
two access levels to the main settings; and the service section menu is pass-
word protected.
User Level – Short press
If the MENU button is pressed once for a short time the main settings will be
displayed but without the edit function. This will enable the user to view current
settings but NOT change the parameters.
Installer Level – Long press
If the MENU button is pressed down for 3 secs the main settings will be displayed
with all functionality available.
The following items can be viewed and/or edited (dependent on access level).
• Domestic Hot water (DHW)
• Heating (and Cooling)
• Schedule timer
• Holiday mode
• Initial settings
• Service (Password protected)
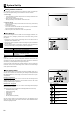
Use the F2 and F3 buttons to move between the icons. The highlighted icon will
appear as a larger version in the centre of the screen. Press CONFIRM to select
and edit the highlighted mode.
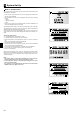
Icon Description
Hot water (DHW)
Heating/Cooling
Schedule timer
Holiday mode
Initial setting
Service