
Installation manual


4
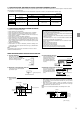
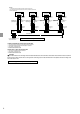
1-6. INSTALLATION DIAGRAM
8QLWVVKRXOGEHLQVWDOOHGE\OLFHQVHGFRQWUDFWRUDFFRUGLQJWRORFDOFRGHUHTXLUHPHQWV
$IWHUWKHOHDNWHVWDSSO\LQVXODW-
LQJPDWHULDOWLJKWO\VRWKDWWKHUHLV
no gap.
When the piping is to be at-
tached to a wall containing metals
WLQSODWHGRUPHWDOQHWWLQJXVH
DFKHPLFDOO\WUHDWHGZRRGHQ
SLHFHPPLQRUWKLFNHU
between the wall and the piping
or wrap 7 to 8 turns of insulation
YLQ\OWDSHDURXQGWKHSLSLQJ
To use existing piping, perform
COOL operation for 30 minutes
and pump down before removing
the old air conditioner. Remake
ÀDUHDFFRUGLQJWRWKHGLPHQVLRQ
for new refrigerant.
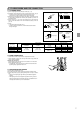
PARTS TO BE PROVIDED AT YOUR SITE
$ 3RZHUVXSSO\FRUG 1
% Indoor/outdoor unit connecting wire* 1
& ([WHQVLRQSLSH5HIHUWR 1
' Wall hole cover 1
( Piping tape 1
)
Extension drain hose
(or soft PVC hose, 15 mm (19/32
LQLQQHUGLDPHWHURUKDUG39&
SLSH93
1
* Refrigeration oil
Little
amount
+ 3XWW\ 1
, 3LSH¿[LQJEDQG 2to7
- )L[LQJVFUHZIRU, 2to7
. Wall hole sleeve 1
/
6RIW39&KRVHPPLQ
inner diameter or hard PVC pipe
VP25 for drain socket
1
* Note:
3ODFHLQGRRURXWGRRUXQLWFRQQHFWLQJZLUH%DQG
SRZHUVXSSO\FRUG$DWOHDVWPLQDZD\
from the TV antenna wire.
7KH³4¶W\´IRU%WR.LQWKHDERYHWDEOHLVTXDQ
-
WLW\WREHXVHGSHULQGRRUXQLW
MXZ-3A30NA
More than
100 mm
LQ
Open as a rule
More than 500 mm
LQLIWKHIURQW
and both sides are open
More than
PPLQ
More than
PPLQLIWKHUHDUH
obstacles to both sides
Open as a rule
0RUHWKDQPPLQLIWKHEDFN
both sides and top are open
0RUHWKDQPPLQ
Outdoor unit installation
Air in
Air out
Air in
2-U-shape notched holes
%DVHEROW0
u
2YDOKROHV
%DVHEROW0
>8QLWPPLQFK@
200
27
40
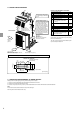
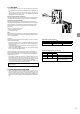
1-7. MOUNTING ARRANGEMENT OF DRAIN SOCKET
3OHDVHSHUIRUPWKHGUDLQSLSLQJZRUNRQO\ZKHQGUDLQLQJIURPRQHSODFH
1 Choose one hole to discharge drain and install the drain socket to the hole.
2 Close the rest of the holes with the drain caps.
&RQQHFWDYLQ\OKRVHRIPPLQLQWKHLQVLGHGLDPHWHURQWKHPDUNHWZLWKWKHGUDLQVRFNHWDQGOHDGGUDLQ
Note:
Do not use the drain socket and the drain cap in the cold region.
'UDLQPD\IUHH]HDQGLWPDNHVWKHIDQVWRS