
Installation manual

6
7
Note:
If the rise portion is long, there will be a lot of returned water in an operation stop, generating slime or odor during off-season.
Ensure that the rise portion is at a minimum.
Pipe the drain piping to ensure that it discharges drain, and insulate it to prevent dew condensation.
A failure to the piping work may cause water leakage and so wet your property.
Caution:
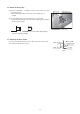
Take the following steps to install the drain hose.
1. Insert the drain hose (supplied with the indoor unit) into the drain port.
(The drain hose must not be bent more than 45° to prevent the hose from breaking or clogging.)
2. Attach the drain pipe (O.D. ø32 PVC TUBE, field supply).
(Attach the pipe with glue for the hard vinyl chloride pipe, and fix it with the band (small) 3.)
3. Perform insulation work on the drain pipe (O.D. ø32 PVC TUBE) and on the socket (including elbow).
4. Follow the steps in the next section to confirm the drain discharge.
5. Wrap the insulation pipe 5 around the connection part between the drain socket and the drain hose, and then install the
band (large) 4.
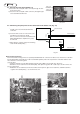
Indoor unit
Edges should be flush with each other!
The seam faces up.
3 Band (small) (accessory)
Drain hose
(supplied with the indoor unit)
Insulating material
(field supply)
(Insertion margin)
Drain pipe
(O.D. ø32 PVC TUBE)
5 Insulation pipe (accessory)
4 Band (large) (accessory)
2535 25
Max. 210 ± 5 mm (linear dimensions)
(field supply)
(Insertion margin)(Visible part)
Fig.5-4