
User manual


EN-13
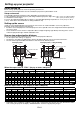
Setting the projector posture
You can select the posture of the projector. Set
COOLING CONDITION in the INSTALLATION 1 menu
according to the posture.
Important:
• Inconsistency between the projector posture and
the menu settings may cause breakdown or failure
of the projector or the lamp.
• When you use the projector in the HIGH ALTITUDE
mode, the selectable projector posture is fl oor
installation (0°) and ceiling installation (180°) only.
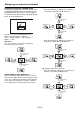
Setting the projection angle
• Set COOLING CONDITION in the INSTALLATION
1 menu referring to the fi gure below. The default
setting is 0°.
Straight up
Straight down
Ceiling installation Floor installation
90
˚ ±
15
˚
90°
270˚ ± 15˚
270°
45
˚ ±
30
˚
45°
135˚ ± 30˚
135°
315˚ ± 30˚
315°
225˚ ± 30˚
225°
0
˚ ±
15
˚
0°
180˚ ± 15˚
180°
Angle range
Projection angle setting
(See page 32 for menu setting.)
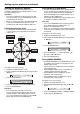
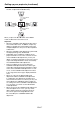
1. Display the INSTALLATION 1 menu.
2. Select COOLING CONDITION by pressing the S or
T button.
COOLING CONDITION
0°
3. Press the ENTER button.
COOLING CONDITION
COOLING CONDITION
0°
4. Select the angle by pressing the W or X button.
5. Press the ENTER button.
Important:
• If the setting value selected in the menu is
inconsistent with the actual projection angle, the
cooling condition setting dialog appears. In this
case, select the projection angle using the W or X
button and then press the ENTER button.
Setting HIGH ALTITUDE MODE
• Set HIGH ALTITUDE MODE in the INSTALLATION
1 menu according to the altitude at which you use
the projector. The default setting is STANDARD.
• Select STANDARD when using the projector at an
altitude from 0 to 2000 meters.
• Select HIGH ALTITUDE when using the projector at
an altitude from 2000 to 2700 meters.
Important:
• If you select STANDARD when using the projector
at an altitude higher than 2000 meters, the
projector may break down or fail.
• When you use the projector in the HIGH ALTITUDE
mode, only fl oor installation and ceiling installation
are allowed.
(See page 32 for menu setting.)
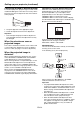
1. Display the INSTALLATION 1 menu.
2. Select HIGH ALTITUDE MODE by pressing the S
or T button.
HIGH ALTITUDE MODE
STANDARD
3. Press the ENTER button.
HIGH ALTITUDE MODE
HIGH ALTITUDE MODE
STANDARD
4. Select STANDARD or HIGH ALTITUDE by
pressing the W or X button.
5. Press the ENTER button.
Setting IMAGE REVERSE
• Set IMAGE REVERSE in the INSTALLATION 1 menu
according to the orientation of the projector. The
default setting is OFF.
• Select OFF for the combination of fl oor installation
and front projection.
• Select MIRROR INVERT for the combination of
ceiling installation and front projection.
• Select MIRROR for the combination of fl oor
installation and rear projection.
• Select INVERT for the combination of ceiling
installation and rear projection.
(See page 32 for menu setting.)
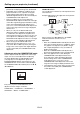
1. Display the INSTALLATION 1 menu.
2. Select IMAGE REVERSE by pressing the S or T
button.
OFF
IMAGE REVERSE
3. Select OFF, MIRROR, INVERT or MIRROR INVERT
by pressing the W or X button.
Setting up your projector (continued)