DIAMOND VIEW 1998E Colour Monitor 19” (48cm) CRT Size 18” (45.
Diamond View is a registered trademark of Mitsubishi Electric Australia Pty. Ltd. Microsoft and Windows are registered trademarks of Microsoft Corporation. Apple and Macintosh are registered trademarks of Apple Computer, Inc. All other trademarks remain the property of their respective owners.
Table of Contents 1 Important Safety Instructions...........................................1 2 Features .............................................................................2 3 Unpacking the Monitor......................................................3 4 Installation .........................................................................3 Drivers for Windows 95, 98, 2000 and Millennium Edition.............4 5 Adjusting the Monitor .......................................................
Copyright Notice Copyright 2002, Mitsubishi Electric Australia Pty. Ltd. All rights reserved. No part of this publication may be reproduced, transmitted, transcribed, stored in a retrieval system or translated into any language or computer language, in any form or by any means, electronic, mechanical, magnetic, optical, chemical, manual or otherwise, without the prior written permission. Disclaimer Mitsubishi Electric Australia Pty. Ltd.
1 Important Safety Instructions Please read the following safety instructions before installing or cleaning your Diamond View monitor: 1. This monitor must be operated from the type of power source indicated on the rating label. If you are not sure of the type of power available in your area, consult your dealer or local electricity supply company. 2. This monitor must be operated with a 3 wire electrical cable that has a plug with a third (grounding) pin.
2 Features Your Diamond View 1998E Monitor has the following features: ♦ Plug and Play Compatibility With DDC-2B, the 1998E is compatible with the Plug and Play features of Microsoft Windows 95, 98, 2000, XP and Millennium Edition. ♦ Compatible with PC, Apple Macintosh and most other computer systems. ♦ Flicker-free Image The monitor supports VESA standard graphics signals with flicker-free refresh rates at resolutions up to 1280 x 1024 pixels at 85Hz. ♦ Larger Viewable Size With its 45.
3 Unpacking the Monitor Please check that the following items are included with your monitor. If they are missing or damaged, please contact your place of purchase immediately. ♦ Monitor with attached signal cable ♦ Tilt/swivel base ♦ Power cord ♦ User’s manual Locate the model name and the serial number label on the back of your monitor and write the details of the monitor and your place of purchase in the space on page (ii) of this manual for future reference.
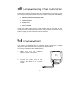
3. Connect the computer end of the DSUB cable to the 15-pin output connector on the video board of your computer. 4. Turn the monitor and the computer on. If you wish to connect the monitor to an older-type Apple Macintosh, you need to use a Macintosh cable adapter to connect the video signal cable of your monitor to the video port of the computer. Your computer dealer should be able to supply you with a suitable adaptor.
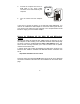
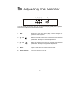
5 Adjusting the Monitor 1 2 3 4 Exit 5 Enter You can adjust the monitor using its On-Screen Display (OSD) menu system. There are 5 buttons that control the monitor: 1. Exit Returns to the last menu page, saves changes or quits the menu system. 2. 3 and Move to another menu item or decrease the selected parameter. Hotkey for contrast adjustment. 3. 4 and Move to another menu item or increase the selected parameter. Hotkey for brightness adjustment. 4.
Selecting Functions and Making Adjustments Contrast Hotkey 1. Press to open the contrast adjustment display. 2. Press or to adjust the contrast level. 3. Press the Exit button to save your changes. Brightness Hotkey 1. Press to open the brightness adjustment display. 2. Press or to adjust the contrast level. 1. Press the Exit button to save your changes.
Make adjustments 1. In Main Menu: Press or that you wish to change. to select the function group with the item 2. Press Enter to open the Sub Menu. 3. Press or to select the item to be changed and press Enter. 4. Press or again to make the adjustment.
5. Press Exit to save the setting and return to the main menu. 1. Luminance Contrast changes the difference between the light and dark areas of the displayed image. Brightness adjusts the brightness of the displayed image. 2. Geometry Hor. Position adjusts the horizontal position of the image. Hor. Size adjusts the image width. Ver. Position adjusts the vertical position of the image. Ver. Size adjusts the image height. Rotation corrects any tilting of the image.
3. Unbalance adjusts the pincushion balance if both sides of the image are bowed toward either the left or the right. Trapezoid makes the vertical edges of the image parallel. Parallelogram aligns the top and bottom edges of the image. Top corner adjusts the edge curvature at the top corners of the image. Bottom corner adjusts the edge curvature at the bottom corners of the image.
4. Recall/Reset and Image Status and press Enter to recall the factory settings for the current Select graphics signal. The word “Recall” will blink on the screen in the process of recall. This page is also a status display that shows the horizontal and vertical frequencies of the current graphics signal. Please note that the resolution is only displayed if you are using a graphics signal that corresponds with one of the monitor’s presets. 5.
Note: The setting of each parameter is represented by a numeric value and corresponding scale. The on-screen menu will automatically disappear after 20-second’s of inactivity. If changes have been made, the monitor will automatically save them. Timing and Refresh Rate Setting By making adjustments of your video card settings, you can set the timing and the refresh rate to match your requirements.
Factory Preset Timings Mode Resolution Vertical Frequency (Hz) Horizontal Frequency (kHz) Industry Industry VESA VESA VESA VESA VESA VESA VESA 640 x 400 640 x 480 800 x 600 800 x 600 1024 x 768 1024 x 768 1280 x 1024 1280 x 1024 1600 x 1200 70 60 75 85 75 85 75 85 65 31.47 31.47 46.88 53.67 60.02 68.68 79.98 91.15 81.
6 Troubleshooting If you encounter any trouble using the Diamond View 1998E monitor, make sure that your monitor is properly installed. (For hardware installation, see Chapter 4 of this manual.) If the problems persist, please check this chapter for possible solutions before calling Mitsubishi Electric or one of our Authorised Service Centres. No image is displayed - Check that the light (LED) next to the monitor’s power button is lit and is green in colour.
- Remove any magnetic objects that are near the monitor. These include speakers and power supplies (AC adaptors). Colours are impure. - Check that the cable is securely connected to the computer. - Check the VGA signal cable for damage. If any pins are bent or broken off, contact your dealer or an authorised Mitsubishi Electric service agent (see Chapter 8 for details). - Check the monitor’s colour settings. Press the Enter button and select the Color Settings menu.
7 Specifications Model Diamond View 1998E Display Characteristics Display Type 19” (48 cm) diagonal cathode ray tube Maximum Viewable Size 18” (45.7cm) diagonal Dot pitch 0.
User Interface Controls Mains power switch, On-Screen Display with 4 control buttons On-Screen Display Functions: Contrast; Brightness; Vert. & Hor. Image Position and Size; Pincushion Amplitude, Phase and Balance; Top and Bottom Corner Pincushion; Color Balance; Degauss; Horiz. and Vert.
8 Service Contacts If problems remain after checking this manual, please contact your place of purchase or contact Australian Service Contacts Visit the Mitsubishi Electric Australia web site at www.mitsubishi-electric.com.
Victoria and Tasmania 4 / 303 Burwood Hwy East Burwood, Vic, 3151 Telephone: (03) 9262-9899 Fax: (03) 9262-9850 Western Australia 5 / 329 Collier Road Bassendean, WA, 6054 Telephone: (08) 9377-3411 Fax: (08) 9377-3499 New Zealand Service Contacts Contact: Melco New Zealand Ltd. 1 Parliament St. Lower Hutt Wellington Telephone: (04) 560-9100 Fax: (04) 560-9140 Web site: www.melco.co.