
- Mitsubishi Digital Electronics VCR User Manual


8
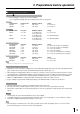
3. Preparations before operation
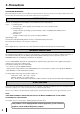
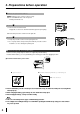
1 Install the ink sheet
Install the ink sheet to the ink cassette before installing the sheet cassette to the unit.
1 Set the black roller of the ink sheet to ink cassette as shown right A, B.
2 Set the thin stick of white roller to the ink cassette as shown right C.
3 Set the thick stick of white roller of the ink cassette as shown right D, E.
In the step 3, turn the roller and set the notch of the roller side to the hole of
the cassette .
Install the roller by putting the notch through the hole.
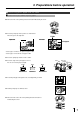
1Install the ink cassette
1 Eliminate any slack of the ink sheet.
Push the black roller and turn the white roller.
2 Insert the ink cassette with the ink sheet into its compartment.
Insert the ink cassette with the knob side toward you.
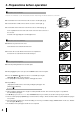
1Set the printing unit
1 Push the printing unit until it is locked into place.
2 After plugging the power cord, press the “POWER” button on the front panel.
3 Press the MEMORY ( ) button for about 1 second while pressing the
MONITOR (
) button on the front panel .
, The print paper is automatically cut after sending by about 10cm.
4 Repeat 3 step.
(Fingerprints and dust can be removed by feeding the print paper. The
printing unit is initialized.)
Attention
}}
}}
}
, When setting the print paper, the set paper is a little pulled into the unit. Take care that any object is not pulled into
the unit with the print paper.
, In 2~3steps, press the “MONITOR” first. If MEMORY button is pressed first, the stored in memory may be cleared.
, Do not feed the print paper (2~3 steps) more than 2 times. Doing so will not arrow the number of prints indicated on page 9
to be printed.
, If the print paper is pulled out too much at installing, an error may occur with the display “PAPER JAM 12”. In this case, initialize
this unit again. (2~3 steps)
0 The installation of the print paper and ink sheet is completed.
White roller
Black roller
A
B
C
E
E
D
notch
a
b