
- Mitsubishi Digital Electronics DVR User Manual


51
•
•••••••••••••••••••••••••••••••••••••••••••••••••••••••••••••••••••••••••••••••••••••••••••••••••••••••••••••••••••••••••••
Operations
5. Check to see that the cursor is to the left of program number
“1” and turn the SHUTTLE ring clockwise twice.
• The “DW” display reverses in color when the SHUTTLE ring
is turned for the first time. When the ring is turned for the
second time, the background turns red and flashes.
6. Turn the JOG dial to display “SPL” in “DW” and turn the
SHUTTLE ring clockwise.
• The setting is confirmed and flashing stops.
If you select the wrong day of the week in error,
turn the SHUTTLE ring clockwise, use the JOG dial to
display the correct day of the week and turn the SHUT-
TLE ring clockwise again.
7. Turn the JOG dial clockwise to move the reversed display
to the “hour” of the start time and turn the SHUTTLE ring
clockwise.
• The background of the “hour” of the START changes to red
and flashes.
8. Turn the JOG dial to display “12” in the “hour” and turn the
SHUTTLE ring clockwise.
• The setting is confirmed and flashing stops.
9. Repeat steps 7 and 8 to set “30” in “minutes” of the start
time and “13” in the “hour” and “00” in the “minutes” of the
end time, and then confirm.
10. Turn the JOG dial clockwise to move the reversed display
to the “MODE” and turn the SHUTTLE ring clockwise.
• The background of the “MODE” setting turns red and flashes.
11. Turn the JOG dial to display “A” in “MODE” and turn the
SHUTTLE ring clockwise.
• The setting is confirmed and flashing stops.
12. Turn the JOG dial clockwise to move the reversed display
to the “MD” and turn the SHUTTLE ring clockwise.
• The background of the “MD” setting turns red and flashes.
13. Turn the JOG dial to display “ON” in “MD” and turn the
SHUTTLE ring clockwise.
• The setting is confirmed and flashing stops.
14. When input timer reservations in other program number,
repeat steps 5 ~ 13.
15. Turn the JOG dial to select “SPL” and turn the SHUTTLE
ring clockwise twice.
• The start day display reverses in color when the SHUTTLE
ring is turned for the first time. When the ring is turned for
the second time, the background turns red and flashes.
16. Turn the JOG dial to display “WED” in start day and turn
the SHUTTLE ring clockwise.
• The setting is confirmed and flashing stops.
17. Turn the JOG dial clockwise to move the reversed display
to the end day and turn the SHUTTLE ring clockwise.
• The background of the end day setting turns red and flashes.
18. Turn the JOG dial to display “SAT” in end day and turn the
SHUTTLE ring clockwise.
• The setting is confirmed and flashing stops.
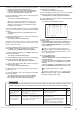
<TIMER PROGRAM> P2
DW START END MODE MD
1
SPL 12:30 13:00 A ON
2 --- --:-- --:-- ---- -
3 --- --:-- --:-- ---- -
4 --- --:-- --:-- ---- -
5 --- --:-- --:-- ---- -
6 --- --:-- --:-- ---- -
7 --- --:-- --:-- ---- -
8 --- --:-- --:-- ---- -
>>
SPL WED-SAT
19. Turn the SHUTTLE ring counterclockwise or press the SET
UP button to exit.
• Turn the SHUTTLE ring counterclockwise to return the cursor
to the previous operation. Then, press the SET UP button to
clear the <TIMER PROGRAM SETTINGS> screen and return
to the normal screen.
If there is an unset item in the program line (- - -
display), the setting screen cannot be exited even when
turning the SHUTTLE ring counterclockwise. In this
case, set all unset items.
20. Press the TIMER button.
• The TIMER indicator lights.
• Timer recording starts if the current time is within the timer
reservation time frame.
• The power turns off and recording will be in the stand-by
mode if the current time is not within the timer reservation
time frame.
• Timer recording/timer recording standby can be cancelled
by pressing the TIMER button again for more than 1 second.
Not available during alarm recording.
To delete program contents, or to exit the program
without performing settings, press the WARNING RE-
SET button during program setting.
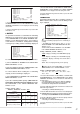
INFORMATION
Recording will not be performed if there is an error in the setting. To help in such situation, the table below
provides information ob error and countermeasure when errors are encountered in Timer recording.
Unit status
TIMER indicator flashes.
Series of short beeps
(beep-beep-beep)
will sound.
Timer recording is not
performed even when
the timer recording
time is reached.
1) The date/time is not set.
2) Timer reservation setting has not been
set to operate.
3) Program is currently being set.
• “HDD REPEAT REC MAIN” is set to “OFF”
or “STANDBY”, or “HDD REPEAT REC SUB”
is set to “OFF”. There is no HDD space left
of HDD(MAIN) or HDD(SUB).
Description of error
Countermeasure
Page
1) Set the date/time.
2) Set the correct reservation.
3) Check the settings.
• Press the WARNING RESET button for
canceling the warning.
• Set to “ON” in the “HDD REPEAT REC MAIN”
or “HDD REPEAT REC SUB” when “OFF” is
selected.
• Press the REC button when “STANDBY” is
selected on the “HDD REPEAT REC MAIN”.
25, 26
50, 51
50, 51
96
53
53