
- Mitsubishi Digital Electronics DVR User Manual

81
•
••••••••••••••••••••••••••••••••••••••••••••••••••••••••••••••••••••••••••••••••••••••••••••••••••••••••••••••••••••••••••••
Operations
Setting ( default : “START•END” )
“
START•END” : Sets the recording start/end date/
time.
“START” : Sets the recording start date/time.
“LATEST DATA” : Starts copying from the end point
according to the available memory in the COPY
device.
6. Set the desired copy (restore) start date and time to “START”
and confirm.
7. (When setting “START•END” in step 5 • • • )
Set the desired copy (restore) end date and time to “END”
and confirm.
8. Select “EXECUTE” and turn the SHUTTLE ring clockwise.
• The copy (restore) operation is executed.
• If the copy (restore) operation does not start, turn the
SHUTTLE ring counterclockwise or press the COPY button.
The “COPY/NO MEDIA” warning is displayed
when executing COPY or RESTORE without a
Compact Flash Card inserted in the slot, or no DDS,
RDD media is inserted in the device.
If the copy range exceeds the available ca-
pacity of the Compact Flash Card, DDS media
or RDD media, “COPY/SIZE/DATA ERROR”
warning will appear on the screen when copying
(
see pages 96, 97). When this case occurs,
set a narrower copy range or insert a Card, DDS
media or RDD media with larger capacity.
If a data with no date is included in the copy
range, “COPY/SIZE/DATA ERROR” warning will ap-
pear on the screen.
When there is no data to restore in the Com-
pact Flash Card, DDS media or RDD media, “REST/
SIZE/DATA ERROR” warning will appear on the
screen when restoring.
A “REST/MEDIA ERROR” error is displayed
when executing RESTORE from a non-FSM2 Com-
pact Flash Card.
For usable Compact Flash Card, check with your
dealer or place of purchase.
For the recordable time when copying to a Com-
pact Flash Card,
see page 93.
The image data is processed and copied in 1MB
blocks.
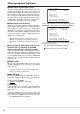
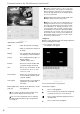
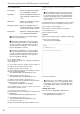
■ Copying from unit to videotape
Data can be copied to a VCR tape even when the unit is
recording. For recording of the VCR, see the instruction
manual of the analog video cassette recorder.
COMPACT FLASH
VIDEO OUT AUDIO OUT
POWER
TIMER
DIGITAL RECORDER DX
-
TL
2500
SPLIT/
SEQUENCE
ZOOM
M-DET
TIMER
PRE ALARM
ACCESS
EMERGENCYOUTPUT B
0
AUDIO CORD
(commercially
available cable,
if necessary)
To AUDIO OUT
terminal
To VIDEO OUT
terminal
VIDEO CORD
(commercially
available cable)
To AUDIO IN
terminal
To VIDEO IN
terminal
ANALOGUE VIDEO CASSETTE RECORDER
1. [Analogue video cassette recorder] Prepare the unit for
recording.
• First, set the input source of the VCR to the external (from
VCR).
2. [This unit] Press the SPLIT/SEQUENCE button to select
the screen type to play back ( see page 41).
• Single screen, SPLIT4 (a, b, c and d) screen, SPLIT9 (a, b)
screen and SPLIT16 screen can be selected.
It is also possible to copy the video of each cam-
era in order using single screen sequential playback
(
see “SEQUENTIAL PLAY”, page 54).
3. [This unit] Use the search function to move to the beginning
of the video to copy ( see “START/END SEARCH”, page
79).
4. [Analogue video cassette recorder] Start recording.
5. [This unit] Press the PLAY button to start playback.
6. To stop copying, press the STOP button of this unit. After
stopping playback, stop the recording on the analogue video
cassette recorder.
Video recorded on VCR will be exactly as dis-
played on the playback screen of the DVR.