DLP™ PROJECTOR MODEL FD730U FD730U-G User Manual FD730U FD730U-G This User Manual is important to you. Please read it before using your projector.
CAUTION RISK OF ELECTRIC SHOCK DO NOT OPEN CAUTION: TO REDUCE THE RISK OF ELECTRIC SHOCK, DO NOT REMOVE COVER (OR BACK) NO USER-SERVICEABLE PARTS INSIDE REFER SERVICING TO QUALIFIED SERVICE PERSONNEL. The lightning flash with arrowhead symbol within an equilateral triangle is intended to alert the user to the presence of uninsulated “dangerous voltage” within the product’s enclosure that may be of sufficient magnitude to constitute a risk of electric shock.
Contents Important safeguards.........................................................................................................................4 Overview.............................................................................................................................................6 Remote control...................................................................................................................................8 Installation .................................................
Important safeguards Please read all these instructions regarding your projector and retain them for future reference. Follow all warnings and instructions marked on the projector. 10. Power sources This projector should be operated only from the type of power source indicated on the marking label. If you are not sure of the type of power, please consult your appliance dealer or local power company. 11.
Important safeguards (continued) WARNING: Do not use the projector with condensation on it. It can lead to breakdown or other failure. Unplug immediately if there is something wrong with your projector. Do not operate if smoke, strange noise or odor comes out of your projector. It may cause fire or electric shock. In this case, unplug immediately and contact your dealer. Place of installation For safety’s sake, do not use the projector at any place subjected to high temperature and high humidity.
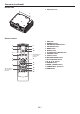
Overview 1 2 3 1 2 3 4 5 6 7 8 9 10 11 12 13 14 4 5 6 789 10 12 13 Lamp cover Lens FOCUS ring ZOOM ring LENS SHIFT dial Remote control sensor (front) Speaker Lock bar Intake vent Control panel Exhaust vent Power jack Terminal panel Kensington Lock Caution: • Do not replace the lamp immediately after using the projector because the lamp would be extremely hot and it may cause burns.
Overview (continued) Bottom side 1 Adjustment feet 1 Remote control ON STANDBY MAGNIFY ASPECT 8 1 2 3 4 5 6 VOL UP EFFICIENT MODE DOWN KEYSTONE AV MUTE VIEWER This model does not have these functions. This model does not have this function. 11 ENTER 7 10 3D AUTO POSITION MENU 9 12 FREEZE VIDEO 1 COMPUTER UNPLUG USB DISP. S-VIDEO 2 LAN DISP.
Remote control Battery installation Use two (AA, R6) size batteries. Inserting the batteries into the remote control 1. Remove the back cover of the remote control by pushing the battery compartment door in the direction of the arrow. 2. Load the batteries making sure that they are positioned correctly (+ to +, and - to -). • Load the batteries from - spring side, and make sure to set them tightly. 3. Replace the back cover.
Installation Screen size and projection distance Refer to the following tables to determine the screen size and projection distance. • The figures in the tables are approximate and may be slightly different from the actual measurements. • The lens shift height shows distances from the factory default position.
Installation (continued) Front projection, ceiling mounting kit. (Don’t use screw holes without arrow marks.) In this case, make sure that the screw is inserted in the projector at least 5 mm. The length of the screw should be 20 mm or shorter. Also make sure that no electrical current is flowing in the mount kit due to current leakage or other cause. For ceiling mounting, you need the ceiling mount kit designed for this projector. Ask a specialist for installation. For details, consult your dealer.
Basic connections This projector can be connected with various devices such as a VCR, video camera, videodisc player, and personal computer that have analog RGB output connectors. Important: • Make sure that the connected device is turned off before starting connection. • Plug in the power cords of the projector and the connected devices firmly. When unplugging, hold and pull the plug. Do not pull the cord.
Basic connections (continued) Connection (for video equipment having an HDMI terminal) Equipment having an HDMI terminal To HDMI terminal HDMI HDMI (with HDMI logo) cable (option) Important: • Use a commercially available HDMI (with HDMI logo) cable. • You don’t have to connect any cable for audio input. You can input video and audio using an HDMI cable only.
Basic connections (continued) Projector + Computer For computer with mini D-SUB PC audio cable (option) Computer cable AUDIO IN-1 or IN-2 COMPUTER/ COMPONENT VIDEO IN To PC audio output Necessary when outputting to both a PC monitor and the projector. To monitor port Computer Computer cable (option) MONITOR OUT AUDIO OUT Audio cable (option) For analog connection: 1. Connect one end of the supplied computer cable to the COMPUTER/COMPONENT VIDEO IN terminal (1, 2) of the projector. 2.
Preparation Preparation for projection Adjusting the position of the projected image 1. Attach the provided power cord to the projector. 2. Plug the power cord in the wall outlet. 3. Remove the lens cap. To adjust the position of the projected image on the screen, use the LENS SHIFT dial. 1. Rotate the LENS SHIFT dial inside the top cover of the projector to adjust the image position. • Rotating the dial clockwise (or counterclockwise for a ceiling-mount projector) moves the image up.
Preparation (continued) When projected images are distorted to a trapezoid To correct vertical keystone distortion, press the KEYSTONE button on the projector or the remote control to display KEYSTONE, and adjust the image by pressing the , button (or VOLUME , button on the remote control). In the following cases: Press the button. Press the button. • In the keystone adjustment, you can obtain an optimum result when the LENS SHIFT dial is at the factory default position. (See page 9.
Basic operation 4 3 6 ON STANDBY MAGNIFY ASPECT VOL UP EFFICIENT MODE DOWN KEYSTONE 1, 2 3D AUTO POSITION MENU ENTER AV MUTE VIEWER FREEZE VIDEO 1 COMPUTER UNPLUG USB DISP. 5 LAN DISP. DVI 5 HDMI 3, 1, 2 Power-on • Do not cover the lens with the lens cap while the lamp is on. • The projector starts warming up when the POWER button is pressed. During the warm-up process, images may appear dark and no commands are accepted.
Basic operation (continued) • To avoid permanently imprinting a fixed image onto your projector, please do not display the same stationary images for long period. 6. Adjust the image size by turning the zoom ring. 7. Adjust the vertical position of the displayed image by turning the LENS SHIFT dial. If necessary, adjust the focus and zoom again. (Wait about 10 minutes before turning the projector back on.) • Before shutting down the projector, be sure to close the menu screen.
Basic operation (continued) AV mute Wall Screen The video and audio signals are temporarily muted when the AV MUTE button is pressed. To cancel muting, press the AV MUTE button again. This function is to reproduce natural color tones when images are projected directly onto a screen or wall surface. You can select from BEIGE, LIGHT BLUE, LIGHT GREEN, PINK, BLACK BOARD, WHITE BOARD, and OFF, to match the color of the screen or wall to be used for projection. 1. Display the INSTALLATION menu.
Menu operation As one of the two types of MENU display, following QUICK MENU appears on the screen when pressing MENU button on the remote con control. In addition, DETAIL MENU (See page 21) appears when selecting DETAIL MENU in this MENU and pressing ENTER button. • Comparing QUICK MENU with DETAIL MENU, if the contents in those two menus are same each other, the functions in those two menus are same as well. • To close QUICK MENU or DETAIL MENU, press MENU button when MENU is displayed.
Menu operation (continued) Menu Options Set the following options provided in the respective menus. 1. QUICK MENU Menu option Setting AUTO COLOR ENHANCER CONTRAST BRIGHTNESS COLOR TEMP. SHARPNESS LAMP MODE Makes projected images bright and crisp. COLOR ENHANCER AUTO STANDARD THEATER Makes projected images look natural. Makes projected images soft and smooth. Best suited for movies. CONTRAST 0 USER Reflected by the value set in IMAGE menu. (See page 27.) ±30 BRIGHTNESS 0 COLOR TEMP.
Menu operation (continued) DETAIL MENU * Menus are not displayed when no signal is supplied to the projector. IMAGE AUTO PRESENTATION STANDARD THEATER USER COLOR ENHANCER CONTRAST BRIGHTNESS COLOR TEMP.
Menu operation (continued) Basic operation 5. Several settings can be adjusted using the menu. Example : Auto power off time setting 1. Press the MENU button. 2. Select the DETAIL MENU and press the ENTER button (or button). 6. or button to select INSTALLATION. 7. Press the or INSTALLATION • Press the ENTER button (or OFF OFF button to adjust the auto power off time. OFF 30min Exit the menu by pressing the MENU button several times. Important: • opt. 4. button to select AUTO POWER OFF.
Menu operation (continued) 2. INSTALLATION menu Menu option WALL SCREEN Setting Selects a desired setting based on the color of the screen or wall on which images are projected. When selecting a setting other than BLACK BOARD/WHITE BOARD, you can fine-tune the color tone to the desired level on the 1 to 5 scale. (See page 18.) STANDARD Select this setting when you want to view images in a well-lit room.
Menu operation (continued) 3. FEATURE menu Menu option Setting AUTO ASPECT 16:9 NATIVE PASSWOR D F UNCT ION MENU POSITION 2 options Use this setting to change the position of the menu on the screen. AUTO The film mode will be automatically activated when a film source signal is input. Select AUTO for normal use.
Menu operation (continued) 4. SIGNAL menu Menu option MEMORY CALL Setting AUTO / MEMORY 1 MEMORY 2 RESOLUTION (MEMORIZE ) VERTICAL FREQUENCY - HORIZONTAL FREQUENCY - HORIZ. PIXELS VERT. LINES EXECUTE CANCEL 350-1200 OK OK 0-999 0-31 0-9999 AUTO RGB COMPUTER INPUT YCBCR /YPBPR • • • • • • 100%-90% HOLD OFF / ON USER CLAMP POSITION CLAMP WIDT H OK 1-255 1-63 VERT. SYNC AUTO / OFF LPF ON / OFF SHUTTER(U) 0-20 SHUTTER(L) 0-20 SHUTTER(LS) 0-20 SHUTTER(RS) 0-20 opt.
Menu operation (continued) 5. NETWORK menu Menu option Setting ***** ... PROJECTOR NAME SET Feature description Displays PROJECTOR NAME. Displays PROJECTOR NAME in blank when PROJECTOR NAME is not set. Set PROJECTOR NAME. Enter up to 15 characters (alphabets or numeric characters). opt. NETWORK PROJECTOR NAME SET NETWORK PASSWORD OK NETWORK PASSWORD OK Set the password for Web control or PJLink certification. IP CONFIG OK IP CONFIG OK Select this setting for IP Configuration.
Image adjustment Adjusting projected images To adjust the tone of white (To customize the color temperature): To adjust the brightness (CONTRAST and BRIGHTNESS): To set (and store) a user-defined color temperature, perform the following procedure. (See page 22 for the menu options.) 1. Select COLOR TEMP. in the IMAGE menu. 2. Press the or button to select USER . 3. Press the ENTER button. or button to select the desired setting. 4. Press the 5. Press the or button to adjust the selected setting. 6.
Image adjustment (continued) BrilliantColor™ Use this setting to make colors with medium brightness, such as yellow and the skin tone appear natural. Press the button to decrease the value to lessen the effect. Press the button to increase the value to heighten the effect. (BrilliantColor™ has no effect at value 0.) 6. Select a value by pressing the or button. • For more enhanced color reproduction, set BrilliantColor™ to 0.
Image adjustment (continued) How to adjust the image supplied from the computer using the menu: Carry out the following procedures according to the symptoms. Wide strips appear. ....................................................... Adjust TRACKING in the SIGNAL menu. The projected image flickers. The projected image is blurred. .................................... Adjust FINE SYNC. in the SIGNAL menu. button is pressed, the The projected image is displaced horizontally. ............. Adjust HORIZ.
Network settings You can set the network of the projector using the menu. 4. opt. NETWORK PROJECTOR NAME SET NETWORK PASSWORD OK IP CONFIG OK PJLink CERTIFICATION ON NETWORK RESET OK Setting Projector Name 1. 2. Display the NETWORK menu. (See page 22 for menu setting.) or button to select PROJECTOR NAME. Press the PROJECTOR NAME 3. 4. v z ?% Press the direction buttons to move the key cursor, select the characters or marks to enter, and press the ENTER button.
Network settings (continued) Setting or Clearing DHCP 1. 2. Display the IP CONFIG menu. or button to select DHCP. Press the DHCP 3. 6. ON When selecting OK, the setting is completed as the Subnet Mask stored. However, when selecting CANCEL, the setting is completed without storing. • It may take some time to reflect the settings. Default Gateway Settings Press the ENTER button. • Confirmation dialog appears. 1. 2. Display the IP CONFIG menu. or button to select DEFAULT GATEWAY.
Network settings (continued) How to Use Network Function • • • When connecting a computer and projector with LAN, configure the both IP Addresses in the same network group. If connecting in different network group, be sure to use a router. As for the settings of a router, ask the network administrator. Configure the IP CONFIG correctly. If the settings are not correct, the communication may be unavailable. For the detail, consult the network administrator.
Advanced features Setting of the image displayed during startup or muting 13. You can display your desired image as the startup screen (or splash screen). Using the menu, you can also use such image as a background that is displayed while the video is muted or no signal is supplied. Press the ENTER button twice. • Image capture will start. • Press the MENU button to cancel the procedure.
Advanced features (continued) • • When you display 60-Hz and 50-Hz video signals at the same time, motion images may not be displayed properly. In this case, set VERT. SYNC of USER in the SIGNAL menu to OFF for the left screen. (See page 25.) When BACK COLOR of the INSTALLATION menu is set to IMAGE, you cannot use the split mode. 7. 8. 9. To change the input source of the left or right screen: • • To change the input source of the left screen, press the button on the remote control.
Advanced features (continued) Setting the efficient mode About ProjectorView Global+ and ProjectorView • For details, see “LAN control UTILITY operation manual” in the CD-ROM. By pressing the EFFICIENT MODE button, you can display the EFFICIENT MODE menu to set the following menu items: LAMP MODE, STANDBY MODE, and AUTO POWER OFF. (For details of each item, see page 23.) 1. Press the EFFICIENT MODE button. • The EFFICIENT MODE menu appears.
Advanced features (continued) Connection For details of the connection, see “LAN control UTILITY operation manual” in the CD-ROM. When STANDBY MODE in the INSTALLATION menu or the EFFICIENT MODE menu of the projector is set to LOW, the LAN network is disabled. To enable the LAN network, set STANDBY MODE to STANDARD. (See page 23.) Configure the initial network settings first. You can configure the initial settings using the projector menu (see pages 30 to 32) or ProjectorView Global+ or ProjectorView.
Lamp replacement This projector is equipped with a lamp to project images. This lamp is a consumable. It may burn out or its brightness may decrease during use. In such cases, replace the lamp with a new one as soon as possible. Be sure to replace the lamp with a new lamp separately sold that is exclusive to this projector. Contact your dealer for purchase of the lamp. 3. Loosen the two screws (d) of the lamp unit, and then pull out the lamp unit (f) by the handle (e).
Lamp replacement (continued) Reset of the lamp operation time 3. Assemble the lamp replacement attachment by folding two taping portions (g) and two cutout portions (h) along the folding line as the figure. (h) (g) Plug in the power cord, and reset the lamp operation time by keep pressing the , , and POWER buttons on the control panel at the same time. Important: • Unless these three buttons are pressed at the same time, the lamp operation time isn’t reset.
Troubleshooting Before asking for repair of the projector, check the following. If the symptom persists, stop using the projector, be sure to unplug the power plug, and then contact your dealer. No image appears on the screen. Problem Solution Power can not be turned on. • Check whether the indicators are on or off and how they are lightning. POWER Off STATUS Off Solution • Connect the power cord to the projector. • Plug the power cord into a wall outlet.
Troubleshooting (continued) No image appears on the screen. (continued) Problem Solution The screen for entering the password appears. • PASSWORD FUNCTION in the FEATURE menu has been set to DISPLAY INPUT to enable the password lock. Enter the password or contact the person in charge of management of the projector. (See page 34.) “NO SIGNAL” is displayed. • Turn on the power of the connected device, or check whether there is something wrong with the connected device.
Troubleshooting (continued) Images are not displayed correctly. (continued) Problem Solution Hue is not appropriate. Tint in projected images is incorrect. • Check that the cables connected to the external devices are not broken. • If the setting of COMPUTER INPUT in the SIGNAL menu is inconsistent with the RGB/ YCbCr output setting of the external device even when the input source is other than COMPUTER (for example, when the input source is HDMI), the entire image appears reddish or greenish.
Troubleshooting (continued) Others (continued) Problem Solution The buttons on the control panel (except for the POWER button) don’t function. Abnormal sound is heard. • PASSWORD FUNCTION in the FEATURE menu has been set to MENU ACCESS to enable the password lock. Cancel the password lock or contact the person in charge of management of the projector. (See page 34.) • Because the color wheel spins at a high speed, metallic sounds may be heard in rare occasions. Such symptom is not a malfunction.
Indicators This projector has two indicators, each of which shows the operation condition of the projector. The following offer solutions to possible problems. If these problem persist, turn the projector off and consult your dealer. STATUS indicator POWER indicator Normal condition POWER STATUS Off Steady red CONDITION Stand-by Lamp stand-by for power-off The power cannot be turned on by pressing the POWER button.
Specifications Type Model Rated power supply Power consumption Display Technology Colors Projection lens Light source lamp Picture size PC compatibility Video compatibility Speaker S-video input Video input Audio input Analog RGB input HDMI input Control connector Outside dimensions Weight Length of power cord Temperature, humidity (performance guaranteed) DLP™ projector FD730U/FD730U-G 100 - 240 V AC, 50/60 Hz 4.2 A During standby: 0.5W (when STANDBY MODE is LOW) 0.
Specifications (continued) Connectors COMPUTER/COMPONENT VIDEO IN, MONITOR OUT (mini D-SUB 15-pin) 11 15 1 COMPUTER/COMPONENT VIDEO IN Spec. R (RED)/CR G (GREEN)/Y B (BLUE)/CB GND GND GND GND GND DDC 5V GND GND DDC Data HD/CS VD DDC Clock 5 19 2 18 MONITOR OUT Pin No. 1 2 3 4 5 6 7 8 9 10 11 12 13 14 15 Spec. R (RED)/CR G (GREEN)/Y B (BLUE)/CB GND GND GND GND GND HD/CS VD - Pin No.
Specifications (continued) Specification of RGB signals in each computer mode of the projector Resolution (H x V) Horizontal frequency (kHz) Vertical frequency (Hz) Normal mode (H x V) Native mode (H x V) TV60, 480i (525i) 720 x 480 15.73 59.94 1440 x 1080 640 x 480 TV50, 576i (625i) 720 x 576 15.63 50.00 1440 x 1080 768 x 576 1080i60 (1125i60) 1920 x 1080 33.75 60.00 1920 x 1080 1920 x 1080 *1 1080i50 (1125i50) 1920 x 1080 28.13 50.
Specifications (continued) Specification of RGB signals in each computer mode of the projector (continued) NATIVE mode Important: • • • • • • • • Some computers aren’t compatible with the projector. The projector’s maximum resolution is 1920 x 1080 pixels. It may not display images of higher resolutions than 1920 x 1080 correctly. Images with SYNC on G (Green) signal may jitter. Images with SYNC on G (Green) signal may be tinged with green.
1 Zusho Baba, Nagaokakyo-City, Kyoto Japan Ver. 1.