
User's Manual
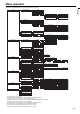
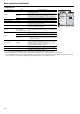
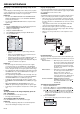

Table Of Contents
- WARNING:
- CAUTION:
- NOTE:
- WARNING
- CAUTION
- WARNING
- Important safeguards
- Overview
- Overview (continued)
- Remote control
- Installation
- Basic connections
- Basic connections (continued)
- Basic connections (continued)
- Preparation
- Basic operation
- Basic operation (continued)
- Basic operation (continued)
- Safety instructions for wireless
- Security precautions for wireless
- Software license agreement for wireless
- Projecting images wirelessly
- Projecting images wirelessly (continued)
- Projecting images wirelessly (continued)
- How to use the connection software
- How to use the connection software (continued)
- How to use the administration screen
- How to use the administration screen (continued)
- How to use the administration screen (continued)
- Uninstalling the connection software
- How to use wired LAN connection
- Menu operation
- Menu operation (continued)
- Menu operation (continued)
- Menu operation (continued)
- Menu operation (continued)
- Image adjustment
- Image adjustment (continued)
- Advanced features
- Advanced features (continued)
- Lamp replacement
- Lamp replacement (continued)
- Troubleshooting
- Troubleshooting (continued)
- Troubleshooting (continued)
- Troubleshooting (continued)
- Indicators
- Specifications
- Specifications (continued)
- Specifications (continued)

EN-39
ENGLISH
Advanced features (continued)
5. Press the ENTER button.
• The screen for entering a password appears.
6. Enter a 4 - 8 digit password using the S, T, W or X buttons on
the remote control as shown below.
(S=1, X=2, T=3, W=4)
7. Press the ENTER button.
• To cancel the procedure, press the MENU button.
8. Enter the password again for confirmation using the same steps.
9. Press the ENTER button.
• If the entered passwords are incorrect, an error message
appears.
• To cancel the procedure, press the MENU button.
To cancel the password function:
1. Display the FEATURE menu.
2. Press the S or T button to select PASSWORD FUNCTION.
3. Press the ENTER button.
• The screen for canceling the password function appears.
4. Press the ENTER button.
• The screen for entering the password appears.
5. Enter a 4 - 8 digit password using the S, T, W or X buttons on
the remote control as shown below.
(S=1, X=2, T=3, W=4)
6. Press the ENTER button.
• If you enter a wrong password, an error message appears.
• To cancel the procedure, press the MENU button.
Important:
• Disable the password function by holding down the MENU and
ENTER buttons on the control panel together for about three sec-
onds.
Magnify
By pressing the MAGNIFY button on the remote control, you can mag-
nify the image to view the details.
• The MAGNIFY mode doesn't function with some input signals. For
details, see page 49.
• The MAGNIFY mode doesn't work with video or S-video signal.
MAGNIFY
To use the MAGNIFY mode:
1. Press the MAGNIFY button.
• You can select the area to be magnified by pressing the S,
T, W or X button on the remote control.
• You can change the magnification of the selected area by
pressing the S or T button.
2. Press the MAGNIFY button again to exit the MAGNIFY mode.
• The regular operation screen will appear.
Important:
• In the MAGNIFY mode, you can't adjust the volume.
PASSWORD
CONFIRM
1
3
24
O K : ENTER CANCEL : MENU
MENU ACCESS
FEATURE
LOCK
UNLOCK
OK
OK
opt.
PASSWORD
1
3
24
O K : ENTER CANCEL : MENU
Magnified image