ENGLISH EN DATA PROJECTOR MODEL XD250U/XD250U-G XD280U/XD280U-G User Manual XD250U XD250U-G XD280U XD280U-G This User Manual is important to you. Please read it before using your projector.
CAUTION RISK OF ELECTRIC SHOCK DO NOT OPEN CAUTION : TO REDUCE THE RISK OF ELECTRIC SHOCK, DO NOT REMOVE COVER (OR BACK) NO USER-SERVICEABLE PARTS INSIDE REFER SERVICING TO QUALIFIED SERVICE PERSONNEL. The lightning flash with arrowhead symbol within an equilateral triangle is intended to alert the user to the presence of uninsulated "dangerous voltage" within the product’s enclosure that may be of sufficient magnitude to constitute a risk of electric shock.
Important safeguards................................................................................................................................4 Overview...................................................................................................................................................6 Remote control .........................................................................................................................................8 Installation ......................................
Important safeguards Please read all these instructions regarding your projector and retain them for future reference. Follow all warnings and instructions marked on the projector. 1. Read instructions All the safety and operating instructions should be read before the appliance is operated. 2. Retain instructions The safety and operating instructions should be retained for future reference. 3. Warnings All warnings on the appliance and in the operating instructions should be adhered to. 4.
Do not block the air inlet and outlet grilles. Unplug immediately if there is something wrong with your projector. If they are blocked, heat may be generated inside the projector, causing deterioration in the projector quality and fire. Do not operate if smoke, strange noise or odor comes out of your projector. It may cause fire or electric shock. In this case, unplug immediately and contact your dealer. Do not use flammable solvents (benzene, thinner, etc.) and flammable aerosols near the projector.
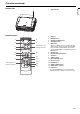
Overview 11 3 12 4 1 2 3 4 5 6 7 8 9 10 11 FOCUS ring ZOOM ring Control panel Air inlet grille Remote control sensor (Front) Air outlet grille Terminal board Speaker Adjustment feet Lock bar Lamp cover Caution: 9 5 8 10 Do not replace the lamp immediately after using the projector because the lamp would be extremely hot and it may cause burns.
Overview (continued) ENGLISH Bottom side 1 Adjustment feet 1 ON button 2 MAGNIFY button 8 3 VOLUME UP, DOWN buttons 9 4 KEYSTONE button 5 6 MENU button Two types of MENU display are equipped. QUICK MENU appears on the screen when pressing MENU button. In addition, DETAIL MENU appears when selecting DETAIL MENU in this MENU and pressing ENTER button.
Remote control Battery installation Use two (AA, R6) size batteries. 1. Remove the back cover of the remote control by pushing the battery compartment door in the direction of the arrow. 2. Load the batteries making sure that they are positioned correctly (+ to +, and - to -). • Load the batteries from - spring side, and make sure to set them tightly. 3. Replace the back cover. Caution: • • • • • • • • • • Use of a battery of wrong type may cause explosion.
Installation Layout of the projector ENGLISH Image size varies depending on the distance between the screen and the projector. Front projection W L : Between the screen and the front edge of the projector Hd : Height of the projected image Screen Diagonal size • Distance from the screen : L Width : W Height : H Shortest (WIDE) Hd Longest (TELE) inch cm inch cm inch cm inch m inch m inch 40 102 32 81 24 61 51 1.3 62 1.6 3.6 cm 9 60 152 48 122 36 91 77 2.0 94 2.
Basic connections This projector can be connected with various devices such as a VCR, video camera, videodisc player, and personal computer that have analog RGB output connectors. Important: • • • • Make sure that the connected device is turned off before starting connection. Plug in the power cords of the projector and the connected devices firmly. When unplugging, hold and pull the plug. Do not pull the cord.
Basic connections (continued) ENGLISH Connection (for video equipment having an HDMI terminal) Equipment having an HDMI terminal to HDMI terminal HDMI IN HDMI (with HDMI logo) cable (option) Important: • • • • Use a commercially available HDMI (with HDMI logo) cable. You don’t have to connect any cable for audio input. You can input video and audio using an HDMI cable only.
Basic connections (continued) Projector + Computer For computer with Mini D-SUB RGB cable for PC Necessary when outputting to both a PC monitor and the projector. COMPUTER IN RGB cable for PC (option) MONITOR OUT Computer to monitor port AUDIO OUT AUDIO IN-1 or IN-2 Audio cable (option) PC audio cable (option) to PC audio output For analog connection: 1. 2. Connect one end of the supplied RGB cable to the COMPUTER IN terminal (1, 2) of the projector.
Preparation for projection Important: 1. 2. 3. • • Attach the provided power cord to the projector. Plug the power cord in the wall outlet. Remove the lens cap. Warning: • • • • • • • • Do not look into the lens directly when the projector is on. The lens cap is for protecting the lens. If you leave the lens cap on the lens with the projector turned on, it may be deformed because of heat build-up. Remove the lens cap when you turn on the projector. One of power cords for the U.S., Europe and U.K.
Basic operation ON STANDBY MAGNIFY ASPECT 3 4 1, 2 FOCUS UP VOL 6 KEYSTONE PAGE DOWN ZOOM AUTO POSITION MENU ENTER AV MUTE FREEZE VIEWER VIDEO 1 COMPUTER UNPLUG WIRELESS 5 3. Indicator STATUS POWER Stand-by - Red When the lamp is on. Green Green Important: • • • If the lamp exceptionally turned off due to the power interruption or voltage drop, it can happen that the lamp does not turn on even if you switch again the power supply on.
Basic operation (continued) Volume from the speaker Use the following procedure to turn off the projector. The lamp may deteriorate if the projector is powered off and on repeatedly within 30 minutes after the lamp is lighted. 1. Press the POWER button on the control panel or the STANDBY button on the remote control. • The message "POWER OFF? YES : PRESS AGAIN" appears on the screen. • To cancel, press any button except the POWER button. (Some buttons on the remote control don’t function for cancel.) 2.
Basic operation (continued) Wall Screen This function is to reproduce natural color tones when images are projected directly onto a screen or wall surface. You can select from BEIGE, LIGHT BLUE, LIGHT GREEN, PINK, BLACK BOARD, WHITE BOARD, and OFF, to match the color of the screen or wall to be used for projection. 1. Display the INSTALLATION menu. (See page 21 for more details.) opt. INSTALLATION WALL SCREEN LAMP MODE 2. 3. 4. Press the S or T button to select WALL SCREEN.
As one of the two types of MENU display, following QUICK MENU appears on the screen when pressing MENU button on the remote control. In addition, DETAIL MENU (See page 19) appears when selecting DETAIL MENU in this MENU and pressing ENTER button. • Comparing QUICK MENU with DETAIL MENU, if the contents in those two menus are same each other, the functions in those two menus are same as well. • To close QUICK MENU or DETAIL MENU, press MENU button when MENU is displayed.
Menu operation (continued) Menu Options Set the following options provided in the respective menus. 1. QUICK MENU Menu option Setting AUTO CONTRAST BRIGHTNESS PRESENTATION STANDARD THEATER USER ±30 ±30 COLOR TEMP. 4 options SHARPNESS ±5 STANDARD COLOR ENHANCER LAMP MODE LOW NORMAL ASPECT 16:9 FULL USER MENU SELECT USER MENU DETAIL MENU • • • Feature description Automatically sets an optimal color balance based on the input signal. Use this setting for most cases.
Menu operation (continued) DETAIL MENU IMAGE COLOR ENHANCER CONTRAST BRIGHTNESS COLOR TEMP. AUTO PRESENTATION STANDARD THEATER USER ±30 ±30 STANDARD LOW HIGH USER COLOR *1 TINT *1 SHARPNESS *1 ADVANCED MENU INSTALLATION WALL SCREEN LAMP MODE STANDBY MODE AUDIO INPUT AUTO KEYSTONE IMAGE REVERSE ADVANCED MENU FEATURE ASPECT PASSWORD FUNCTION MENU POSITION CINEMA MODE *3 VIDEO SIGNAL *5 WXGA *2 SETUP *1 LANGUAGE RESET ALL SIGNAL NETWORK INFORMATION HORIZ. POSITION VERT. POSITION FINE SYNC.
Menu operation (continued) Basic operation 5. Several settings can be adjusted using the menu. Example : Auto power off time setting 1. Press the MENU button. 2. Select the DETAIL MENU and press the ENTER button (or T button). AUTO POWER ON AUTO POWER OFF 6. IMAGE Press the W or X button to select INSTALLATION. 7. INSTALLATION • 4. Press the ENTER button (or T button). ON OFF 30min Exit the menu by pressing the MENU button several times. Important: • opt.
Menu operation (continued) Menu option WALL SCREEN Setting OFF/BEIGE / LIGHT BLUE / LIGHT GREEN / PINK /BLACK BOARD/WHITE BOARD STANDARD LAMP MODE LOW STANDARD STANDBY MODE LOW AUTO AUDIO INPUT AUDIO 1/AUDIO 2/AUDIO 3 MIX AUTO KEYSTONE ON/OFF OFF MIRROR IMAGE REVERSE INVERT MIRROR INVERT ADVANCED MENU • • Feature description Selects a desired setting based on the color of the screen or wall on which images are projected. (See page 16.
Menu operation (continued) 3. FEATURE menu Menu option Setting NORMAL ASPECT 16:9 FULL PASSWORD FUCNTION MENU POSITION 2 options CINEMA MODE AUTO/OFF VIDEO SIGNAL 8 options WXGA OFF/AUTO/1280 x 768/ 1280 x 768RB/ 1360 x 768/ 1366 x 768 AUTO OFF SETUP 3.75%/7.5% • LANGUAGE 12 languages RESET ALL OK Feature description Automatically sets the aspect ratio in relative to the input signal. Use this setting for most cases.
Menu operation (continued) Menu option HORIZ. POSITION VERT. POSITION 0-999 0-999 Setting FINE SYNC. 0-31 TRACKING 0-2800 AUTO RGB COMPUTER INPUT YCBCR/YPBPR • • • • • OVER SCAN 100%-90% HOLD OFF / ON USER OK Feature description Select this setting to adjust the horizontal position of projected images. Select this setting to adjust the vertical position of projected images. Select this setting to eliminate flickering or blurs, if they appear, when you are viewing projected images.
Menu operation (continued) 6. INFORMATION menu Menu option LAMP TIME (LOW) INPUT RESOLUTION VERTICAL FREQUENCY HORIZONTAL FREQUENCY SYNC. TYPE EN-24 Feature description This menu shows a lamp operating time (hour) calculated assuming that LAMP MODE is LOW. • When the LAMP MODE is STANDARD, this menu shows a longer lamp operating time than the actual time. (See page 34 for the interval of lamp replacement.) • When the lamp operating time is 0 to 10 hours, "0H" is displayed.
Adjusting projected images To adjust the brightness (CONTRAST and BRIGHTNESS): You can make adjustments of the brightness of the projected image using the menu. (See page 18 or 20 for the menu options.) 1. Display the QUICK MENU or the IMAGE menu. 2. Select CONTRAST or BRIGHTNESS by pressing the S or T button. 3. Adjust the selected option by pressing the W or X button. To cancel the menu: 4.
Image adjustment (continued) BrilliantColorTM To cancel the menu: Use this setting to make colors with medium brightness, such as yellow and the skin tone appear natural. Press the W button to decrease the value to lessen the effect. Press the X button to increase the value to heighten the effect. (BrilliantColorTM has no effect at value 0.) 6. Select a value by pressing the W or X button. • For more enhanced color reproduction, set BrilliantColorTM to 0.
You can set the network of the projector using the menu. 4. opt. NETWORK PROJECTOR NAME SET NETWORK PASSWORD OK IP CONFIG OK PJLink CERTIFICATION ON NETWORK RESET OK Setting Projector Name 1. 2. Display the NETWORK menu. (See page 27 for menu setting.) Press the S or T button to select PROJECTOR NAME. PROJECTOR NAME SET Press the W or X button to select SET . Press the ENTER button. • PROJECTOR NAME screen appears. 5.
Network settings (continued) Setting or Clearing DHCP 1. 2. DHCP 3. 6. Display the IP CONFIG menu. Press the S or T button to select DHCP. ON Press the ENTER button. • Confirmation dialog appears. When selecting OK, the setting is completed as the Subnet Mask stored. However, when selecting CANCEL, the setting is completed without storing. • The display returns the IP CONFIG menu after selecting OK or CANCEL.
Network settings (continued) • • • ENGLISH How to Use Network Function When connecting a computer and projector with LAN, configure the both IP Addresses in the same network group. If connecting in different network group, be sure to use a router. As for the settings of a router, ask the network administrator. Configure the IP CONFIG correctly. If the settings are not correct, the communication may be unavailable. For the detail, consult the network administrator.
Advanced features Displaying a user-defined image during startup or muting You can display your desired image as the startup screen (or splash screen). Using the menu, you can also use it as the background that is displayed while the video is muted or no signal is input. Important: • • You can't select IMAGE CAPTURE when PASSWORD FUNCTION in the FEATURE menu is set to SPLASH ID SCREEN to activate the password lock. You can't select IMAGE CAPTURE when the component video signal is input.
Advanced features (continued) To cancel the password function: Display the FEATURE menu. Press the S or T button to select PASSWORD FUNCTION. Press the ENTER button. • The screen for canceling the password function appears. ENGLISH 1. 2. 3. opt. FEATURE MENU ACCESS 4. LOCK OK UNLOCK OK Press the ENTER button. • The screen for entering the password appears. PASSWORD 1 4 2 O K : ENTER CANCEL : MENU 3 5. 6.
Advanced features (continued) Supervising and controlling by computer You can supervise and control the projector's operation using a personal computer via a LAN network. • To supervise and control the projector, install the software "ProjectorView Global +*" contained in the attached CD-ROM. For the installation procedure and usage of the software, see "User Manual of LAN Control Utility" contained in the attached CD-ROM.
This projector is equipped with a lamp to project images. This lamp is a consumable. It may burn out or its brightness may decrease during use. In such cases, replace the lamp with a new one as soon as possible. Be sure to replace the lamp with a new lamp separately sold that is exclusive to this projector. Contact your dealer for purchase of the lamp. Replace the spare lamp using the lamp attachment unit that is equipped with the spare lamp (separately sold) designed specifically for this projector.
Lamp replacement (continued) 5. Remove the lamp attachment unit. • Pull the lamp unit out of the projector slowly. If it is pulled out quickly, the lamp may break, scattering glass fragments. • Do not spill liquid on the removed lamp unit or do not place it near any flammable object or where children can reach to prevent injuries or fire. When the projector is mounted to the ceiling: Confirm that the lamp unit (j) is securely held inside the lamp disposable bag of the lamp attachment unit.
Before asking for repair of the projector, check the following. If the symptom persists, stop using the projector, be sure to unplug the power plug, and then contact your dealer. No image appears on the screen. Problem Solution • Check whether the indicators are on or off and how they are lightning. POWER STATUS Solution Off Off Steady red Blinking orange If any objects are blocking the air inlet or outlet grille, remove them and carry out the following. 1. 2. 3. 4.
Troubleshooting (continued) Images are not displayed correctly. Problem Projected images are shaking. Projected images are displaced. Solution • • • • • • Check that the cable connected to the external device isn’t intermittent. Connect the cable’s plug with the external device’s connector firmly. Press the AUTO POSITION button. Some computers output out-of-spec signals on rare occasion. Adjust the SIGNAL menu. (See page 26.
Troubleshooting (continued) Problem Solution The exhaust vents emit warm air. • This air comes out after cooling the inside of the projector. You may feel hot, but this is not a malfunction. No audio is output. • • • Check that the volume isn’t set to low. Check the AUDIO INPUT setting. When the external device is connected with an HDMI cable, set the audio output of the device to PCM output. • The menu can’t be used. • "TEMPERATURE!!" is displayed. The mark appears.
Indicators This projector has two indicators, each of which shows the operation condition of the projector. The following offer solutions to possible problems. If these problem persist, turn the projector off and consult your dealer. STATUS indicator POWER indicator Normal condition POWER STATUS Steady red Off CONDITION NOTE Stand-by Lamp stand-by (about 1 minute) Steady green Blinking green Steady green Steady green The POWER button cannot be used to switch between on and off.
• Type DLP™ DATA projector Model XD250U/XD250U-G/XD280U/XD280U-G Rated power supply 100 - 240 V AC, 50 / 60 Hz Power consumption 3.3 A During standby: AC 100-120V: 3W (when STANDBY MODE is STANDARD) 0.4W (when STANDBY MODE is LOW) AC 220-240V: 3W (when STANDBY MODE is STANDARD) 0.5W (when STANDBY MODE is LOW) Display Technology 0.55-inch Single chip Digital Micromirror Device (DMD) Pixels 1024 x 768 = 786432 pixels Colors 16770000 colors ENGLISH Specifications Projection lens F 2.5-2.
Specifications (continued) Connectors COMPUTER IN/OUT (Mini D-SUB 15-pin) 11 HDMI IN (HDMI 19-pin) 15 19 2 18 10 6 1 IN 5 OUT pin No. Spec. pin No. Spec. pin No. Spec.
Specifications (continued) Signal mode TV60, 480i (525i) resolution (H x V) horizontal frequency (kHz) vertical frequency (Hz) XD250U/XD250U-G XD280U/XD280U-G (H x V) - 15.73 59.94 1024 x 768 *2 *3 TV50, 576i (625i) - 15.63 50.00 1024 x 768 *2 *3 1080i 60 (1125i 60) - 33.75 60.00 1024 x 576 *2 1080i 50 (1125i 50) - 28.13 50.00 1024 x 576 *2 480p (525p) - 31.47 59.94 1024 x 768 *2 576p (625p) - 31.25 50.00 1024 x 768 *2 720p 60 (750p 60) - 45.00 60.
Mitsubishi Projector Warranty, Sales Support and Service Information North America MDEA (Mitsubishi Digital Electronics America, Inc.) Presentation Products Division 9351 Jeronimo Road Irvine CA 92618, USA For Warranty Registration, visit: http://www.mitsubishi-presentations.com under Customer Care Sales & Inquiries Phone :Toll Free (888)307-0349 E-mail :ppdinfo@mdea.com Technical Inquiries Phone :Toll Free (888)307-0309 E-mail :TSUPPORT@mdea.com MESCA (Mitsubishi Electric Sales Canada Inc.) http://www.