USER’S MANUAL AIR-CONDITIONER ENGLISH MANUEL DE L’UTILISATEUR FRANÇAIS CLIMATISEUR ANWENDERHANDBUCH DEUTSCH KLIMAGERÄT ISTRUZIONI PER L’USO SRK20ZIX-S SRK25ZIX-S SRK35ZIX-S SRK50ZIX-S SRK60ZIX-S ITALIANO CONDIZIONATORE D’ARIA MANUAL DEL PROPIETARIO ESPAÑOL ACONDICIONADOR DE AIRE GEBRUIKERSHANDLEIDING NEDERLANDS AIRCONDITIONING MANUAL DO UTILIZADOR PORTUGUÊS APARELHO DE AR CONDICIONADO ΟΔΗΓΙΕΣ ΧΡΗΣΗΣ ΕΛΛΗΝΙΚΑ ΚΛΙΜΑΤΙΣΤΙΚΟ РУКОВОДСТВО ПО ЭКСПЛУАТАЦИИ РУССКИЙ КОНДИЦИОНЕР ВОЗДУХА KULLA
Thank you for purchasing a MITSUBISHI HEAVY INDUSTRIES, LTD. Air-Conditioner. To get the best long-lasting performance, please read and follow this User’s Manual carefully before using your air-conditioner. After reading, please store the Manual in a safe place and refer to it for operational questions or in the event of any irregularities. This air-conditioner is intended for domestic use.
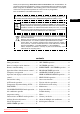
Safety precautions • Before starting to use the system, please read these “Safety precautions” carefully to ensure proper operation of the system. • The safety precautions are classified as “ DANGER” and “ CAUTION”. Precautions as shown in the column “ DANGER” indicate that improper handling could lead to drastic result like death, serious injury, etc. Even precautions as shown in the column “ CAUTION” might pose a serious problem, depending on the circumstances.
❚ Safety precautions CAUTION The system should only be used for its original purpose and not for anything else like, for instance, preservation of food, plants or animals, precision devices or works of art. Do not place anything containing water, like vases, on top of the unit. The system is only intended for use in ordinary domestic rooms. Any other use of the system may damage the quality of food, etc. Water entering the unit could damage the insulation and therefore cause an electric shock.
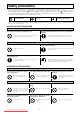
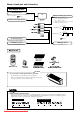
Name of each part and its function INDOOR UNIT Air Inlet panel Draws the indoor air. Page 17 Air filter Removes dust or dirt from the inlet air. Page 17 Air-cleaning filter Page 18 Room temperature sensor Heat exchanger Air outlet Air blows out of here. Indoor unit fan Left/right airflow direction adjustment louver Page 10 Up/down airflow direction adjustment flap Page 10 Drain hose Drains water from the indoor unit.
Name of each part and its function Unit display section Unit ON/OFF button This button can be used for turning on/off the unit when remote control is not available. Page 6 RUN (HOT KEEP) light (green/blue) • Illuminates during operation. green : except ECONO operation blue : ECONO operation Remote control signal receiver • Blinks when airflow stops due to the ‘HOT KEEP’ and ‘CLEAN operation’. 1.5 sec. HOT KEEP ON OFF 0.5 sec. 3 sec. CLEAN operation ON OFF 1 sec.
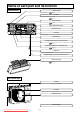
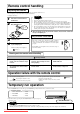
Remote control handling Replacing the batteries The following cases signify exhausted batteries. Replace old batteries with new ones. • Receiving beep is not emitted when a signal is transmitted. • Display fades away. NOTE 1 2 Pull out the cover and take out old batteries. • Do not use old and new batteries together. • Remove the batteries when the remote control is not used for a long period.
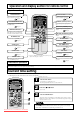
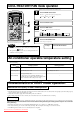
Operation and display section for remote control Operation section FAN SPEED button OPERATION MODE select button Each time the button is pressed, the display is switched over in turn. Each time the button pressed, the display is switched over in turn. Page 8, 9 Page 8 ON/OFF (luminous) button HI POWER/ECONO button Press to start operation, press again to stop. This button changes the HIGH POWER/ ECONOMY mode. Page 14 AIR FLOW (UP/DOWN) button This button changes the air flow (up/down) direction.
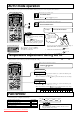
AUTO mode operation ■ Automatically selects the operation mode (COOL, HEAT, DRY) depending on the room temperature when switched on. When the unit is not in AUTO mode: 1 Press MODE button. Move the [ mark] to the (Auto) position. Point the remote control toward the air-conditioner, and 2 Press the ON/OFF button. To stop: Press the ON/OFF button. NOTE AUTO mode can be operated by simply pressing the ON/OFF button. • In case air is not blowing out during the operation.
COOL/HEAT/DRY/FAN mode operation Point the remote control toward the air-conditioner, and 1 Press the MODE select button. Move the [ (Cool), 2 3 mark] to the required operation position. (Heat), (Dry), (Fan) Press the ON/OFF button. Press the TEMP button. Press or button for the preferred temperature. Standard 4 Airflow direction adjustment procedure. Press the FAN SPEED button Set the fan speed as preferred. Page 10 NOTE To stop: Press the ON/OFF button.
Airflow direction adjustment Adjusting airflow direction ■ Up/down direction can be adjusted with the AIRFLOW mode changes as follows: Change on AIRFLOW (UP/DOWN) mode. (UP/DOWN) button on the remote control. Every time you press this button the (Flap stopped) ■ Left/right direction can be adjusted with the AIRFLOW mode changes as follows: Change on AIRFLOW (LEFT/RIGHT) mode. (Swing) (LEFT/RIGHT) button on the remote control.
SLEEP TIMER operation ■ The unit stops automatically after the set time lapses. The set temperature is automatically adjusted according to the elapsed time in order to avoid too much cooling or heating. 1 Page 13 Press the SLEEP button. ■ If it is pressed while the unit is off SLEEP TIMER operation starts with the previous operation settings, and the air conditioning is turned off after the set time elapses.
ON-TIMER operation ■ Operation starts 5 to 60 minutes before the set time so that the room temperature reaches the optimum temperature at the set time. ON-TIMER operation can be set regardless of whether the air-conditioner is running or not. Page 13 Example: In the case the preferred room temperature is required at 8:00. 1 2 Press the ON-TIMER button. ON TIMER indicator is blinking. Press the “ or ” button.
PROGRAM TIMER operation ■ The timer operations of the combination of ON and OFF TIMER. Once this has been set the timer operations will be repeated at the same time every day unless the ON/OFF button is pressed. Example: When it is prefered to stop at 22:30, and then start operation at 8:00, near the set temperature. ■ OFF TIMER operation setting Set by the procedures on page 11. Set to ■ ON TIMER operation setting Set by the procedures on page 12.
HIGH POWER/ECONOMY operation If the air-conditioner is not operating, point the remote control toward the air conditioner, and 1 2 Press the ON/OFF button. Press the HI POWER/ECONO button.
SELF CLEAN operation ■ CLEAN operation should be run after AUTO, COOL and DRY operation to remove the moisture from inside the indoor unit and control the growth of mold and bacteria. 1 In order to active CLEAN operation, press the CLEAN switch with the tip of a ballpoint pen. Every time the CLEAN switch is pressed, the display is switched in the order of: No display (CLEAN off) (CLEAN on) NOTE • Two hours later, the air conditioner stops running automatically.
Downloaded from AC-Manual.
Maintenance Before maintenance During the operational season Cleaning the air filter Turn off the power supply. • Do not spill any liquid. There's a danger of electric shock. Standard interval is once every two week • Pull up the air inlet panel forward. • Lightly hold the knobs at both sides and lift a little to remove the panel forward. 1 Remove the air filter 2 Cleaning If the filter is very dirty, clean it with warm water (approx. 30°C), and dry it thoroughly.
Cooling/heating is affected by an air filter clogged up with dust etc., and the operation noise becomes louder. It may also use extra electricity. Please clean the air filter at appropriate intervals. NOTE At the end of the season 1 At the beginning of the season Perform the fan operation for a half day. Dry the inside of the unit. 2 Stop the unit and turn off the power supply. 3 4 5 Clean and reinstall the air filters. The unit consumes appr. 2W even when the unit is not operating.
Proper installation Suitable installation position • Do not put any obstruction in front of the indoor unit, preventing proper ventilation and functioning. • Do not install the unit in any of the following places: • Where there is a danger of leaking flammable gases. • Where there is substantial splashing of oil. • Malfunctioning due to corrosion may occur if the unit is installed in a spa where sulfide gases are generated, or in a seaside resort exposed to sea breezes. Contact your dealer.
Notice The unit does not restart immediately after you have stopped it. Restart is blocked for 3 minutes after you have stopped the operation to protect the unit. (RUN light is on) Not operating? Please wait for three minutes. The three-minute protection timer in the microcomputer automatically starts it up again. Airflow is not blown out when starting the HEATING operation. Airflow has stopped to prevent blowing out of cold air until the indoor heat exchanger has warmed up. (2 to 5 min.
Contact your dealer ■ Turn off the power switch immediately and inform your dealer in any of the following situations: The fuse or switch blows continuously. The cable becomes extremely hot. The covering of the cable is cracked. CAUTION Fuse often blows. The TV, radio or other equipment starts to malfunction. If the power cord becomes damaged, ask your dealer or a qualified engineer to install the replacement to avoid accidents. A switch does not activate properly.
Self diagnosis function ■ We are constantly trying to do better service to our customers by installing such judges that show abnormality of each function as follows: RUN light Description of trouble Cause 1 time flash Heat exchanger sensor 1 error • Broken heat exchanger sensor 1 wire, poor connector connection 2 time flash Room temperature sensor error • Broken room temperature sensor wire, poor connector connection 3 time flash Heat exchanger sensor 3 error • Broken heat exchanger sensor 3 wire
AIR-CONDITIONING & REFRIGERATION SYSTEMS HEADQUARTERS 16-5, 2-Chome, Kounan, Minato-ku, Tokyo, 108-8215, Japan Fax: (03) 6716-5926 MITSUBISHI HEAVY INDUSTRIES EUROPE, LTD. AIR-CONDITIONER DIVISION 3rd Floor Thavies Inn House 3-4 Holborn Circus London EC1N 2HA, ENGLAND Phone: 44(0)20 7842 8171 Fax: 44(0)20 7842 8104 Downloaded from AC-Manual.