
Installation manual


6StartUp
햲
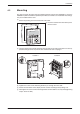
Make all connection required as shown in chapter 5.
햳
Turn on the power of the GOT.
햴
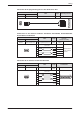
Check the display. On the system screen „SET-UP MODE“ you can adjust the brightness
of the screen („LCD CONTRAST“).
햵
Set the required mode and the type of the connected PLC on the „SET-UP MODE“ screen.
If this setting is not correct, communication between GOT and PLC is not possible.
햶
Transfer the user screens to the GOT.
NOTE If the PLC has already communicated with the GOT via the RS232C port, the port for the
data transfer has to be selected manually:
Select „DATA TRANSFER“ in the „OTHER MODE“ screen.
6.1 Data Transfer to the F920GOT
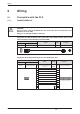
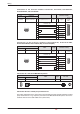
The voltage (5 V DC) to power the F920GOT-BBD5-K-E is supplied via the communication
ports. Therefore during the transfer of screen data using the RS232C port a PLC must be con-
nected to the RS422 port to power the GOT.
If the F920GOT is connected to a PLC of the MELSEC FX, AnU, or QnA series:
There is no need to change the configuration. Connect a PC to the RS232C port of the GOT,
make sure the power supply of the PLC is still switched on and start the data transfer.
If the F920GOT is connected to a PLC of the MELSEC System Q:
The RS232C port of the GOT is used for communication with a System Q CPU. During data
transfer however, when the RS232C port is occupied by a PC, use the RS422 port of the GOT to
supply the F920GOT-K with power from the PLC. Prepare a cable as shown in the lower figure
on page 17.
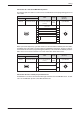
For data transfer please follow the procedure given below:
햲
Switch off the power supply of the PLC.
햳
Remove the cable connecting the RS232C port of the GOT and the programming port of
the System Q CPU.
햴
Connect the PC and the GOT using the cable FX-232-CAB1.
햵
Use the power supply cable shown on page 17 to connect the RS422 port of the GOT with
the programming port of the System Q CPU.
햶
Switch on the power supply of the PLC (and thereby the GOT), select „DATA TRANSFER“,
in the „OTHER MODE“ screen and transfer the data to the GOT.
햷
When the data transfer is finished, switch off the PLC, remove the power supply cable and
make a connection between the RS232C port of the GOT and the programming port of the
CPU using the cable shown in the upper figure on page 17.
Start Up
22 MITSUBISHI ELECTRIC