
Instruction manual


19
CONNECTIONS
PREPARATION
TROUBLE-
SHOOTING
FEATURES
PRECAUTIONS
OTHERS
CONTENTS
OVERCOMING PAPER JAMS
11
11
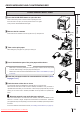
1 Press the DOOR OPEN button to open the door.
Make sure that the power is turned on before opening the door.
If the door does not open, turn off the power and turn it on again.
Then press the DOOR OPEN button again.
22
22
2 Remove the ink cassette.
Push down the ink cassette as shown by the arrow 1 and pull it out.
33
33
3 Take out the print paper.
When taking the print paper out, pull it up toward you.
44
44
4 Cut off the defective part of the print paper with scissors.
NOTE
• Make sure to cut off the printed part of the print paper. Failure to do this may result
in the ink ribbon sticking to the print paper and being torn.
• Make sure to clean the thermal head and the roller. Refer to “CLEANING” (on pages
21 and 22).
55
55
5 Install the print paper and the ink cassette with the ink ribbon. (Refer
to pages 11-15.)
66
66
6 Push the center of the door to close.
The print paper setting is initialized two seconds after you close the door.
When the auto feed & cut mode has been selected, the FEED & CUT procedure is
repeated three times after you close the door. When the print paper with the post card
printing on its reverse side is installed, the FEED & CUT procedure is repeated five
times.
22
22
2 When the manual & cut mode has been selected
When the manual feed & cut mode has been selected, hold down the FEED & CUT
button for 1 second or longer. Repeat the manual feed & cut three times. When the
print paper with the post card printing on its reverse side is installed, repeat this procedure
five times.
For how to select the auto feed & cut mode, see "Setting of DIP switches" (on page 10).
2
1
CANCEL
DOOR OPEN
FEED&CUT
ERROR MESSAGES AND COUNTERMEASURES
Thermal head (inside)
Downloaded From ManualsPrinter.com Manuals