MITSUBISHI Photo Suite User Manual CPK60 Printer Version 1.
Content 1. MITSUBISHI Photo Suite .......................................................................................................... 3 2. System requirements: ............................................................................................................. 4 3. Printer specifications ............................................................................................................... 5 4. Installation ......................................................................
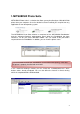
1. MITSUBISHI Photo Suite MITSUBISHI Photo Suite is a solution that allows you to print directly to a Mitsubishi K60 printer from your computer. Once the solution has been installed, you can print from any application or from the operating system. The MITSUBISHI Photo Suite solution is comprised of the “MITSUBISHI PrintModule” and the “Advanced Settings” administration panel. When the PrintModule has been initiated, it can be seen on the Windows toolbar.
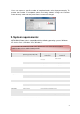
Users can request a specific number of completed orders to be kept permanently. To prevent that number of completed orders from being deleted, change the “Finished orders to keep” value and then press “Save” to save the changes. 2. System requirements: MITSUBISHI Photo Suite is compatible with the following operating systems: Windows XP Service Pack 3, Windows Vista, Windows 7. To install the MITSUBISHI Photo Suite software the user must be the machine administrator or have administrator permits.
3. Printer specifications Printer resolution: Up to 300 dpi. Printing formats : 10x15cm / 4x6”, 15x20cm / 6x8” and 13x18cm (centred on a 15x20cm) / 5x7” in 6x8”. Printing method: Sublimation. Finishes: Glossy or Matte. Colour control: Mitsubishi Electric® ICC profile + custom color curves Printing speed: In copies per hour, production (cph)* Printing mode 10x15cm / 6x4” 15x20cm / 6x8” Glossy Up to 316 cph Up to 162 cph Matte Up to 220 cph Up to 117 cph 4.
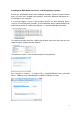
Installing the MITSUBISHI Photo Suite’ in 32-bit operating systems. Execute the ‘MITSUBISHI Photo Suite’ installation assistant. Follow the steps indicated by the assistant. After completing the operation, connect the Mitsubishi K60 printer to a 2.0 USB port in your computer. If a message appears saying a New hardware device has been detected, please cancel it. If the printer controller is not installed, the printer will be displayed in the Windows devices administration panel as "Other devices".
Installing the MITSUBISHI Photo Suite’ in 64-bit operating systems. Execute the ‘MITSUBISHI Photo Suite’ installation assistant. Follow the steps indicated by the assistant. After completing the operation, connect the Mitsubishi K60 printer to a 2.0 USB port in your computer. If a message appears saying a "New hardware device" has been detected, please cancel it.
If a Windows text box appears during the installation process that says “Windows cannot verify the editor of this controller software”, select the option “Install this controller software anyway”. If the controller is correctly installed, the printer will be displayed in the Windows devices administration panel as “MITSUBISHI USB Printer “. Once the above steps have been completed, the printer will now be installed and ready to use.
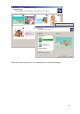
5. Printing of files. Once the “MITSUBISHI Photo Suite” has been installed, you can print from any application such as a conventional printer, selecting the “K60 Printer”. You can also print from other programmes such as Adobe Photoshop ®. To do this, adjust the output parameters in accordance with the printer specifications described above. Example of printing from the Windows assistant Go to a folder in the system, select an image or several images and then press print.
Select the photographs to be printed Follow the steps indicated by the assistant to print the selected photographs.
6. Advanced colour settings. In the “K60 Printer” panel in the section “Advanced printing characteristics” the following parameters can be defined. Paper size: Your can select from among the following formats: 10x15cm / 4x6”, 15x20cm / 6x8” and 13x18cm (centred on a 15x20cm) / 5x7” in 6x8”. Type of finish: You can select either a “Matte” or a “Glossy” finish. Sharpness: Make your selection within a scale of 0 to 8.
Manual colour settings: The manual colour settings enable the following parameters: Gamma: You can select from among different gamma values. To use the colour curve with the ICC provided by Mitsubishi Electric, select Gamma5. Colour Chart: You can select one of two values, “Chart0” and “None”. To use the colour curve with the ICC provided by Mitsubishi Electric, select "None" To obtain the best results, combine “Chart0” and “Gamma1” Curve: You can select different Curves.
7. Uninstalling. To correctly uninstall the “MITSUBISHI Photo Suite” solution stop or cancel all printing jobs in progress. Then go to “Home Menu”, “All programmes”, “MITSUBISHI Photo Suite” and select “Uninstall” and then follow the uninstaller assistant instructions to complete the process. Once the process has been completed, the “MITSUBISHI Photo Suite” will be completely uninstalled from your computer. Starting with the Mitsubishi Photo Suite 1.
Thank you for purchasing Mitsubishi Electric® products Microsoft, Windows, Windows XP SP3, Windows Vista and Windows 7 are registered trademarks of Microsoft Corporation in the USA and/or in other countries. Adobe and Adobe Photoshop are registered trademarks of Adobe Systems. The different software packages mentioned in the manual are commercial marks registered in their respective companies.