,_ MITSUBISHI TV Owner"s Guide MITSUBISHI
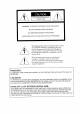
RISK OF ELECTRIC SHOCK DO NOT OPEN CAUTION: / TO REDUCE THE RISK OF ELECTRIC SHOCK, DO NOT REMOVE COVER (OR BACK) NO USER-SERVICEABLE PARTS INSIDE REFER SERVICING TO QUALIFIED SERVICE PERSONNEL. The lightning flash with arrowhead symbol, within an equilateral triangle, is intended to alert tile user to the presence of uninsulated "dangerous voltage" within the product's enclosure that may be of sufficient magnitude to constitute a risk of electric shock.
:MITSUBISHI_OW GUm R'S Table of Contents Important Preface: Safeguards Welcome ........................................................................................................................... to Mitsubishi .......................................................................................................... 3 9 Summary of Special Features ....................................................................................................... Unpacking Your TV ............................
Getting Started (cont.) Changing channels ................................................................................................................... Understanding the on-screen menus ...................................................................................... Setting the clock ....................................................................................................................... Memorizing channels ...........................................................................
IMPORTANT SAFEGUARDS PLEASE READ ALL THESE INSTRUCTIONS REGARDING YOUR TELEVISION SET AND RETAIN FOR FUTURE REFERENCES. FOLLOW ALL WARNINGS AND INSTRUCTIONS MARKED ON THE TV RECEIVER. . . Read Instructions All the safety and operating instructions before the appliance is operated. Retain Instructions The safety and operating future reference. . . . . . _Warning: should be read instructions Heed Warnings All warnings on the appliance tions should be adhered to. sho_.
Accessories Do not place this TV receiver on an unstable cart, stand, tripod, bracket, or table. The TV receiver may fall, causing serious injury to a child or adult, and serious damage to, the appliance. Use only with a cart, stand, tripod bracket, or table recommended by the manufacturer, or sold with the TV receiver. Any mounting of the appliance should follow the manufacturer's instructions, and shoul:l use a mounting accessory recommended by the manufacturer. .
10. PowerSources ThisTV receivershouldbeoperatedonlyt_omthe typeof powersourceindicatedonthemarkinglabel. If youarenot sureofthe typeofpowersupplyto yourhome,consultyour appliancedealeror localpowercompany. 11. Groundingor Polarization Foryoursafety,this TV receiveris equippe6with a polarized alternatingcurrentline plughavingonebladewiderthan the other. This plugwill fit into the power_utletonlyone way. If youareunableto insertthe plugfully into the outlet. Try reversingthe plug.
15. Overloading Donotoverloadwall outletandextensioncordsasthis carl resultin a risk offire or electricshock. 16. ObjectandLiquidEntry Neverpushobjectsofanykind into this TV receiverthrough openingsastheymaytouchdangerous "_o[tage pointsor short-outpartsthat couldresultin a fire or electricshock. Neverspill liquid ofanykind onthe TV receiver. 17. OutdoorAntennaGrounding If anoutsideantennaor cablesystemi_,;connected tot:he_.
18. Servicing Do not attempt to service this TV receiver yourself as opening or removing covers may expose you to dangerous voltage or other hazards. Refer all servicing to qualified service personnel. 19. Damage Requiring Service Unplug this TV receiver from the wall outlet and refer servicing to qualified service personnel und.e_ _the following conditions : (a) When the power-supply cord or plug is damaged. (b) If liquid has been spilled, or objects have fallen into the TV receiver.
PREFACE Welcome to Mitsubishi Congratulations on your purchase of a Mitsubishi Your TV is designed for superb viewing pleasure continued reliability. _._V.
Summary of Special Features Your top rated Mitsubishi TV delivers: 181-Channel Capacity ensuring your continued continue to expand. --- programs up to 181 channels, viewing pleasure as cable services Two-Speaker Sound System --- a special, speaker system that produces clear, stereo sound. The CS-35303 and the CS-35313 have a four-speaker system. Expanded Sound Capability TV to an external audio system ure.
Unpacking Your TV What you will find As you unpack your new TV, please check to be sure that along with the TV, the following items are included: • • • • an owner's guide and a warranty, a registration card, a remote control transmitter, and a set of two AA size batteries for the remote contrd. A few suggestions Before you hook up your new TV, please take a few minutes to: O Complete the registration card.
What's in Each Chapter Here's what you will find in this owner's guide: Chapter location 1, "Getting to Know Your TV," introduces and functions of the buttons and controls Chapter antenna, 2, "Connecting Your TV," explains how to connect decoder and other equipment to your TV. Chapter 3, "Operating Your TV," provides tions you need in order to use your TV. Chapter 4, "Using the Special Features," of the special features of the TV. you to the of your TV.
Some Conventions Used in this Guide Mitsubishi has gone to great effort to provide 11sers with an easy.-tefollow, useful owner's guide. Different types of information is treated in different ways. Users should read information labelled impol:tant which is boxed and labelled warning. The owner's terms sparingly, and all information highligh'_ed should be read carefully.
CHAPTER 1 G-e-tting_ t o Kn o w You r TV Now that you've unpacked your TV, read through the safety infi)rmarion, and glanced at the overview explaining how this owner's guide is organized, it's time to become familiar with the buttons. and controls you'll be using when you operate the _.LW. This chapter will introduce the range of options available by using the buttons on the control panel of the TV or the remot_e control. It also offers some general guidelines ibr using the remote control.
• Overview [ CS-31303 OEGAUSS of the Control Panel ] RESET ......... 6VOL(_ POWER © O PROGRAM TIMER [ CS-35303, CS-35313 ] NEUTRAL @ DEGAUS5, @ AN RESET INPUT TI 1; • ® CH • TIMER 0 PFIOGR'_I • VOL • POWER lT STRENGTH DaECTONJ] (_ C) power button (POWER) Use to turn the TV on or off. C) volume controls (VOL) Press the Abutton to turn turn down the volume.
(_channel controls (CH) Use the Abutton to switch and the Vbutton to switch (_) input button(INPUT) Use to select the input • WV_ to a channel to a channel with a higher number with a lower number. source to be viewed: or • External. (_)A/V reset button (A/V RESET) Press to reset all audio and video functions to t:heir normal or settings except for volume, reception mode (Stereo/SAP/ Mono), speaker (on/off), and closed captioning.
Overview of the Remote Control Getting ready to use installing the batteries the remote 0 Take the box containing packing bag. O Remove the back cover of the remote the direction of the arrow. O 0 control two AA size batteries control by pushing Replace the back cover of the remote For best results, Chapter in Load the batteries as indicated in the illu_tration, making sure that they are positioned correctly (+ to +, and - to .-). control.
some dos and don'ts To ensure that your remote follow these guidelines: Don't Don't Avoid When cals° general control will continue working properly, press two or more buttons at the same time. allow the remote control to get wet or become heated. dropping the remote control on a h ar._ surface. cleaning the remote control, don't use any harsh chemiUse only a soft, slightly moistened cloth.
Remote control "T'V buttons CABLE and functiolas VCR-A VCR-B CC3 (CD CC3 CC3-• REC STOP ]PAUSE @ (::_ Q PEW @ ® MUTE J__®-- PLAY SQV FF QV o .o o.. VOLUME @ INPUT /'*"_&"_' CHANNEL ® ® ® © ® @@ @ @ ® MENU CANCEL DISPLAY HOME CC) (_3 CZ3 CC3 @ ® 'G ® Gc_ c::_G ® ® -c_® G G .
C) select buttons Use these buttons to select the component you wish to operate: the TV, an audio component (in CABLE layer), VCR-A or VCRB. These are also used to set up your remote control for your particular brand of VCR. C)VCR buttons These buttons can be used to control VCRs. These are preprogrammed to operate select Mitsubishi components. (_power button (POWER) Use to turn the TV on or off. _mute control (MUTE) Use to turn the sound off completely volume.
-balance, -surround off/simulate/hall, -speaker on/off. or video function button (VIDEO)---Use following video functions: -tint, -color, -contrast, -brightness, -sharpness, -color temperature low/middle/high, or -closed captioning. to _elect one of the adjust up/down buttons, right/left buttons---After selecting the audio or video function, use either the up(right) or the down(left) button to adjust the function you've selected. These buttons can be used to: -turn the function on or off (e.g.
(_ picture-in-picture controls Use to control the special picture-in-picture (PIP)---Press (P[P) function. • PIP button cancel it. to see the reduced • channel button (VCR-CH)---Press the reduced PIP image. • source button (SOURCE)---Press repeatedly to switch the source of the reduced PIP image between the TV and the external input. to change PIP image or tlhe channel of • pause button (PAUSE)---Press to freeze the reduced PIP image or cancel the image freezing.
c_n_A___Pir E_h 2 Connecting Your TV This chapter offers step-by-step instructions for completing most common hook-ups.
Overview of the Back Panel VHF/UHF (75_) @ (_) antenna terminal (VHF/UHF) Use to connect a VHF/UHF antenna. (_) S-VIDEO input terminal Use to connect the video out of a Super TV. _Important: If you connect Super VHS (S-VHS) equipment, External matically be the input for viewing your S-VHS VCR. C)video input terminal Use to connect the video output component to the TV.
• Basic Connections This section describes the equipment and procedures needed for basic hook-ups. (For more complex hook-ups, contact you dealer or local cable company.) The connections explained in this section are: • TV+antenna • TV+cable or cable with • TV+separate • TV+VCR+antenna • TV+VCR+cable • TV+audio without a decoder UHF a decoder box, box, and VHF antennas, or cable with without a decoder a decoder box, box, and Basic Connections system.
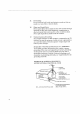
TV+antenna equipment or cable without a decoder box you will need If you have a standard 75-ohm coaxial cable, you will not need additional equipment. If your antenna has two leads (called flat twin leads), you'll need: 1 75-300 ohm transformer. TV rear terminals 75 Ohm Coaxial Cable -- -- 300 Ohm Flat Twin Lead 0 VHF/UHF 175£_) 0 0 _ / Optional 300 Ohm to 75 Ohm Matching Transformer connecting a cable O Push or screw the end of the cable onto the antenna the television.
TV+cable with a decoder equipment you will need box Use this hook-up if you need a decoder box to descramble cable signals. This hook-up will allow you to use your TV's remote control to change channels through the decoder box, if the cable layer of the remote control is set up to do so (See "Using the remote control" on page 42). To complete the hook-up, • of 75 ohm coaxial I length cables. you'll need: Procedure O Connect box.
TV+ separate equipment UHF and VHF antennas you will need If UHF and VHF signals are brought into your home with two separate antennas, you'll need to combine the anten:aas into a single wire to connect them to the TV. To do this you will need a UHF/ VHF combiner. (There are different combiners for different kinds of leads. Check with your local electronics store far the kind of combiner you need.
TV+VCR+antenna equipment or cable without a decoder box you will need You may want to connect a VCR along with your antennas or cable. To complete this hook-up, you may need the following equipment: • i length of coaxial cable, 1 set of RCA pin-type cables, audio 1 RCA pin type video cable, (if connecting a standard VCR), or 1 Super Video cable (S-VHS) Super VHS VCRs.
TV+VCR+antenna (cont.) procedure (See illustration O Connect terminal Connect terminal or cable without on the following box page.) the incoming cable or antenna on the VCR. one end of a coaxial on the VCR. a decoder to the ANTENNA cable to the ANTENNA Connect the other end of the cable to the antenna the TV. IN OUT terminal[ on Connect an RCA pin-type video cable to the VIDEO OUT terminal on the back of the VCR.
Incomin Cable -- 75 Ohm Coaxial Cable i) VCR Rear Terminals IN Antenna Lead OUT iF--Yellow Lead Attach 75 Ohm Coaxial Cable either one O 0 @ White Lead -- .
TV+VCR+cable equipment with a decoder box you will need This hook-up will allow you to record scrambled channels. you should not change channels during recording. To complete need: the hook-up, • of coaxial 2 lengths 1 set of RCA pin-type cables, you'll cable, audio 1 RCA pin-type video cable, (if connecting a standard VCR), or I Super Video cable (S-VHS) Super VHS VCRs.
procedure (See illustration O Connect on the following the incoming page.) cable to the IN terminal on the decoder box. Connect a coaxial cable to the OUT terminal on the back of the decoder box; connect the other end of this cable 1_othe ANTENNA-IN terminal on the back of the VCR. Connect the second coaxial cable to the ANTENNA-OUT termi hal on the back of the VCR. Connect the other e:ad of this cable to the antenna terminal on the back of the TV.
TV+VCR+cable with a decoder Incoming box Cable __0 ---- _----7 75 Ohm __ | CoaxialOable I O---_ q VCR Rear AUDIO OUT Lead Lead VCR rear Lead IN vYellow Antenna O _ Attach either -C:_= one 0 OUT .m_ 75 Ohm Coaxial Cable O VHF/UHF @ Q oO [elHl*.
TV+audio system equipment you will need To hook-up an audio system, • 1 set of RCA pin-type cables. you will need: audio Procedure O Connect one end of OUTPUT terminals cable to connect the connect the left (L) RCA pin-type audio cables to the AUDIO on the back of the television Use the red right (R) channel and the white cable to channel. Connect the other ends of this cable to the AIEX ]:N terminals the back of the audio system. on Turn offthe television's speakers.
_cHAe__T_E a___ Operating Your TV Now that your TV is connected to the cable, s_ntennas, or external components, it's time to enjoy your equipment. This chapter will explain how to operate the TV, first focusing on functions that are basic and easy and then explaining some advanced features.
• Getting Started This section is designed to get you started enjoying your new TV. If you follow these procedures one by one, you will soon have a picture and can begin discovering everything your television can do.
Adjusting the color purity (CS-35303, CS-35313 only) Your MITSUBISHI CS-35303, CS-35313 color television has a large screen picture tube and color purity may be affect,ed slightly by the earth's magnetic field. For best results, follow the instruction below for color purity adjustment. control panel _ _C_ L I O Turn off the TV set. Select the desired location and install the set. Determine the compass direction where the set is facing.
Using the operating remote control Mitsubishi components This remote control unit comes programmed to ope:rate Mitsubishi TVs and VCRs. The select buttons determine which component the remote control will operate.
If your VCR is this brand... ...enter this code If your VCR is this brand... ...
Using If your cable box is this brand... the ...enter Zenith Tocom 61,62,82 Pioneer 64,65,84 this code 67,68,72 Panasonic 63,70 Macom 71 54,57,58,59,60,85,87 Oak ..enter this brand... 52,53,69 55,56 (cont.) If your cable box is this code G.I. S.A. control 51 Hamlin Jerrold remote Philips 73,74,75,76,77, 93,94,95,96,97,98:.99 79 Regency 66,86,88,89,91,92 _>Important: Sometimes manufacturers will change their prcducts, or they may use more than one code.
After you have set up your remote control for your particular brand of cable box, you can use the remote to operate your cable box. O Choose the layer using the select button VCR-A, VCR-B or CABLE. Point the remote buttons. control Started control: at the cable box and press the desired Only the POWER and CHANNEL ating your cable box.
Turning DImportant: the TV on/off Before using the remote select button. control to operate the TV, press the TV Use the POWER button on either the control control to turn the TV on and off. _Important: 46 panel or the remote Even with the power turned off, there is a small current that continues to flow into the TV. This maintains any changes to the setting as well as operates the built-in clock and t!ming functions.
Selecting the input source Press the input button (INPUT) on the control panel or on the remote control to select the input source you wish tc view: TV or External (Ext).
Changing channels Your TV offers you four ways of changing channels once their numbers have been programmed into channel memory. DImportant: [:>Important: 48 • selecting • directly • using the special quick view option to switch memorized channel, and • using the Super special channels To change a channel accessing channels using the automatic a channel by pressing cham_el scan feature. the _umber buttons.
cDooc_ 0_0 000 channe] To change channels: s .automati- 0 000= [:>Important: changing cally O Press one of the channel controls (CH, CHANNEL,) on the control.[ panel or on the remote control. The TV automatically goes to the next broadcasting station. The channel controls (CHANNEL) will work only after channels have been programmed into memory. (See "Memorizing channels," page 54.
Changing channels (cont.) using the quick view option To use quick view: O Select the channel you wish to memorize as the quick view channel. O Press the QV bu;ton for about 3 seconds. On releasing this button, the channel number will appear on the screen. O Press the quick view (QV) button to view the QV channel.
Understanding the on-screen menus One of the distinctive features of this TV is an on-screen menu system that provides step-by-step instructions for using some of r.he TV's special capabilities. When using any of the on-screen mind: • The on-screen minutes. menus • Unavailable • Some on-screen menu keep the fcllowing will clear if no item is selected items menu menus, are indicated items must be set before • You can exit the on-screen MENU button repeatedly. viewing.
Setting the clock Your TV contains an internal clock to indicate tlhe current time. If there is a broadcaster in your area that is sendi:ag the current time along with its regular broadcast signal, then your TV can automatically set its clock with this signal. Otherwise, you can set the clock yourself. O Press the MENU button on she remote control.
If you follow daylight savings time, set the "Daylight savings" to "On" using the AD,YUST button. If you do not foll,_w, set it to "Off." Then press the ENTER button. Set the clock Auto clock On Day Monday Clock 10:00 am Time zone _. Daylight Eastern savings Use ADJUST Then press Press On to select. • ENTER. MENU to return to First Time Set-Up Menu. The automatic setting is completed, and the clock will start automatically. Tile screen will re,;urn to the "First Time Set-Up" menu.
Memorizing channels Your TV automatically memorizes the channels you can receive. Once channels are memorized, you can scan through them using the channel control on the remote control and control panel. To memorize channels: O First Time Set-Up Set the clock • Memorize channels Add/delete channels Use ADJUST to select. Press the MENU button on the remote control. The TV Main Menu will appear on the screen.
Adding and deleting channels After all available channels have been programmed automatically, channels with weaker signals can be added or deleted by using the following procedure. First Time Set-Up Set the dock Memorize _. channels Add/delete channels Use ADJUST Then Select "First Time Set-Up" using the ADJUST button; then press the ENTER button. `to select. press ENTER. Press MENU TV Main to return 'to Select "Add/delete channels" using the ADJ3JST button; press the ENTF, R button. Menu.
Renaming the inputs This feature allows you to rename the external inputs. After renaming, the new name will appear on the screel] display. TV Main O Press the MENU button on the remote control. The TV Main Menu Your choices are: Menu will appear on the screen. First Time Set-Up • Customize Viewing Advanced Features Use ADJUST to select. Then press ENTER. Press MENU Customize • Viewing mute Use Power restore Use Advanced Use ADJUST press Press to select. to return to Menu.
Selecting language This TV allows you to see three different menus: English, Spanish and French. language on-screen O Press Customize Rename • Select the inputs Language Use Video mute Use Power Use ADJUST Press Q restore Use Advanced Then the MENU button on the remote control. The TV Main Menu will appear on the screen. Viewing PIP to select. press • then ENTER. MENU to return to @ Select "Select Langaage" using the ADJUST butl:on; then press the ENTER button. TV Main Menu.
Using video mute With using the video mute function, any blank section of video tape is replaced by a blue screen. The sound is also turned off. If there is a case where you might wish to try viewing the playback of noisy tape, you can turn the video mute off. O Press Customize Rename Select • the inputs Language Use Video mute Use Power restore Use Advanced Use ADJUST Then Press the MENU button on the remote control. The TV Main Menu will appear on the screen, Viewin,q Q PIP to select.
Using the power restore feature When this feature is used, the TV will automatically tam on when electric current is supplied. This feature is useful when, for example, your TV is plugged into an outlet that you control with a wall switch. To use the power restore Customize Viewin.q Rename Select the inputs Language Use Video • restore Use Advanced ADJUST Then press Press MENU PIP to select. Select "Customize Viewing" using the _ADJUST button; press the ENTER button. then ENTER.
Using the advanced PIP You can use the pause button display special PIP features. • TV Still, • Snap-shot, or • Replay. functions in the Picture-in-Picture mode to Select one of the following settings: In "TV Still," the PIP image switches between still and moving. In "Snap-shot," you can view and move the frozen PIP image. In "Replay," you can view still PIP images in sequez._ce for a "strobe" animation effect.
Adjusting the sound You can adjust all of your television's sound functions by using a pair of buttons: select a function with the AUDIO l_utton and adjust the function with the ADJUST button or right/left button. You use the ADJUST button to: • • • select a position (e.g., stereo), increase or decrease the function (e.g., bass), or shift from one end of a scale to the other (e.g., balance). After adjusting the sound, an on-screen function and level you've selected.
• "Simulate" gives you a pseudo-stereo monaural sound broadcasts. • "Hall" makes behind stereo effect when receiving sound seem wider and extend around you. 'Speaker On/Off' normal operation. audio system. turns the TV speakers on or off. Set to "On" for Set to "Off' if you connected yo_r TV to an adjusting the audio functions O Use the AUDIO button on the remote control[ to select one of the functions.
Adjusting the picture You can adjust all of your television's picture functions by using a pair of buttons: select a function with the VIDEO b_Ltton and adjust the function with the ADJUST button or righffleft button. You use the ADJUST button to: • • • shift from one end of a scale to the other (e.g., ti:nt), increase or decrease the function (e.g., color), select a position (e.g., color temperature). After adjusting the picture, an on-screen function and level you've selected.
Using the closed caption decoder Many broadcasters now supply closed captioning information along with their regular broadcasts. There are two types of captioning that broadcasters can send: "standard" and "text." Standard captioning i,,_related to the program that is being shown. Standard captioning usually follows the dialogue of the characters on-screen. Text captioning does not usually relate to the program being shown. Is often contains information such as weather or news.
Using the Advanced Features This section explains tions. You'll learn: Setting how to use some of the more advanced func- the timer, Using the parental Using the Super Using the Advanced lock, Quick Features and View tuning.
Setting the timer This special feature allows you to program the 'IV to turn matically at a preset time. To set the timer: TV Main are: First Time • O Press the MENU button on the remote control. The Main Menu will appear on the screen. Menu Your choices Sel-Up Customize Viewing Advanced Fealures Use ADJUST Then press Press O Select "Advanced Features" using the ADJUST button; then press the ENTER button. to select. ENTER. MENU Advanced to exit menus.
Using the parental lock This special feature locks the entire to prevent others from watching it. Advanced 0 Features Set the timer • Use parental Use Super Use ADJUST Then to return to TV Main Menu. Use Parental • Press the MENU butt,on on the remote control. The Main Menu will appear on the screen. O Select "Advanced Features" using the ADJUST button; then press the ENTER button. ENTER. MENU zhannel View to select.
Using the locking the channel Use Parental Now, parental lock lock {Channel) (cont.) • the lock is off. Enter your personal using NUMBER Then press ENTER Press MENU to turn Parental to return Features lock This Channel to Menu. (Channel the Enter the secret code in fi)ur digits using 1:he number buttons (0-9); then press the ENTER button. code buttons, the lock on. Advanced The message for locking channel will appear. You can clear the code pressing the CANCEL button.
Using the Super Quick View tuning Super-Quick-View allows you to cycle through a list of up to ten numbers by using the SQV button. You can use the menu system to add channels to and remove channels from the list. Advanced O Press the MENU bat ;on on the remote control. The Main Menu Features Set the timer Use parental • Use Super Quick Use ADJUST press View Select a position to store a TV channel using the ADJUST button; then pres,_ the ENTER button.
CHAPTER Using the 4 Special Features In addition to the basic and advanced functions explained in the previous chapter, this TV offers the user several special features not generally available on other brand TVs. This chapter will explain how to use these distinctive features.
Understanding the On-Screen Displays Your TV provides an on-screen summary of the current settings for the TV or cable channels, as well as the informal:ion related to Extended Data Services (XDS). XDS allows broadcasters to supply you with the current time, channel inf_rination, (such as call letters and the network name), and program information (suc, h as the program name and program description). :rc, view this information, press the display button (DISPLAY) on the remote control.
€ Using the Off-Timer This special function allows you to set the TV to turn oft automatically. You can set the TV to turn offfrom 10 to 120 minutes (2 hours). In this section you'll learn: • Setting • Changing Using the off-timer, or canceling the Off-Timer and the off-timer.
Setting the off-timer 0 Press the off-timer button T) on the remote control. (OFF- 0 Select how long you want the TV to stay on by repeatedly pressing the off-timer button (OFF-T). The time will decrease in 10 minute intervals each time OFF-T 000_ TV Off timer 120 rain. you press O the button. To view the amount of time: press the off.timer button (OFFT) once.
Changing or canceling TV Off timer 10 min. the off-timer O Press the off-timer button (OFFT) on the remote control. An On-screen display will indicate the amount of time remaining until the TV will turn off. O Continue pressing the eft-timer button (OFF-T) repeatedly to change the remaining time or cancel the off-timer. The offtimer is canceled when "---" appears time.
• Using the Picture-in-Picture (PIP) Mode One of the special features of the TV is the picture-in-picture (PIP) mode, which allows you to view two different sources at the same time. In this section you'll learn: _Important: 76 • Selecting the PIP image, • Selecting the source, • Selecting the channel, • Exchanging • Moving • Freezing • Using the Snap-shot • Using the Replay the PIP image, the PIP image, the PIP image, feature, feature.
.,4..' Selecting the PIP image ooo0 _000 @ Select the number of the TV channel you want to view by using the channel control (CHANNEL). 0 Press the PIP button. A reduced image will appear in the bottom right corner of the screen. 023 ESPN Stereo & SAP SC,V A c_O00U 023 0 Press again; the size of tlhe reduced image will change. 023 ESPN Stereo & SAP SQV Press the PIP button or.Lceagain to cancel the PIP image. _>Important: When the main image image will also appear color.
Selecting the source O Turn your VCR on and select a channel on the VCR that is c::3 _ 0 OO different than the channel see on your TV screen. C3 r._ I c=b O oJ _' SOS' 000,::3 O Press the source button (SOURCE',) on _;he remote control repeatedly to select the source of the PIP image: TV or External. The PIP image follows.
Exchanging the PIP image Press the enter (ENTER,) button to exchange the positions of the background image and the reduced image. 023 ESPN Stereo & SAP SQV Ext 023 Moving the PIP image Press the adjust (up/dowr,) button right/left button to move the reduced image to other are_,s of the screen. or 0_Ol 000 k2' 8881 O0 Oc=l c:::_O O.
Freezing the Use Advanced • Current PIP image O Select "Use Advanced PIP" in "Customize Viewing" menu; then set the current setting to "TV Still." ,(See "Using the advanced PIP thnctions," page 60.) O Use PIP setting : TV Still Use ADJUST Then press Press MENU Customize to select. ENTER. to return to Viewing the MENU to the Menu. normal button to return picture. 0 Press the pause button (PAUSE) to freeze the reduced image on the screen.
Using the Snap-shot Use Advanced feature 0 Select "Use Advanced PIP" in "Customize Viewing" menu; then set the current, setting to "Snap-shot." (See 'Using the advanced PIP functions," page 60.) 0 Use the MENU button to the normal picture. 0 Press the pause button (PAUSE); the frozen PIP image and the moving PIP image will appear. 0 Press the PAUSE button again; the third PIP image will appear, moving. The previous two PIP images will be frozen.
Using the Replay Use Advanced )" Current feature 0 Select "Use Advanced PIP" in "Customize Viewing" menu; then set the cu_:rent setting to "Replay." (See "Using the advanced PIP functions," page 60.) 0 Set the replay speed between (:short interval: and 9 (long interval). 0 Use the MENU button to the normal picture. 0 Press the pause button (PAUSE). The main image will be frozen and replayed i:._sequence for a "strobe" animation effect.
Brl Troubleshooting Even though you're now familiar with the basic and advanced operations of the TV, you may run into trouble from time to time as you become accustomed to the TV. This chapter offers solutions to some of the common problems you may encounter. We suggest that you consult this chart before contacting a MitsubislM service representative.
Troubleshooting Possible Problems The remote work. control doesn't • Check installed (cont.) Solutions that the batteries For are correctly. Check the select button set to TV. is More Information See 'Getting ready 1_ouse the re_]ote control" in Chapter 1 for an ex]?lanation _f how to install batteries in the remote control. See 'Remote control buttons and functions" in Chapter 1, which explains where the select button is located.
Problems Possible On-screen displays appear each time you adjust a function. There's • no sound even when the volume is turned up. Solutions For More Information This is part of the normal operation of the TV. See "Urderstanding the OnScreen Displays" in Chapter 4 for a iull explanation of the on-screen displays. Check that the MUTE button isn't on. See "Remote control buttons and functions" i.n Chapter 1, which explains the loc_.tion and function of the MUTE button.
C H__AP T__E_E R 5 Troubleshooting Even though you're now familia:r with the basic and advanc operations of the TV, you may I,an into trouble from time to you become accustomed to the _I_. This chapter offers soh some of the common problem,_ you may enco_anter. We su_ that you consult this chart befo:ce contacting a Mitsubishi representative.
Calling for service If you are unable to correct the problem, consult your MITSUBISHI dealer or MITSUBISHI Authorized Warranty Service Center. Do not adjust any controls Do not remove not described the protective in this owner's guide. back cover of this unit. If you see the following display on your screen, you should not change any settings. This is a special display used by the factory. I_ Initial E2RESET Hotel PtP Montr. fix SystemlA :Off : Off CCD Auto : On : On :On Call letr.
APPENDIX Automatic Procedure Cut along dotted for the Parental line and file after reading After you lock the TV, you will need the secret _]} O Lock 89 code in order to: view the locked TV, or cancel the lock. If you forget the code, you can view the locked TV without entering the code. To do this, simply press the buttons labeled "QV" and "9" at the same time. [:>Important: This procedure will only unlock the TV temporarily.
Index C A Adding and deleting 55 channels adjust (up/down) buttons 22, 23 Adjusting the color purity 41 Adjusting the picture 63 adjusting the brightness adjusting the color adjusting the sharpness adjusting the Lint changing the color temperature changing the contrast setting closed captioning Adju_,;ting the sound 61 adjusting the balance adjusting the bass adjusting the treble setting the reception mode setting the surround mode turning the speaker on/off antenna terminal 26 audio and VCR buttons 21
Getting ready to use the remote control 18 Remote control buttons and Junctions 20 P picture-in-picture controls 23 power button (POWER) 16, 21 program timer indicator (PROGRAM TIMER) 17 Q quick view button (QV) 21 R Renaming the inputs 56 Remote control buttons and functions 20 right/left buttons 22, 23 S select buttons 21 Selecting language 57 Selecting the channel (PIP mode) 78 Selecting the PIP image 77 Selecting the input source 47 Selecting the source (PIP mode) 78 Setting the clock 52 Settin
i m Mr[SUBISHI MITSUBISHI ELECTRONICS MITSUBISHI Audio/Video a. Picture for the tube. Tube. b. Other Parts. COLOR TELEVISION OR COLOR LIMITED WARRANTY AMERICA, INC.
_,= MITSUBISHI MITSUBISHI ELECTRONICS 6100 Atlantic Boulevard Norcross, GA 30071-1305 871C906D0 AMERICA, INC. Printed in U.S.A.