
User manual


EN-25
Viewing 3D images
With the separately sold 3D glasses (EY-3DGS-78U),
you can enjoy viewing 3D images on this projector.
To view 3D images, install the supplied 3D emitter.
Installing the 3D emitter
1. Unplug the power cord of the projector.
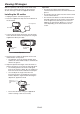
2. Place the supplied non-slip sheet on the bottom of
the 3D emitter.
Non-slip sheet
3D emitter
3. Connect the 3D emitter terminal on the 3D emitter
to the 3D SYNC terminal on the projector using the
supplied mini DIN 5-pin cable.
To 3D SYNC
terminal
To 3D emitter
terminal
Mini DIN 5-pin cable
4. Plug the power cord of the projector into the wall
outlet and turn on the power.
t 5IFJOEJDBUPSPOUIF%FNJUUFSXJMMMJHIUHSFFO
and the 3D emitter will be ready to communicate
with the 3D glasses.
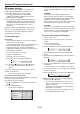
5. Adjust the position and angle of the 3D emitter so
that the 3D glasses can receive the infra-red signal.
t 5IFUSBWFMJOHEJTUBODFPGUIFJOGSBSFETJHOBM
from the 3D emitter is about 10 m in straight line
from the front of the infra-red transmission part.
t :PVDBOBEKVTUUIFBOHMFPGUIFJOGSBSFE
transmission part as shown below. Loosen the
knob to adjust the angle and after finishing the
adjustment, tighten the knob.
Knob
Infra-red
transmission
part
t 4FDVSFUIF%FNJUUFSVTJOHUIFTVQQMJFE%
emitter securing screws as necessary.
Important:
t %POPUQVUBOZPCKFDUXIJDIPCTUSVDUTUIF
communication between the 3D emitter and the 3D
glasses.
t %POPUQMBDFUIF%FNJUUFSOFBSUIFSFNPUFDPOUSPM
sensor of other devices.
t 5IFUSBOTNJTTJPOEJTUBODFJTEFDSFBTFEXIFOUIF
infra-red signal from the 3D emitter is transmitted
to the 3D glasses by reflecting on the screen. In
addition, the transmission distance in such case
varies depending on the characteristics of the
screen.