Owner’s Guide visit our website at w w w.m it s u bi s h i - t v.c om �� � �� �� �� � � �� �� �� � �� �� � � �� �� �� �� ��� �� �� ��� �� �� � ��� �� �� �� � ��� �� � �� � �� �� � �� ��� �� �� �� �� �� � �� �� �� � �� ���� �� � ��� �� �� ��� � � �� �� ��� � �� �� �� � �� � � �� � � � � � �� � � � � � � � � �� � �� � � �� �� � �� �� ���� ���� �� � ���� ���� ���� ���� ���� ������ ���� ���� �� ���� ���� �� NetCommand® 2.
This NetCommand 2.0 Guide describes specific information for using the NetCommand features of the HD-5000. For any other information regarding the HD-5000, please see the HD-5000 Owner’s Guide. This product incorporates copyright protection technology that is protected by U.S. patents and other intellectual property rights.
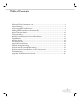
Table of Contents Welcome To NetCommand® 2.0............................................................................. 4 Special Features ...................................................................................................... 5 Connecting IEEE 1394 Devices.............................................................................. 6 Adding IEEE 1394 Devices Automatically.............................................................. 8 Device Selection Menu ...............................
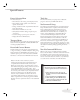
Welcome to NetCommand® 2.0 Your new Mitsubishi HDTV Receiver is equipped with NetCommand® ., the latest technology in home theater control. NetCommand technology combines the control of older IR controlled devices with the control of brand new IEEE devices to make your television the “brain” of your home theater. By connecting all of your compatible A/V devices as mapped out in both the HD- Owner’s Guide, and this, the NetCommand .
Special Features Device Selection Menu This menu allows you to: • Select the device for viewing on the display monitor. • Select display monitor speakers or A/V Receiver speakers for the audio. • Change a NetCommand® compatible A/V Receiver’s inputs automatically. • Power NetCommand devices on or off. • Verify NetCommand recordings and peer-to-peer connections. • Cancel recordings or peer-to-peer connections. • Display the menu for HAVi devices.
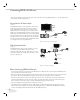
Connecting IEEE 1394 Devices There are two different connection styles that can be used when connecting IEEE devices. Use the style that fits your network of audio/video products. Direct Device-To-Device Style (Figure 1) The IEEE offers you the capability to chain devices, unlike previous audio and video connections where you had to individually connect each device directly to the HDTV Receiver.
Connecting IEEE 1394 Devices, continued 4-Pin Style vs. 6-Pin Style (Figures 3, 4, 5) There are two different types of connectors used for IEEE terminals and cables, a -pin style (Figure ), and a -pin style (Figure ). The -pin connector is capable of sending digital audio signals, digital video signals and digital control signals back and forth between devices. Your HDTV Receiver/ Controller has three -pin type connectors available. Figure 3.
Adding IEEE 1394 Devices Automatically When an IEEE device is connected into the HDTV Receiver network and is powered ON, the new device will automatically announce its presence. This process is called device discovery and can take up to minute. Some non-audio/video or non-compatible IEEE devices, such as Personal Computers (PCs), may not announce their presence to the HDTV Receiver.
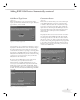
Adding IEEE 1394 Devices Automatically, continued 1394 Device Type Screen (Figure ,) If the new device is also connected using analog inputs, you will need to define the device type. Select the type of device, such as a VCR. Figure 8. 1394 Device Type Screen Once the device type is selected, then the Device screen is displayed so the manufacturer can be selected (see Figure ). If the manufacturer is listed, then you may be able to control this device while it is operating as an analog VCR.
Adding IEEE 1394 Devices Automatically Compatible IEEE 1394 Devices It is possible to connect devices to the HDTV Receiver that have IEEE connectors but are not compatible with the HDTV Receiver or with the NetCommand® control system. There are three areas of compatibility to consider: 1. Digital Video Signals The HDTV Receiver is able to decode MPEG video.
Device Selection Menu When you press DEVICE button on your remote control, the Device Selection menu appears. When NetCommand® has not been setup, the Device Selection menu allows you to select an input for viewing. When NetCommand is setup the Device Selection menu allows you to select the device for viewing, select audio from the display monitor speakers or A/V Receiver, power compatible devices On or Off, and verify the destination of signals.
Transport Menu Displaying the Transport Menu Using the Transport Menu Selecting a VCR or DVD Player from the Device Selection menu will automatically display the Transport menu. This menu is also displayed when one of the transport buttons on the remote control is pressed while viewing these devices. You can re-display this menu by pressing the Device Menu button.
Remote Control Buttons: Device Menu Button Device Menu Button (Figure 13) The DEVICE MENU button displays the Transport Menu for playback devices. A second press of this button will display the menus for NetCommand® compatible IEEE devices. Menu access varies by device.
Guide Button, AV Disc Search, Track List Screen Guide Button AV Disc Search The GUIDE button displays the on-screen programming guides. . Start the playback of the desired track on the AV disc. (Figure 13, page 13) • For NetCommand® compatible satellite receivers and some cable boxes, the GUIDE button will display the on-screen programming guide for the receiver or cable box. Use the ADJUST and ENT(er) buttons to navigate the displayed Guide.
Special Features Buttons, Manual Analog Recording Special Features (Figure 13, page 13) For both NetCommand® compatible traditional IR devices and IEEE compatible devices, these buttons on your TV remote control may also operate the similar functions for the device: Recording On A NetCommand® Traditional VCR Pressing the Record button will function the same way as pressing the record button on the VCR’s remote control or front panel. CHANNEL To record directly from antenna or cable: VOLUME .
NetCommand® Controlled Recordings Recording Setup Recording Now Your HDTV Receiver is able to start and stop recordings automatically and send the signals from one external playback device to another external recording device. It is also able to convert digital signals from Ant-DTV and from IEEE devices to analog signals that can be recorded on NetCommand compatible analog VHS and S-VHS VCRs.
NetCommand® Controlled Recordings, continued Note: When selecting channels, you may use the ADJUST or , or use the number buttons. Record List Screen Copy-Protected Material To view a list of all of your currently programmed recordings, select List from the Record/Connect screen. A maximum of scheduled recordings are possible at a time. To cancel a recording on the Record List, use ADJUST or to select the recording, then press CANCEL.
NetCommand® Controlled Peer-to-Peer Connections What is a Peer-to-Peer Connection? A peer-to-peer connection allows the IEEE devices in your HDTV Receiver network to talk to each other without the further need of HDTV Receiver intervention once the peer-to-peer connection is established. For example, the HDTV Receiver can setup a connection for an AV Disc or DVCR that sends a recorded program to an IEEE monitor in another room. NetCommand will establish the connection between the two devices.
Problem Possible Solution • When a Device is selected from the Device Selection menu, the screen is blue (no signal source). • Make sure the selected device is turned on. • From the Edit NetCommand® menu select Review then check the Review screen to see if inputs match the actual connections on the HDTV Receiver. If they do not match, either change the actual connections, or select Change on the EditNetCommand menu to change the HDTV Receiver’s Memory for the connection.
Problem Possible Solution • There is no audio and video from the IEEE device. • The device is not turned on - turn the device power on. • No media (tape or disc) is inserted into the device. • The media is blank (has no recording). • The play command failed - Try pressing play again on the device’s remote control or front panel. • The device is already in use (for example the device is currently recording). • The source is copy-protected or violates copy-protection.
Problem Possible Solution • The IEEE plug does not fit into HDTV Receiver (too large). • The wrong type of IEEE cable has been used. Obtain a -pin type or a pin to pin adaptor cable from an electronic or computer store. • An IEEE device has been plugged in but does not appear in the Device Selection menu (not discovered). • The IEEE connection to the HDTV Receiver or another device is not secure or is loose. • The IEEE device is not powered on.
Appendix: NetCommand® Controls NetCommand Compatible Traditional Devices (Analog) When Device Selection Menu is Displayed and the Device is Highlighted (Yellow Outline) REMOTE CONTROL BUTTON A/VReceiver VCR DVD Cable Box/DBS POWER Power On/Off (toggle) Power On/Off (toggle) Power On/Off (toggle) Power On/Off (toggle) DEVICE MENU n/a n/a n/a n/a GUIDE Changes between Digital and Analog audio Changes VCR inputs n/a Changes antenna inputs (RCA model DTC-100 only) FORMAT n/a n/a Change
Appendix: NetCommand® Controls Remote Control Button When Net Command® Compatible Traditional Device is Viewed or Played A/V Receiver VCR DVD Cable/DBS Channel up/down Skip Forward/Backwards Chapter or Track Channel up/down Page up/down when guide showing 0-9 (digits) number functions number functions number functions DEVICE Menu 1st press Transport Menu, 2nd press Setup Menu display CH up/down VOL up/down Volume Up/Down MUTE Mute On/Off QV Last Channel Recall HOME ENTer CANCEL Counter
If you have questions regarding your television, call Consumer Relations at () -, or email us at M D E A s e r v i c e @ b i g s c re e n . m e a . c o m To order replacement or additional remote controls or owner’s guides call () - or visit our website at w w w.m it s u bi s h i - t v.c om © Mitsubishi Digital Electronics America, Inc. BA Written and Printed in the U.S.