,D'_ ELECTRIC LCD FLAT PANEL HDTV MODELS LTLT- 1 OWNER'S GUIDE • For questions: Visit our website at www.mitsubishi-tv.com. E-mail us at MDEAservice@mdea.com. Call Consumer Relations at 800-332-2119. For information on System Reset, please see the back cover. To order replacement or additional remote controls or Owner's Guides, visit our website at www.mitsuparts.com or call 800-553-7278. Guidelines for setting up and using your new widescreen Command TV start on page 12. x.v.
For Your Records Record the model number, serial number, and purchase date of your TV. The model and serial numbers are on the back of the TV. Refer to this page when requesting assistance with the TV. MODEL NUMBER FCC Declaration Product: LCD Flat Panel HDTV Models: LT-46149, LT-52149 Responsible Party: Mitsubishi Digital Electronics America, Inc.
Contents Remote Control ........................ 30 4 ChannelView Channel Listings .............. 31 Installation and Operating Notes ............. 5 Status Display ......................... 32 TV Guide Daily Access Requirements .......... 5 Fav (Favorite Channels) ................... 33 5 TV Signals and Display Formats ............. 34 Viewing Camera Files and GalleryPlayer Images. 35 Important Information About Your TV Important Safety Instructions................
important Safety instructions Please read the following safeguards for your TV and retain for future reference. Always follow all warnings and instructions marked on the television. 1) Read these instructions. 2) Keep these instructions. 3) Heed all warnings. 4) Follow all instructions. 5) Do not use this apparatus near water. 6) Clean only with dry cloth. 7) Do not block any ventilation openings. Install in accordance with the manufacturer's instructions.
Installation Notes Cleaning Waft Mount Requirements For wall-mounting, see "Stand Removal," page 11. Use with other than the authorized accessories may cause the TV to become unstable, which can cause damage to the product or possible injury. Custom cabinet installation must allow for proper circulation around the television.
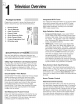
Televis"Overview integrated Please take a moment to review the following list of items to ensure that you have received everything. 1. Remote Control 2. Two AA Batteries 3. Cable Tie with Pin 4. Owner's Guide 5. Quick Reference 6. Quick Connect Guide 7. Product Registration 8.
1. Television NetCommand for HDMI Sound Overview 7 Projector HDMI devices with Consumer Electronics Control (CEC) capabilities may be compatible with the TV's NetCommand for HDMI feature. Compatible devices can receive control signals through the HDMI connection. The TV's remote control may be able to operate some functions of these devices. Sound Projector technology uses the TV's bank of 16 speakers to create a simulated surround sound effect by reflecting sound off walls.
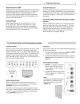
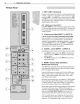
1. Television Overview TV Main Panel 1. ANT l/ANT 2 (Antenna) If you are connecting an antenna or direct cable service without a cable box, connect the main antenna or cable source to ANT 1. Use ANT 2 for a second source. ANT 1 and ANT 2 can each receive digital and analog over-theair channels from a VHF/UHF antenna or non-scrambled digital/analog cable source. ANT l/MAIN and CableCARD TM Use ANT l/MAIN to receive premium subscription cable TV service authorized by the CableCARD TM access card.
1. Television Personal Computer," page 18, and Appendix B, "Specifications," page 69. These inputs are HDCP (High-Bandwidth Protection) compliant. Digital Copy These inputs are Simplay/-/z7 certified for proper interoperability with other products certified by SimplayT'h Overview 9 sound receiver or stereo system. Select AV Receiver when the Auto Output Sensing screen displays. Digital audio from digital channels and HDMI devices is converted to analog audio by the TV. 10.
1. Television Front=Panel indicators Overview and IR Sensor POWER O STATUS indicator. Off during normal TV operation. POWER/TIMER indicator. Lit when TV is powered on; flashes when TV is powered off and the auto-on TV Timer is set. IR Sensor IR Sensor (Infrared Sensor). Senses infrared signals emitted by the remote control. O Off O Steady On O Slow Blinking _) Fast Blinking POWER indicator None O Standby condition. Normal operation. Green O TV is powered on. Normal operation.
1. Television Overview 11 Stand Removal Stand=Removal 1, Procedure Disconnect the TV's AC power cord from the AC power outlet. Protective Spread the protective sheet that was wrapped around the TV on a flat, even surface, such as a sturdy table. The protective sheet will help prevent damage to the display. sheet _ _ TVx Stand _ _ Table iMPORTANT: To avoid damaging the screen, make sure there are no foreign objects under or on top of the protective sheet.
TVSet- Getting 1. Started Review the important safety, installation, and operating information at the beginning of this book. installing the Remote Control Batteries Choose a location for your TV. • Allow at least four inches of space on all sides of the TV to help prevent overheating. Overheating may cause premature failure of the TV. 4, 2. Load the batteries, making sure the polarities (+) and (-) are correct. For best results, insert the negative (-) end first. Refer also to "Installation 3.
2. Additional TV Setup 3, Review chapter 4, "TV Operation and Features," for TV features including: Remote Control. For use of the remote control, see page 30. Fav. Use an on-screen menu to create custom lists of your favorite channels from ANT 1 and ANT 2. See Setup > Edit, page 47. Input Selection (viewing source). Select a connected program source to watch, such as a VCR, DVD player, or antenna. Press INPUT on the remote control to select from icons for the TV Order.
2. TV Setup Use the Setup > Edit menu (page 47) for additional channel options, such as adding or deleting channels from memory, naming channels, and saving favorite channels in custom memory banks. Use the Setup menu for basic TV setup options. 1, Press MENU to open the Main menu. Press V to highlight the Setup icon and display the Setup menu.
2. Auto lnput Sensing for CEC-Enabled Devices When the TV's NetCommand for HDMI feature is enabled, most CEC-enabled devices are recognized and identified automatically by the TV. NetCommand for HDMI may allow you to control functions of a CEC-enabled device. See Appendix E, "NetCommand HDMI Control of CEC Devices," page 81. Setup Procedure for TV Inputs Power on the TV if not already on. Connect your devices to the TV, making note of which TV input is used for each device.
2. TV Setup Tips on Auto Sensing Connected Devices • • Choose a different name for each input. Antenna inputs (ANT l/ANT 2) are never detected, although you can turn off unused antenna inputs in the Inputs > Name menu. You can change the device type displayed in the Input Selection menu by using the Inputs > Name menu (page 51). Any "learned" NetCommand IR codes will be erased, however. Changing 1, and Changing 3, Disconnect the HDMI device. > Name menu.
2. About Home-Theater Control TV Setup 17 Systems This summary offers some examples of the control methods available using the TV's remote control. wish to use one or more of these methods in your home theater after completing Auto Input Sensing. Remote Control Programming with Any Connection Type Program the remote control to operate the A/V device. To control the device, set the slide switch to the correct position for the device type. See Appendix C, "Programming the Remote Control.
2. TV Setup Connecting a Computer Use one of the connection on your computer's to the TV methods listed below based video output. = Computer with DVI and stereo audio outputs = Digital DVl DVI-to-HDMI cable or an HDMI cable with an HDMI-to- Stereo audio cables DVl adapter Note: If the computer's audio output is a single mini jack, a mini audio-toRCA-male "Y" adapter cable is also required. HDMI HDMI-to-HDMI cable = No additional audio connection is required.
2. TV Setup Using the TV with a Personal Computer Computer Video Adjustments Power on the computer if it is not already on. Select PC from the Input Selection menu. To do this, press INPUT to open the Input Selection menu, move the highlight to the PC icon, and press ENTER. 3_ Working from the computer, change the resolution of the computer image. View the computer image on the TV and maximize the computer resolution while maintaining a suitable aspect ratio for the image.
2. TV Setup The CableCARD TM system allows your TV to receive, decode, and unscramble the premium digital channels included in your cable TV subscription without the use of a cable box. The system is unidirectional, meaning that certain digital cable services, such as requests for video-on-demand and pay-per-view programs, a cable operator's enhanced program guide, and dataenhanced television services may require use of a set-top box instead. For more information, call your local cable operator.
TVConnections Before You Begin Auto lnput Sensing The TV's Auto input Sensing feature automatically recognizes most connections and prompts you to identify the type of device connected. See page 14 for more on Auto Input Sensing. Connection Surround Sound For best surround sound audio quality, route audiosignal cables or HDMI cables from the source device directly to your A/V receiver or sound system.
3. TV Connections If your cable box or satellite receiver has an HDM{ output, use the connections for HDM{ devices described on this page. Required: RCA component video cables, analog stereo audio cables. 1. left/right Connect RCA-type cables from the Y Pb Pr outputs on the device to the Y Pb Pr inputs on the TV main panel, matching the colored green, blue, and red connections. Connect left (white) and right (red) audio cables from the device to AUDIO L and R on the TV main panel.
3. TV Connections StandardCable Box, Sa or Other Device with Receiver, Connect DVI devices (digital only) to the TV's HDMI input jacks. Analog stereo audio cables and a DVl-to-HDMI cable or DVl/HDMI adapter and HDMI cable are required. 1, Required: S-Video cable and left/right analog stereo audio cables. 1, Connect the DVl-to-HDMI cable (recommended) or HDMI cable with DVl/HDMI adapter from the DVl device's back panel to the TV's HDMI jack.
3. TV Connections An,e.naswithSepara (can be used with a CabIeCARD TM) You must connect the incoming cable for your primary viewing source to ANT l/MAIN, especially for CableCARD TM use. Connect the primary incoming coaxial lead cable to ANT 1 on the TV main panel. VHF Leads Required: 3. UHF/VHF combiner Connect the UHF and VHF antenna leads to the UHF/VHF combiner. Push the combiner onto ANT 1 on the TV main panel. For an optional secondary antenna source, connect an antenna (or cable) to ANT 2.
3. TV Connections 25 VCRto anAntennaor Wali Outlet Cable Required: Two-way RF splitter, two coaxial cables, right and left analog audio cables, either S-video or composite video cable. 3, Connect the incoming cable or antenna to IN on the RF splitter. Connect one coaxial cable from OUT on the RF 3, 4, splitter to ANTENNA IN on the VCR back panel. Connect one coaxial cable from OUT on the RF splitter to ANT 1 on the TV main panel.
& Z 3. TV Connections Connect either an S-Video or composite video cable from VIDEO OUT on the VCR back panel to a VIDEO composite or S=VIDEOjack on the TV main panel. Connect only one type of video cable. S-Video is preferable to composite video, if available. To use the TV speakers with the VCR, connect left (white) and right (red) audio cables from AUDIO OUT on the VCR back panel to the associated INPUT AUDIO L and R on the TV main panel.
3. TV Connections 27 A/VReceiver Required: Most setups require either a digital audio cable or analog stereo audio cables. To send audio from TV channels received on ANT 1, ANT 2, or devices connected directly to the TV, you must use one of the connections shown below. The TV makes all audio available in digital and analog formats: • Analog audio coming into the TV is output in digital stereo format on the DIGITAL AUDIO OUTPUT jack.
3. TV Connections B: Composite Convenience input jacks on the TV's side panel offer the easiest way to connect a camcorder. Two different connection options are described on this page. You can alternatively use any of the jacks on the main connection panel. Video Connection Required: Composite video and analog stereo audio cables supplied with the camcorder. 1, Connect the composite video cable from VIDEO OUT on the camcorder to VIDEO/Y on the front of the TV.
TV andFeatu The Sleep Timer turns the TV off after the length of time you set. To set the TV to turn on at a certain time, see the Setup > Timer menu on page 49. Setting 1, Input Selection menu Press INPUT to display the Input Selection menu. If there are only two inputs to the TV, INPUT switches between them without displaying the menu. 3, 4, Highlight an input icon using A V ,_ I_. 3, Press ENTER to switch to the input and close the menu.
4. Remote TV Operation and Features Control 1. POWER: Turns TV power on and off. 2. Slide Switch: Selects the A/V device to be operated by the remote control. Set the slide switch to TVfor operation of the TV, and NetCommandcontrolled devices. Control of additional devices requires programing (see Appendix C, "Programming the Remote Control." 3. SLEEP:Sets the TV to turn off within 2 hours in increments of 30 minutes. .
4. receivers, and DVD players. Program the remote control for your equipment and test the keys. See Appendix C, "Programming the Remote Control." 25. 1_ (PAUSE}:Freezes a broadcast TV picture from an antenna source, cable box, or satellite receiver (if key has not been reassigned for NetCommand use).
4. TV Operation and Features Press the INF0key to see the on-screen status display. The most common displays are shown here. You will rarely, if ever, see all status indicators at the same time. ) English -_ On-screen status display sample information 1. Source antenna or input Source antenna or input 2. Analog channel being received (antenna sources only) Digital major and sub-channel sources only) 3.
4. TV Operation and Features 33 Use the six Fav channel banks to store groups of your favorite channels from ANT 1 and ANT 2. You can set up a Fav channel bank for each of your favorite program types or set up a bank for each TV user. You may prefer to perform Fav channel setup from a menu. See the Setup > Edit options, page 47. Channel and Fav numbers in the on-screen status display See the current View channels Fav bank number in current Fav bank Press INFO. 1. Press the FAVkey.
4. TV Operation and Features This is a 16:9 widescreen TV suitable for images available from HDTV and many DVDs. You can view olderstyle squarish images (4:3 aspect ratio) using one of the display formats described on this page. Press the FORMAT key to cycle through the available display formats. The TV remembers the format you last used for each input. DVD image Definitions Image information may be stated on the DVD case. Some DVDs support both of the formats described below.
4. Viewing and the USB Photo Port JPEG Thumbnail For instructions on viewing the GalleryPlayer demo or to purchase images, see page 50. Back up the data on your USB drive before connecting it to the TV. Mitsubishi is not responsible for any file damage or data loss. Connect your USB card reader or USB drive to Wait until you see the completion message on screen before continuing. Menu A V 4 1_ Move the highlight from image to image.
4. TV Operation and Features Slide Show USB Photo Menu Compatible Use these keys during the slide show. Not all functions are available for GalleryPlayer slide shows. I_ Still images recorded on digital cameras using the Exchangeable Image File Format, version 2.1 (EXIF 2.1) standard for digital still cameras and Design Rules for Camera File Systems version 1.0 (DCF 1.0) Begin or resume slide show playback Some images may not play nail list.
TVMenus Press MENU on the remote control to open the Main menu. AV Menu Captions Menu Customize picture and sound settings. 38 Turn closed captions on and off; customize caption displays. 45 Setup Menu Perform basic TV setup. Set language, scan (memorize) channels, set the TV clock, edit channel options, lock TV use by channel, set Energy Mode, auto-on TV Timer. View a GalleryPlayer demo and obtain a setup key.
5. TV Menus AV Menu An on-screen slider displays when making some audio and video adjustments. Numeric values represented on the slider range from 0 (minimum) to 63 (maximum), with 31 as the mid-point. The AV menu contains sub-menus adjustments Video See the description of video adjustments on page 42. Audio See the description of audio adjustments on page 43.
5. TVMenus 39 AVMe. . co.t .ued Video Mute On, Off Global On: Displays a solid blue background when there is no video signal from the current input. Use the On setting to let the colored screen remind you that the TV is powered on at times when there is no picture. The TV will power off if it detects no video signal for five minutes. Off. The screen appears black if there is no video signal from the current non-antenna input.
5. TV Menus A V Menu, continued Sound Projector The TV's bank of 16 speakers can be adjusted to reflect sound off the room walls to create a surround sound effect. See also Sound Mode options in the Audio > Sound Mode menu on page 44. Sound Projector menu TV Location Center, Left, Left Corner, Right, R Highlight the item that best describes the TV's location relative to the wall. Corner Sound Projector TV Wall Length (in feet) [Enter digits] Press A V to change the number or enter digits.
5. TV Menus 41 AVMe. . co.t .ued Sound Projector CUSTOM Options Highlight CUSTOM and press ENTER to open the adjustment screen. Left Angle Right Angle Center Angle Left Surround Angle Right Surround Angle Left Level Press A V to select an audio beam; colors of the adjusters correspond to audio beams in the on- Right Level Center Level Left Surround audio beam or change the sound level. Level Right Surround Level screen diagram.
5. Video TV Menus Menu Mitsubishi recommends you assign names to TV inputs before making video adjustments (use the Inputs > Name menu). Otherwise, adjustments will be reset to the defaults if you name inputs afterwards. To make video adjustments: • From the Video menu: 1. 2. 3. • Press A Y to highlight an option. Press 4 _ to display the submenu and adjust. Press MENU to return to theAV menu. While watching TV: Press the VIDEO key repeatedly to display the video option you want to change.
5. _ TVMenus 43 _ Audio Menu To make audio adjustments: • From the 1. Press 2. Press 3. Press Audio menu: A V to highlight an option 4 I_"to display the submenu and adjust. MENU to return to theAV menu. While watching TV: Press the AUDIO key repeatedly to display the audio option you want to change. Press 4 I_ to change settings. Speakers AV menu, Audio options The Speakers option displays only if an A/V receiver connection you select is applied to all TV inputs. has been identified.
_ 5. Audio Menu, Sound Mode Listen To Available for analog channels from ANTI/ANT2 or an analog VCR recording. Language Level Sound Effects TV Menus continued Stereo No special audio effects from the TV speakers. stereo. Surround Stereo is heard as simulated surround sound from the TV speakers. Surround sound is played as intended. See details at the bottom of this page.
5. Captions on Analog Captions Channels The TV can decode captions from ANT l/ANT 2 and the VIDEO composite and S-VIDEO jacks. Broadcasters can send either standard closed captions or text service. Standard closed captions follow the dialogue of the program and display in a small section of the screen. Text-service closed captions often contain information such as weather or news and cover a large portion of the screen.
5. TV Menus Setup Menu Use the Setup menu to: • Select English or Spanish for menus and on-screen text. • Scan the channels available for the antenna or cable service connected to the ANT 1 or ANT 2 jacks. • • Edit channel options, including channel locking. Set theTV's internal clock. • Set the TV Timer to turn on the TV automatically a designated time. • Set the energy mode for power consumption the TV is powered off. • Play the GalleryPlayer demo and get a GalleryPlayer setup key.
5. TV Menus SetupMenu, 47 continued Edit Use the Edit menu to edit channel options when ANT 1 or ANT 2 is the current source, To highlight a channel number to edit: Edit o Press OF{A/V to jump to the next page of channel numbers. Press and hold OF{A/V to speed through pages. Press A V to move through all channel numbers, one at a time. Press and hold A V to speed through channel numbers. The TV tunes to the highlighted channel on release of OF{ A/V Channel or A V.
5. TV Menus Clock If you have enabled the TV Guide Daily system, there is no need to set the clock; settings are grayed out and unavailable. i !iiiiii If TV Guide Daily is not enabled, set the clock if you wish to: • UsetheTV's Timer function. Maintain accurate ChannelView listings. Use either the manual or auto method to set the clock. • Settings Clock Setup menu, Clock options ii Manual. To set the clock manually: 1. Select Manual. 2. 3. Set the time of day. Set the date. 4. 5.
5. TVMenus 49 Setup Menu, continued Timer Timer On, Off Use the Timer to set a time for the TV to turn on automatically. Use this menu to set a day, time, =nput, and channel for the Timer. If the TV is already on at the requested time, the TV will automatically tune to the designated channel. o The TV clock must be set before you can use the Timer feature. TV Energy Mode must be set to Fast Power On to have the TV power on at the set time. To open the Timer menu.
5. TV Menus Setup Menu, continued GalleryPlayer Use this TV's GalleryPlayer feature to display beautiful high-definition images on your TV. A set of sample images is included with the TV. Setup > GalleryPlayer options Demo Mode o Setup Key CREATE/ EXPORT Highlight the icon and press ENTER to begin play of the sample GalleryPlayer images included with the TV. Press any key on the remote control or TV control panel to end the demo.
5. TV Menus 51 /nputs Menu Lets you assign or change names of inputs appearing in the Input Selection menu. Ray),CableAudio,B°X'DVDDvR,Camc°rder'(DVD,GameDVD2,(Game, Blu. cD/ Press 4 1!_to move between inputs. Press A V to select a name. PS, Xbox, Wii), MP3 Player, PC, Satellite, VCR, AVR Lets you tum Ant-1 and Ant-2 On/Off (to display/hide in Input Selection menu). On/Off (ANT 1 and ANT 2 only) • Lets you delete unused HDMI inputs from the Input Selection Delete (deactivated HDMI only) menu.
5. TV Menus TV locks available from the Lock menu are: Lock by Ratings Parent Other Restrict access to programming based on V-Chip rating signals sent by the broadcaster. Lock by Time Time Restrict TV use by time of day. Lock Control Panel Disable the buttons on the TV's control panel. Use this option if small children in the home try to press control-panel buttons. Note: Channel Lock is an additional lock that blocks access to specific channels.
5. TVMenus 53 Lock Menu, continued Parent Menu Options .... (U.S.=based rating system) Lock Off, On Disables or enables program blocking based on V-Chip signals and the U.S. rating system. TV TV-Y Youth. TV=Y7 Youth 7 and older, TV-G General Audience. TV-PG Parental Guidance. Parental Guidance recommended; not be suitable for some children, TV-14 Adolescent 14 and older. Not recommended for children under 14. TV-MA Mature Audience. For children under 7.
5. TV Menus Lock Menu, continued _ Other Menu Options (alternate rating system) This TV can recognize new rating systems that may come into effect in the future. The Other option remains grayed out until the TV receives a signal using an alternate rating system. Such alternate rating systems will apply only to digital programming received on the ANT 1 and ANT 2 inputs. Time Blocks all use of the TV during the time period you specify. lock is in effect. Lock by Time Lock On, Off Time, 1.
NetCo mahdi Control Note: • To learn about NetCommand for HDMI devices, see Appendix E and "About Home-Theater Control Systems," page 17. NetCommand You can choose the level of NetCommand for your home theater. [] Standard Setup. Perform a standard setup if you want NetCommand to control only a few devices, such as the TV, a playback device (like a DVD player), and a cable box. With this setup, you can use the TV's remote control to operate these devices. [] A/V Receiver Setup.
6. NetCommand IR Control Other A/V Device An IR emitter cable is included with the TV. 3. The NetCommand system uses emitters connected to the IR-NetCommand Output jack to control other devices such as DVD players, cable boxes, satellite receivers, and VCRs. 1, 3. A/V Receiver Connect the plug end of the supplied IR emitter cable to the IR-NetCommand Output jack on the TV main panel.
6. NetCommand To perform this procedure, you need: • A_to Input IR Control 57 Sensing The remote controls for both the TV and the device you want to control. The IR emitter cable supplied with the TV. To set up an A/V receiver, see "Setting Up NetCommand Control of an AN Receiver," page 61. Connect and position the IR emitters for the devices you wish to control. See "In Emitter Placement" on the opposite page.
6. NetCommand IR Control Refer to this chart when "learning" device keys. "Learn" some, all, or none of the keys used for each device type. The chart has space for you to write in functions you assign to the F1-F4keys. See the following page for more on keys marked in the "Special Operation Method" column. Guide On Screen Program Guide or DVD Disc Menus Page Up Page Up in Guides Page Dn Page Down in Guides CHIPAGEV Adjust Adjust or arrow up J. Up GUIDE . . .
6. NetCommand Operating NetCommand=Controlled Controlling Most Device As an example of NetCommand ing your cable box and you wish channel higher, press OH/PAGE ix the "learned" channel-up control 1, Types Controlling control, if you are watchto tune to the next NetCommand then sends signal to the cable box. When you wish to use the device, press INPUT to display the Input Selection menu. 3, Press A Y 4 I_ to highlight the icon for the device. 4, Press ENTER to switch the TV to the device.
Guide 6. NetCommand IR Control Displaying the Disc Menu (DVD or high-definition disc format) While watching the device. 3ress GUIDE to display the disc menu. "Learn" the DiSC MENU, TOPMENU, or other key as named on the original remote in the Guide learning position. Displaying the On-Screen Program (cable box or satellite receiver) Guide 1. "Learn" the GUIDE key on the original remote in the Guide learning position. 2.
6. NetCommand Setting Up NetCommand • Controlling power and volume is described on this page. • Automatic audio switching, suitable for most equipment setups, is described under "A/V Receiver Control: Automatic Audio Switching" on the next page. AV Receiver screen. Perform NetCommand IR "learning" for A/V receiver power and volume keys. 3, Automatic audio and video switching can be set up If your A/V receiver has an HDMI output.
6. NetCommand A/V Receiver Control: IR Control Automatic Audio Switching Perform one of these setups to enable the A/V receiver to switch automatically to the correct audio input when you select a device in the TV's Input Selection menu. To set up control of an A/V receiver you need: • The remote controls for both the TV and the A/V receiver. The IR emitter cable supplied with the TV. Connecting cables ment. To switch both audio and video via an HDMI connection, see page 65.
6. NetCommand IR Control Audio Switching Before You Begin Connect your A/V devices to the TV and connect your A/V receiver to the audio outputs on the TV and the DVD player. See chapter 3, "TV Connections," for suggestions. Important: To use Setup 1, you must connect the A/V receiver to the TV's audio output; i.e., the TV's AVR AUDIO OUTPUT or DIGITAL AUDIO OUTPUT jack.
6. NetCommand Audio Switching Switching IR Control Setup 2: Automatic to a Surround A/V Receiver Sound Device Use this setup to send digital surround sound directly from a device to an A/V receiver. 1, Under Learn, highlight Input2. in this example, the IR code for the A/V receiver's DVD Audio input will be "learned" as Input2. Press ENTER on the TV's remote control.
6. NetCommand Setting Up NetCommand IR Control 65 Contro! of an A/V Re Setup to Control A/V Receiver Power and Volume TV main panel Perform the steps under "A/V Receiver Control: and Volume," page 61. Power Se t up to Con tro Switch in 0 Utp u t th e T V Au d If you have used one of the optional audio connections to the TV's AVR AUDIO OUTPUT or DIGITAL AUDIO OUTPUT jacks, set up NetCommand to control switching to the TV audio input.
6. NetCommand IR Control 8, Press EXITif finished or repeat these steps for additional video sources connected to the A/V receiver. NetComrnand IR Control: Device Connected to an A/V Receiver Use this setup to have NetCommand control a device sending audio and video through the A/V receiver to the TV via HDMI. 1, 3, Press ENTER and the highlighted input label will start flashing to indicate readiness for "learning.
Appendices 67 I I I I I I 0 I -O I d_ m mm LL C
Appendices
Appendices 69 inputs With Stand/Without Antenna/Cable ::!input Stand 2 RF .................................................... F connec!o[: 75-ohm ...................................................... ................................. 4 ; CEA-86iD LT-46149 _ 29.9/28.2 42.0 14.1/4.8 ; 71.4/64.
Appendices This appendix explains programming the TV's remote control to operate other A/V devices. This is distinct from NetCommand control. The TV's remote control can operate other devices by three different methods: • Remote Control Programming: You must move the slide switch to the position specific to the type of device. , CHA/V POWER • • • SLEEP (_ {FAST FORWARD) _ {PAUSE) (]_{) {PLAY) i • NetCommand ® IR "learning": You can operate other devices with the slide switch in the TV position.
Appendices Programming the Remote Control & Move the slide switch at the top of the remote to the position for the product you want to control. Refer to the table below. Only one of each device type can be controlled in each slide-switch position. 3, Cable Box DTV Receiver Satellite Receiver VCR VCR DVR Laser Disc Player DVD Player/Recorder DVD AUDIO ......
Programming Appendices Codes RadioShack 31075,30468,30437,
Appendices Programming SAE Sansui _ Codes, 130157 30157,30000 ............................... Se=rs ..... 36it9 Sonic Fron- continued Amplifier 31584 Onkyo ............................................................... 31609 31074 ....... Anam .......... ............ i_9i_ 73 ...... .....Arcam 31805, 31320, 31298, 30842 30135 3ressVu 10775 Ch@ariai ..................................................................
Appendices Programming Uniden Zenith ......... Codes, continued 10722 11856,11810,10856 : DirecTV 20739 KTV 20000 .......................................................... .............................................................................................. LG.............. 20240 20038 Duiabrand......................... ................................... 20037 Optimus 21262,21162,21062, 21048,20593, 20432, 20240,20162, 20104 .... ............Eioya_s ..................................
Appendices Appendix C: Programming Programming Codes, 75 the Remote Control, continued IRT iJaton _JBL 20783 21078 20702 20831 20558 ii20045,20043,20042, Stack 9 21972 i! .............................
Appendices Programming Codes, continued Samsung Portland 20770 20675 21075,21044, 20820, 20744 20573 20490 20199 Sony 21536, 21533, 21516, 21431 21070 21033 20864 20533 United Universum 20730 20591 ce_ts ............. Pioscan........ 20522 ............................................ Sanyo....................................................... ............. EVA.............................................................. V 21226 21064 ........ 20699...........................................
Appendices Active Selection Source and Channel Information Clock 77 Program Rating Icons Info Box Progress Indicator Video Window Program Title Tile Highlighted Tile (indicates active selection) Ad Panel HD (high=definition) Icon Channel Call Letters This appendix explains the free TV Guide Daily service available with this TV. Use this optional service to: • View 24 hours of show listings. Change how channels are displayed (channel call letters, numbers, or both).
Appendices Appendix D: TV Guide Daily, continued Setting Up TV Guide Daily Navigating Setup of the TV Guide Daily system is optional. 1, .............................................................................. Display the inputs > Guide menu to display TV Guide Daily setup options. To enable the TV Guide Daily system, highlight On. if you wish to disable the system, highlight Off.
Appendices 2. In the Setup Screen, press Y to highlight "Display setup progress" and press ENTER.The Setup Progress screen appears. 3. Press GUIDE to exit the Guide or press ENTER to return to the Setup Screen. Looking at Ads To view promotions • linked to ads From the Guide Setup screen, you can change the channel lineup, change channel display settings, and view setup progress (e.g., when the next listings update will occur).
Appendices Appendix D: TV Guide Daily, continued Procedure 1, While in the Guide Listings, press MENU.This displays the Setup Screen. Highlight "Change channel display" and press ENTER. The channel editor screen will appear. 3. Use 4 _" to highlight the desired row setting to be changed. • To change channel position (Position Number highlighted), press A V to move the position or enter a new channel position number.
Appendices Appendix E: NetCommand HDMI Control of CE Many new HDMI devices have a feature called CEC (Consumer Electronics Control) or HDMI Control. Mitsubishi calls this feature NetCommand HDMI Control or NetCommand for HDMI. HDMI CEC allows one device, such as the TV, to control other devices, such as an A/V receiver or disc player. CEC use is optional.
Appendices Figure 4 (NetCommand HDMI Control is off). The TV's NetCommand for HDMI Control is turned off. Action: Follow the instructions in "Enabling or Disabling the TV's NetCommand HDMI Control" on the previous page. Note: You may not see the screen in figure 2 if the HDMI device has previously been detected by the TV. To check if CEC is enabled for the device, see the inputs > Name menu. If you are unable to change the device name, it indicates CEC is enabled.
Appendices Appendix E: Netcommand Resolving CEC Conflicts, Connections, Removing 83 HDM! Controlof Changing HDMI HDMI Devices Because each manufacturer selects which CEC functions to support, some devices can conflict with other devices. If control conflicts arise, you can: = Turn off CEC in the other device's setup menu. = Turn off TV control of an individual CEC device (see below). • Reset TV control of an individual CEC device (see below).
TV Reset Appendices Comparison Guide You can resolve many common TV problems using the reset functions described in the following table. See also the troubleshooting suggestions later in this appendix. iMPORTANT Before you change sound or picture settings: If picture or sound settings seem wrong for a broadcast Format channel (a channel from ANT 1, ANT 2, a cable box, or satellite receiver), first check other channels from the same input before changing settings.
Appendices Control=Panel Lock Release rstem Reset To re-enable the control-panel buttons after activation of the Control-Panel Lock Press and hold the MENU button on the control panel for over eight seconds. This works even if the TV is powered off. If the TV does not turn on or off, does not respond to the remote control or controlpanel buttons, or has audio but no video. Press the SYSTEM RESET button on the control panel.
Appendices General TV Operation Symptom Remarks 1. The TV remote control does not work. • • • • 2. When I try to use the remote control, the POWER key blinks five times. Replace the batteries. 3. TV does not respond to the remote control or to control-panel buttons and TV will not power on or off. • ® • Unplug the AC power cord for 10 seconds. Use the System Reset button.
Appendices Appendix F: Troubleshooting, 87 continued TV Channels ....................................... ; ......................................................................................................... 2' You cannot access a channel. Use number keys insiead of CH A/V. • ,, Be sure the channel you want to view is in memory. See Setup > Scan on page 46. Check that the TV is switched to the correct device or antenna for that ,, channel by pressing the INPUT key.
Appendices Picture tion graphics. 5. • When viewing a stopped VCR, white lines are rolling on the screen. • ...... Tfi PerfectColor tmage, or the colors are dim, or the screen is black. an S been incot r y Set ese e.............................. balance. If the signal is 1080p, upgrade a Category 1 (unmarked) HDMI cable to a Category 2 high-speed HDMI cable. quality). turned up. Turn off video mute for the VCR. Begin playing the tape. Change the VCR input to the antenna input.
Appendices Appendix F: Troubleshooting, 89 continued indicators Symptom Remarks 1. STATUS indicator light is a steady red. • • Room temperature has exceeded proper levels. Cool the room. The TV has overheated. Clear blocked air vents and ensure at least four inches of clearance on all sides of the TV. 2. STATUS indicator light is a steady/flashing • Unplug set from AC power. Plug back in and wait one minute for blinking to stop. Press SYSTEM RESET button and wait for blinking to stop.
Appendices NetCommand IR Control Symptom s. Thereisnosoundorpicture fromtheAJVreceiver NetCommand AJVreceiver setupisnotswitching audioandvideo formyDVDplayer orotherdeviceconnected tothe inputsproperly.See'SetuptoControl Automatic AudioandVideo A/V receiver; the A/V receiver should be sending video to the TV over an HDMI cable. (A/V Receiver Switching via HDMI, page 65. .......................................... S for Aud!o ......................................................................
Appendices 91 Mitsubishi TV Software END=USER LICENSE AGREEMENT FOR EMBEDDED SOFTWARE IMPORTANT - READ CAREFULLY: This License Agreement is a legal agreement between you (either an individual or an entity) and Mitsubishi Digital Electronics America, Inc. (MDEA) for all software pre installed and/or provided along with this television ("Software"). By utilizing this television and Software, you agree to be bound by the terms of this License Agreement. The Software and treaties.
Warranty MITSUBISHI LCD FLAT PANEL HDTV LiMiTED WARRANTY MITSUBISHI DIGITAL ELECTRONICS AMERICA, INC. ("MDEA') warrants to the original purchaser of this LCD Flat Panel HDTV that if purchased from an authorized MITSUBISHI Audio/Video Dealer, should it prove defective by reason of improper workmanship and/or material: a. Parts. All parts (except any software incorporated into this HDTV are warranted for a period of one year from the date of the original purchase at retail.
Warranty 93 arising from product installation, removal from or re-installation into custom installations or on wall mountings, or set-ups, any adjustments of user controls (including contrast, brightness, color, tint, fine tuning, sharpness), other adjustment necessary to prepare the unit for display or use, connection with any external audio receiver, antenna, cable or satellite systems, or service of products purchased or serviced outside the U.S.A.
Index index A Adjust Keys (Up/Down/Left/Right) 30, 37 Anamorphic Picture Format 34 Antenna Connecting 24 Signal Strength for Digital Channels 32 Antenna Inputs (ANT 1, ANT 2) 8 Audio Lock (A/V receiver control) 71 AUDIO OUTPUT Jacks 9 Auto Input Sensing 14 Auto-Off (Sleep Timer) 29 Auto-On (Timer) 49 A/V Memory Reset 84 A/V Receiver and TV Speakers 43 and TV's Remote Control 61, 65, 70 Audio Lock 71 Connecting 9, 27 Controlling Sound Volume 16 Disconnecting Analog 16 NetCommand IR Control 55, 59, 61 Co
Index Lock TV Q Bypassing the Lock 67 Lock by Channel 47 Lock by Ratings 53 Lock by Time 54 Lock Control Panel 54 Preset V-Chip Blocking 52 Low Power (Energy Mode) 49 Wired IR option 9 QV Key (QuickView TM) and FAV Key 33 M Media Setup Menu 36 Memorizing Channels 14, 46 Memory Reset, A/V 84 Mute Closed Captions 45 MUTE key 30 Video Mute 39 N Name (Inputs > Name menu) 51 NetCommand for HDMI Devices 7, 70, 81, 83 NetCommand IR Control About 55 A/V Receiver Control 61 Compared to Programming the Remote C
,_ MITSUBiSHI ELECTRIC Website: www.rnitsubishi=tv.corn E-mail: MDEAservice@mdea.corn For questions, call Consumer Relations at 800-332-2119 To order replacement or additional remote controls or Owner's Guides Visit our website www, mitsuparts,com or call 800-553-7278 SYSTEM RESET If the TV does not respond to the remote control, control-panel buttons, or will not power on/off, press the SYSTEM RESET button on the control panel. The green LED will flash quickly for about one minute.