
MXZ-3C24NA3 Service Manual


OPERATING PROCEDURE PHOTOS/FIGURES
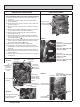
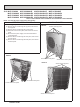
3. Removing the fan motor
(1) Remove the top panel, the service panel, and the front
panel (Refer to section 1).
(2) Disconnect the power supply cord and indoor/outdoor
connecting wires.
(3) Disconnect the connector of CNF1 on the outdoor control
P.C. board.
(4) Remove the propeller fan.
(5) Remove the fan motor.
NOTE: The propeller fan nut is a reverse thread.
4. Removing the compressor and 4-way valve
(1) Remove the top panel, the service panel and the front
panel.
(2) Disconnect the power supply cord and indoor/outdoor
connecting wires, and remove the back panel.
(3) Recover gas from the refrigerant circuit.
NOTE:
Recover gas from the pipes until the pressure gauge
shows 0 PSIG.
(5) Disconnect the compressor lead wire from the terminal of
the compressor (U, V, W).
(6) Disconnect the outdoor control P.C. board connectors:
CNF1, CNTH1, CNTH2, CN63H, CN712, CN713, CN714
(MXZ-C·NAHZ, MXZ-C·NAHZ2, MXZ-C·NAHZ3, MXZ-
C·NAHZ4), CN791, CN792, CN793 (MXZ-5C42NA, MXZ-
3C24/30NAHZ, MXZ-5C42NA2, MXZ-3C24/30NAHZ2,
MXZ-5C42NA3, MXZ-3C24/30NAHZ3, MXZ-5C42NA4,
MXZ-3C24/30NAHZ4), CN794, CN795 (MXZ-5C42NA,
MXZ-5C42NA2, MXZ-5C42NA3, MXZ-5C42NA4)
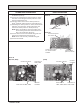
(7) Remove all the screws fixing the electrical parts, and
remove the electrical parts (Photo 4).
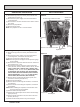
(8) Remove the propeller fan.
(9) Remove all the screws fixing the VB fixture, and remove
the VB fixture.
(
10
) Remove all the screws fixing the separator, and remove
the separator.
NOTE: When installing the separator, insert the tabs of the
heat exchanger into the separator.
(
11
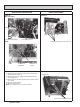
) Remove all the sound proof felts.
(
12
) Detach all the brazed parts of the suction and discharge
pipes (Photo 11).
(
13
) Remove all the compressor nuts, and remove the com-
pressor (Photo 11).
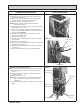
(
14
)
Detach all the brazed parts of 4-way valve and pipes.
152
4-way valve
R.V. coil
Brazed parts
Photo 10
Photo 9
Propeller
fan
Separator
Sound
proof felt
Screws of the outdoor fan motor
Screw of the
VB xture
VB fixture
Screws of the outdoor fan motor
OBH702M