
MHK2 Install Manual


3
1 2
3
Mounting Wall Plate
1. Open package to find the Wall Plate. See Figure 1.
2. Position the Wall Plate on the wall. Level and mark
hole positions. See Figure 2.
Drill holes at marked positions, and then lightly tap
supplied wall anchors into wall using a hammer.
‒ Drill 7/32” holes for drywall.
3. Place the Wall Plate over the wall anchors. Insert and
tighten mounting screws supplied with the Wall Plate.
Do not overtighten. Tighten until the Wall Plate no
longer moves. See Figure 3.
Use 3x supplied
screws #8 1-1/2”
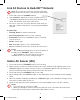
1 Align the Wall Plate with the MHK2 Controller and
push gently until the MHK2 snaps in place.
2 If needed, gently pull to remove the MHK2 Controller
from the Wall Plate.
Note: Avoid locations where there are air drafts
(top of staircase, air outlet), dead air spots
(behind a door), direct sunlight or concealed
chimney or stove pipes.
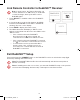
Install Batteries
Insert AA batteries
Mounting MHK2 RedLINK™ Wireless Remote Controller
33-00446EFS_B.indd 3 10/17/2019 3:08:58 PM