
MLZ-KP Installation Manual


En-7
• Forfutureservicing,giveextralengthtotheconnectingwires.
• Donotfoldtheexcesswire,orcramitintosmallspace.Takecautionnottodamagethewires.
• Besuretoattacheachscrewtoitscorrespondentterminalwhensecuringthecordand/orthewiretotheterminalblock.
2-4. CONNECTING WIRES FOR INDOOR UNIT
Note:Theunitshouldbeinstalledbyalicensedcontractor/electrician.Ifrequiredbyapplicablenational,stateandlocalcodes;adisconnectswitchwillneed
tobeinstalledwhentheindoorunitispoweredfromtheoutdoorunit.
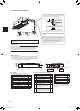
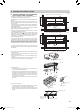
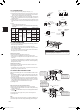
1)Removetheelectricalcover(1).
2)Removetheconduitplate.
3)Attachtheconduitpipetotheconduitplatewiththelocknut.Theindoor/outdoorunitconnectingwire
Dappearingfromtheinsideofconduitpipeshould
belessthan7/8in.(23mm).(Fig.1)
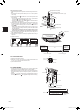
4)Processtheendofgroundwire(Fig.2).Connectittothegroundterminaloftheelectricalpartsbox.
5)Processtheendofindoor/outdoorunitconnectingwire
D(Fig.2).Attachittotheterminalblock.Becarefulnottomakemis-wiring.Attachthewiretothe
terminalblocksecurelysothatitscorecannotbeseen,andnoexternalforceaffectstheconnectingsectionoftheterminalblock.
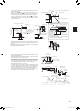
6)Firmlytightentheterminalscrews.Aftertightening,verifythatthewiresaretightlyfastened.
7)Reinstalltheconduitplate.
Fig.1
Lead
wire
9/16in.
(15mm)
Fig.2
Terminalblock
Locknut
Electricalbox
Grounding
terminal
Screw
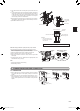
Lessthan7/8in.
(23mm)
Conduitplate
Conduitpipe
Locknut
Conduitplate
Conduitpipe
Electricalcover(1)
Screw
ø
7/8in.
(ø22.2mm)
RG79Y948H01_en.indd 7 2018/01/23 11:41:55