
MLZ-KP Installation Manual


En-9
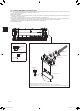
3-3. PIPE CONNECTION
• Incaseofreconnectingtherefrigerantpipesafterdetaching,makethe
aredpartofpipere-fabricated.
• Fastenarenutwithatorquewrenchasspeciedinthetable.
• Whenfastenedtootight,arenutmaybrakeafteralongperiodand
causerefrigerantleakage.
• Besuretowrapinsulationaroundthepiping.Directcontactwiththe
barepipingmayresultinburnsorfrostbite.
Indoor unit connection
Connectbothliquidandgaspipingstoindoorunit.
• Applyathincoatofrefrigerationoilontheseatsurfaceofpipe.
• Forconnection,rstalignthecenter,thentightentherst3to4turns
ofarenut.
• Usetighteningtorquetableaboveasaguidelineforindoorunitside
unionjointsection,andtightenusingtwowrenches.Excessivetightening
damagesthearesection.
Outdoor unit connection
Connectpipestostopvalvepipejointoftheoutdoorunitinthesame
mannerappliedforindoorunit.
• For tightening, use atorque wrenchor spannerand usethe same
tighteningtorqueappliedforindoorunit.
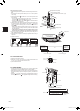
3-2. FLARING WORK
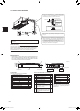
1)Cutthecopperpipecorrectlywithpipecutter.(Fig.1,2)
2)Completelyremoveallburrsfromthecutcrosssectionofpipe.(Fig.3)
• Puttheendofthecopperpipetodownwarddirectionasyouremove
burrsinordertoavoidtoletburrsdropinthepiping.
3)Removearenutsattachedtoindoorandoutdoorunits,thenputthem
onpipehavingcompletedburrremoval.(Notpossibletoputthemon
afteraringwork.)
4)Flaringwork(Fig.4,5).Firmlyholdcopperpipeinthedimensionshown
inthetable.SelectAinch(mm)fromthetableaccordingtothetoolyou
use.
5)Check
• ComparethearedworkwithFig.6.
• Ifareisnotedtobedefective,cutoffthearedsectionanddoaring
workagain.
Copper
pipe
Good
90°
TiltedUnevenBurred
Nogood
Fig.1 Fig.2
Burr
Copperpipe
Sparereamer
Pipecutter
Fig.4Fig.3
Smoothall
around
Evenlength
allaround
Insideisshin-
ingwithoutany
scratches.
Fig.5 Fig.6
A
Flarenut
Die
Copperpipe
Clutchtype
Flaringtool
Wingnuttype
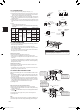
3-4. INSTALLING THE PIPE COVER
Makesuretoinstallthepipecover.Incorrectinstallationresultsinwater
leakage.
• Noinsulationisneededonthepipeconnectingpartoftheindoorside
forthisunit.Thepipecovergathersthewatercondensedaroundthe
pipeconnectingpart.
1)Installthepipebandremovedin3-1.tosecuretheconnectingpipes.
*Thepipebandshouldholddowntheinsulatingmaterialofconnecting
pipe.Insulatingmaterialshouldprotrude3/8in.(10mm)ormorethan
thepipeband,asshownintheillustrationontheright.
2)Installpipecover.
When using pipe with super insulating material
(aboutø1-7/8in.(ø48mm)liquidpipe,ø2in.(ø51mm)gaspipe)
1)Makesurethattheplateisturnedover,andtheconcavepartisfacing
upward.(Referto3-1.)
2)Useband
providedwiththeunit.(Donotusethepipebandattached
totheunit)
3)Connectingpipeexitofpipecoverisprecut.Cutitalongtheline.
4)Installpipecover.
Note:
Install pipecover andpipe bandsecurely. Incomplete installation will
causewatertodripfromtheunit,soakinganddamaginghouseholdgoods.
Insulatingmaterial
shouldprotrude3/8in.
(10mm)ormorethan
theedgeofpipeband
Pipeband
Pipecover
Band
(accessorypart)
Fixingscrew
Cut
Pipecover
Insulatingmaterial
shouldprotrude3/8in.
(10mm)ormorethan
theedgeofpipeband
Insulatingmaterial
shouldprotrude3/8in.
(10mm)ormorethan
theedgeofpipeband
Insulatingmaterial
shouldprotrude3/8in.
(10mm)ormorethan
theedgeofpipeband
Fixingscrew
When installing the unit, securely connect the refrigerant
pipes before starting the compressor.
[When using pipe with super
insulating material]
WARNING
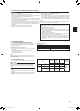
Pipe
diameter
inch(mm)
Binch
(mm)
Ainch(mm) Tighteningtorque
Clutch
typetool
forR410A
Clutch
typetool
forR22
Wingnut
typetool
forR22
ft-lb
(kgf•cm)
N•m
ø1/4
(6.35)
21/32
(17)
0to0.02
(0to0.5)
0.04to
0.06
(1.0to
1.5)
0.06to
0.08
(1.5to2.0)
10to13
(140to180)
13.7to
17.7
ø3/8
(9.52)
7/8
(22)
25to30
(350to420)
34.3to
41.2
ø1/2
(12.7)
1-1/32
(26)
0.08to
0.10
(2.0to2.5)
36to42
(500to575)
49.0to
56.4
ø5/8
(15.88)
1-5/32
(29)
54to58
(750to800)
73.5to
78.4
RG79Y948H01_en.indd 9 2018/01/23 11:41:56