Air-Conditioners SEZ-KD09,KD12,KD15,KD18NA OPERATION MANUAL FOR USER For safe and correct use, please read this operation manual thoroughly before operating the air-conditioner unit. KB79K741H01_cover.pm6 1 08.9.
Contents 1. Safety Precautions ................................................................ 2 2. Parts Names .......................................................................... 2 3. Screen Configuration ............................................................. 4 4. Setting the Day of the Week and Time .................................. 4 5. Operation ............................................................................... 5 6. Timer .....................................................
2. Parts Names ■ Wired Remote-Controller “Sensor” indication Display Section Displayed when the remote controller sensor is used. Day-of-Week For information purposes, all parts of the display are shown as lit. During actual operation, only the relevant items will be lit. Shows the current day of the week. Time/Timer Display “Locked” indicator Shows the current time (the 12 hour clock or the 24 hour clock ), unless the simple or Auto Off timer is set.
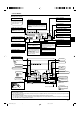
2. Parts Names ■ Outdoor unit Power Refrigerant Pipes Indoor-Outdoor Connection wire Ground 3. Screen Configuration Set Day/Time Function Selection of remote controller TIME SUN A D C Standard Control Screens ˚F˚F ˚F OFF ON B C Timer Monitor Timer Setup MON SUN MON TUE WED THU FRI SAT TIMER OFF B ˚F˚F WEEKLY WEEKLY For details on setting the language for the remote controller display, refer to Section 8: Function Selection. The initial language setting is English.
. Operation 5.1. Description of “AUTO RESTART FUNCTION” • This unit is equipped with the auto restart function. When the main power is turned on, the air conditioner will start operation automatically in the same mode as set with the remote controller before the shutoff of main power. • If the unit was set to off with the remote controller before the shutoff of main power, it will remain stopped even after the main power is turned on.
5. Operation 5.6.1. For Wired Remote-controller ● To run the ventilator together with the indoor unit: ■ Press the ON/OFF button 1. • The Vent indication appears on the screen (at 8). The ventilator will now automatically operate whenever the indoor unit is running. ● To run the ventilator independently: ■ Press the Mode button 2 until cause the ventilator to start. appears on the display. This will ● To change the ventilator force: ■ Press the Ventilation button 8 as necessary.
6. Timer 5. Press the appropriate Set Time button A as necessary to set the desired time (at 5). * As you hold the button down, the time first increments in minute intervals, then in ten-minute intervals, and then in one-hour intervals. 6. Press the ON/OFF button 1 to select the desired operation (ON or OFF), at 6. * Each press changes the next setting, in the following sequence: No display (no setting) → “ON” → “OFF” 7. Press the appropriate Set Temperature button 3 to set the desired temperature (at 7).
6. Timer 7. After completing steps 3 to 6 above, press the Filter in the value. button 4 to lock Note: Your new settings will be cancelled if you press the Mode (Return) button 2 before pressing the Filter button 4.
6. Timer ● Alternatively, turn off the air conditioner itself. The timer value (at 7) will disappear from the screen. 4 5 Timer Setting 7 TIMER AFTER OFF AUTO OFF 1 AUTO OFF 1. Be sure that the “Auto Off” is visible on the screen (at 1). 2. Hold down the Timer Menu button B for 3 seconds, so that “Monitor” is indicated on the screen (at 4). • The timer remaining to shutdown appears at 5. 3.
7. Other Functions 7.2.3. Error Codes indication When the Check button is pressed: If you have entered contact number to be called in the event of a problem, the screen displays this number. (You can set this up under Function Selection of remote controller. For information, refer to section 8.) CALL:XXXX XXX:XXX ERROR CODE ˚F ˚F ON/OFF ON/OFF Error Code ERROR CODE ON/OFF ON lamp (Flashing) Indoor Unit’s Error Code Indoor Unit No.
8. Function Selection [Function selection flowchart] Setting language (English) Normal display (Display when the air condition is not running) Hold down the E button and press the D button for 2 seconds. E Press the operation mode button. G Press the TIMER MENU button. D Press the TIMER ON/OFF button. Hold down the E button and press the D button for 2 seconds. Remote controller function selection mode Item1 G Change Language Item2 Dot display English G Germany E F Spanish TEMP.
8. Function Selection [Detailed setting] [4]–3. Mode selection setting [4]–1. CHANGE LANGUAGE setting The language that appears on the dot display can be selected. • Press the [ MENU] button G to change the language. 1 English (GB), 2 German (D), 3 Spanish (E), 4 Russian (RU), 5 Italian (I), 6 Chinese (CH), 7 French (F), 8 Japanese (JP) Refer to the dot display table. [4]–2. Function limit (1) Operation function limit setting (operation lock) • To switch the setting, press the [ ON/OFF] button D.
8.
8. Function Selection Selecting language English Germany Spanish Russian Italy Chinese French Japanese Contact number setting of error situation Display change Temperature display °C/°F setting Room air temperature display setting Automatic cooling/heating display setting 9. Care and Cleaning ˚F ˚F TEMP. FILTER ON/OFF s Filter removal Caution: • In removing the filter, precautions must be taken to protect your eyes from dust.
10. Troubleshooting Troubleshooting Air conditioner does not heat or cool well. Solution ■ Clean the filter. (Airflow is reduced when the filter is dirty or clogged.) ■ Check the temperature adjustment and adjust the set temperature. ■ Make sure that there is plenty of space around the outdoor unit.
10. Troubleshooting Troubleshooting Operating sound is louder than specifications. Solution ■ The indoor operation sound level is affected by the acoustics of the particular room as shown in the following table and will be higher than the sound specification, which was measured in an echo-free room. High soundLow soundNormal rooms absorbing rooms absorbing rooms Broadcasting Reception room, Location Office, hotel studio, music examples hotel lobby, etc. room room, etc.
11. Installation, relocation and inspection Also consider operation sound • Do not put an object around the air outlet of the outdoor unit. It may cause lowering of capacity or increase operating sound. • If abnormal sound is heard during operation, consult your dealer. Relocation • When the air conditioner is to be removed or reinstalled because of rebuilding, moving, etc., special techniques and work are required. Warning: Repair or relocation should not be done by the customer.
This product is designed and intended for use in the residential, commercial and light-industrial environment. Please be sure to put the contact address/telephone number on this manual before handing it to the customer. HEAD OFFICE: TOKYO BLDG., 2-7-3, MARUNOUCHI, CHIYODA-KU, TOKYO 100-8310, JAPAN KB79K741H01 KB79K741H01_cover.pm6 2 08.8.