Air-Conditioners SEZ-KD09,KD12,KD15,KD18NA OPERATION MANUAL FOR USER For safe and correct use, please read this operation manual thoroughly before operating the air-conditioner unit. MANUEL D’UTILISATION POUR L’UTILISATEUR Pour une utilisation correcte sans risques, veuillez lire le manuel d’utilisation en entier avant de vous servir du climatiseur. KB79K741H01_cover.pm6 1 English 08.9.
Contents 1. Safety Precautions ................................................................ 2 2. Parts Names .......................................................................... 2 3. Screen Configuration ............................................................. 4 4. Setting the Day of the Week and Time .................................. 4 5. Operation ............................................................................... 5 6. Timer .....................................................
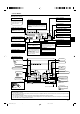
2. Parts Names ■ Wired Remote-Controller “Sensor” indication Display Section Displayed when the remote controller sensor is used. Day-of-Week For information purposes, all parts of the display are shown as lit. During actual operation, only the relevant items will be lit. Shows the current day of the week. Time/Timer Display “Locked” indicator Shows the current time (the 12 hour clock or the 24 hour clock ), unless the simple or Auto Off timer is set.
2. Parts Names ■ Outdoor unit Power Refrigerant Pipes Indoor-Outdoor Connection wire Ground 3. Screen Configuration Set Day/Time Function Selection of remote controller TIME SUN A D C Standard Control Screens ˚F˚F ˚F OFF ON B C Timer Monitor Timer Setup MON SUN MON TUE WED THU FRI SAT TIMER OFF B ˚F˚F WEEKLY WEEKLY For details on setting the language for the remote controller display, refer to Section 8: Function Selection. The initial language setting is English.
. Operation 5.1. Description of “AUTO RESTART FUNCTION” • This unit is equipped with the auto restart function. When the main power is turned on, the air conditioner will start operation automatically in the same mode as set with the remote controller before the shutoff of main power. • If the unit was set to off with the remote controller before the shutoff of main power, it will remain stopped even after the main power is turned on.
5. Operation 5.6.1. For Wired Remote-controller ● To run the ventilator together with the indoor unit: ■ Press the ON/OFF button 1. • The Vent indication appears on the screen (at 8). The ventilator will now automatically operate whenever the indoor unit is running. ● To run the ventilator independently: ■ Press the Mode button 2 until cause the ventilator to start. appears on the display. This will ● To change the ventilator force: ■ Press the Ventilation button 8 as necessary.
6. Timer 5. Press the appropriate Set Time button A as necessary to set the desired time (at 5). * As you hold the button down, the time first increments in minute intervals, then in ten-minute intervals, and then in one-hour intervals. 6. Press the ON/OFF button 1 to select the desired operation (ON or OFF), at 6. * Each press changes the next setting, in the following sequence: No display (no setting) → “ON” → “OFF” 7. Press the appropriate Set Temperature button 3 to set the desired temperature (at 7).
6. Timer 7. After completing steps 3 to 6 above, press the Filter in the value. button 4 to lock Note: Your new settings will be cancelled if you press the Mode (Return) button 2 before pressing the Filter button 4.
6. Timer ● Alternatively, turn off the air conditioner itself. The timer value (at 7) will disappear from the screen. 4 5 Timer Setting 7 TIMER AFTER OFF AUTO OFF 1 AUTO OFF 1. Be sure that the “Auto Off” is visible on the screen (at 1). 2. Hold down the Timer Menu button B for 3 seconds, so that “Monitor” is indicated on the screen (at 4). • The timer remaining to shutdown appears at 5. 3.
7. Other Functions 7.2.3. Error Codes indication When the Check button is pressed: If you have entered contact number to be called in the event of a problem, the screen displays this number. (You can set this up under Function Selection of remote controller. For information, refer to section 8.) CALL:XXXX XXX:XXX ERROR CODE ˚F ˚F ON/OFF ON/OFF Error Code ERROR CODE ON/OFF ON lamp (Flashing) Indoor Unit’s Error Code Indoor Unit No.
8. Function Selection [Function selection flowchart] Setting language (English) Normal display (Display when the air condition is not running) Hold down the E button and press the D button for 2 seconds. E Press the operation mode button. G Press the TIMER MENU button. D Press the TIMER ON/OFF button. Hold down the E button and press the D button for 2 seconds. Remote controller function selection mode Item1 G Change Language Item2 Dot display English G Germany E F Spanish TEMP.
8. Function Selection [Detailed setting] [4]–3. Mode selection setting [4]–1. CHANGE LANGUAGE setting The language that appears on the dot display can be selected. • Press the [ MENU] button G to change the language. 1 English (GB), 2 German (D), 3 Spanish (E), 4 Russian (RU), 5 Italian (I), 6 Chinese (CH), 7 French (F), 8 Japanese (JP) Refer to the dot display table. [4]–2. Function limit (1) Operation function limit setting (operation lock) • To switch the setting, press the [ ON/OFF] button D.
8.
8. Function Selection Selecting language English Germany Spanish Russian Italy Chinese French Japanese Contact number setting of error situation Display change Temperature display °C/°F setting Room air temperature display setting Automatic cooling/heating display setting 9. Care and Cleaning ˚F ˚F TEMP. FILTER ON/OFF s Filter removal Caution: • In removing the filter, precautions must be taken to protect your eyes from dust.
10. Troubleshooting Troubleshooting Air conditioner does not heat or cool well. Solution ■ Clean the filter. (Airflow is reduced when the filter is dirty or clogged.) ■ Check the temperature adjustment and adjust the set temperature. ■ Make sure that there is plenty of space around the outdoor unit.
10. Troubleshooting Troubleshooting Operating sound is louder than specifications. Solution ■ The indoor operation sound level is affected by the acoustics of the particular room as shown in the following table and will be higher than the sound specification, which was measured in an echo-free room. High soundLow soundNormal rooms absorbing rooms absorbing rooms Broadcasting Reception room, Location Office, hotel studio, music examples hotel lobby, etc. room room, etc.
11. Installation, relocation and inspection Also consider operation sound • Do not put an object around the air outlet of the outdoor unit. It may cause lowering of capacity or increase operating sound. • If abnormal sound is heard during operation, consult your dealer. Relocation • When the air conditioner is to be removed or reinstalled because of rebuilding, moving, etc., special techniques and work are required. Warning: Repair or relocation should not be done by the customer.
Index 1. Consignes de sécurité ........................................................ 18 2. Nomenclature ...................................................................... 18 3. Configuration d’écran .......................................................... 20 4. Régler le jour de la semaine et l’heure ............................... 20 5. Fonctionnement .................................................................. 21 6. Minuterie .................................................................
2. Nomenclature ■ Pour la télécommande à fil Témoin “Capteur” Section de l’affichage S’affiche lors de l’utilisation du capteur de la télécommande. Jour de la semaine Pour cette explication, toutes les parties de l’affichage sont montrées allumées. Lors du fonctionnement réel, seuls les éléments correspondants seront allumés. Indique le jour de la semaine.
2. Nomenclature ■ Unité externe Alimentation Tuyaux de réfrigérant Intérieur-Extérieur Câble de raccordement Masse 3.
5. Fonctionnement 5.1. Description de la “FONCTION DE REDEMARRAGE AUTOMATIQUE” • Cet appareil est équipé de la fonction de redémarrage automatique. Lorsqu’il est remis sous tension, le climatiseur se met automatiquement à fonctionner dans le mode demandé par la télécommande au moment de sa mise hors tension. • Si l’appareil avait été éteint par la télécommande avant sa mise hors tension, il reste arrêté même après sa remise sous tension.
5. Fonctionnement 5.6.1. Pour la télécommande à fil ● Pour lancer le ventilateur conjointement à l’unité intérieure: ■ Appuyez sur le bouton ON/OFF 1. • Quand l’indication de ventilation apparaît à l’écran (en 8). Le ventilateur sera désormais lancé automatiquement à chaque fois que l’unité intérieure démarrera. ● Pour faire fonctionner le ventilateur indépendamment : ■ Appuyez sur le bouton Mode 2 jusqu’à ce que Cela lancera le ventilateur. apparaisse à l’affichage.
6. Minuterie 7. Appuyez sur le bouton de réglage de température 3 approprié pour régler la température choisie (en 7). * À chaque fois que vous appuyez vous changez le réglage, selon la séquence suivante : aucun affichage (pas de réglage) ⇔ 76 °F [24 °C] ⇔ 78 °F [25 °C] ⇔ ... ⇔ 84 °F [29 °C] ⇔ 86 °F [30 °C] ⇔ 54 °F [12 °C] ⇔ ... ⇔ 73 °F [23 °C] ⇔ pas d’affichage. (Plage disponible : La plage disponible pour ce réglage va de 54 °F [12 °C] à 86 °F [30 °C].
6. Minuterie 7. Après avoir effectué les étapes 3 à 6, appuyez sur le bouton 4 Filter pour valider ces informations. Remarque : Vos nouvelles informations seront effacées si vous tapez le bouton 2 Mode (Entrée) avant d’appuyer sur le bouton 4 Filter .
6. Minuterie 4 5 Réglage du programmateur ● Sinon, il est possible d’éteindre le conditionneur d’air lui-même. La valeur du programmateur (en 7) disparaîtra de l’écran. 7 TIMER AFTER OFF AUTO OFF 1 AUTO OFF 1. Assurez-vous que l’indication “Arrêt Auto” apparaisse à l’écran (sur 1). 2. Appuyez sur le bouton Menu du programmateur B pendant 3 secondes, de manière à ce que “Moniteur” apparaisse à l’écran (en 4).
7. Autres fonctions 7.2.3. Indication des codes d’erreur Quand on appuie sur le bouton Check : Si vous avez entré un numéro de téléphone à appeler en cas de problème, l’écran affiche ce numéro. (Vous pouvez effectuer ce réglage sous la sélection des fonctions. Pour de plus amples informations, reportez-vous section 8.
8. Sélection des fonctions [Organigramme de sélection des fonctions] Langue par défaut (Anglais) Affichage normal (affichage lorsque le climatiseur ne fonctionne pas) Maintenez la touche E enfoncée et appuyez sur la touche D pendant deux secondes. Maintenez la touche E enfoncée et appuyez sur la touche D pendant deux secondes. E Appuyez sur la touche “operation mode” (mode de fonctionnement). G Appuyez sur la touche “TIMER MENU” (MENU DE LA MINUTERIE).
8. Sélection des fonctions [4]–3. Réglage de la sélection des modes [Réglage détaillé] [4]–1. Réglage CHANGE LANGUAGE (Modification de la langue) La langue d’affichage de l’écran à pixels peut être sélectionnée. • Appuyez sur la touche [ MENU] G pour modifier la langue. 1 Anglais (GB), 2 Allemand (D), 3 Espagnol (E), 4 Russe (RU), 5 Italien (I), 6 Chinois (CH), 7 Français (F), 8 Japonais (JP) Consultez le tableau d’affichage par point. [4]–2.
8.
8. Sélection des fonctions Langue par défaut English Germany Spanish Russian Italy Chinese French Japanese Paramétrage des numéros en situation d’erreur Modification de l’affichage Réglage de l’affichage de la température en °C/°F Réglage de l’affichage de la température de l’air de la pièce Réglage de l’affichage refroidissement/chauffage automatique 9. Entretien et nettoyage s Retrait du filtre ˚F ˚F TEMP. FILTER ON/OFF ■ Affiche qu’il faut nettoyer le filtre. Nettoyez le filtre.
10. Guide de dépannage Guide de dépannage Le climatiseur ne chauffe ni ne refroidit correctement. Solution ■ Nettoyez le filtre. (Le débit d’air est réduit lorsque le filtre est sale ou colmaté.) ■ Contrôlez la température et ajustez la température définie en conséquence. ■ Assurez-vous qu’il y a suffisamment d’espace autour de l’appareil extérieur.
10. Guide de dépannage Guide de dépannage Le bruit de fonctionnement est supérieur aux spécifications. Solution ■ Le niveau sonore du fonctionnement intérieur dépend de l’acoustique de la pièce dans laquelle l’appareil est installé (voir tableau suivant), et sera supérieur aux caractéristiques sonores (mesurées dans une pièce sans écho).
11. Installation, deplacement et inspection Bruit de l’appareil • Ne placez pas d’objet près de la sortie d’air de l’appareil extérieur. Cela pourrait en amoindrir la performance ou augmenter le bruit durant le fonctionnement. • Si un bruit anormal est entendu pendant la marche, veuillez consulter votre concessionnaire. Entsorgung • Quand le climatiseur doit être enlevé ou réinstallé à cause de travaux, d’un déménagement, etc., cela doit être fait par un technicien qualifié.
GB E F E I NL P GR RU TR blank 2 07.11.
GB E F E NL P GR RU TR blank 3 07.11.
This product is designed and intended for use in the residential, commercial and light-industrial environment. Please be sure to put the contact address/telephone number on this manual before handing it to the customer. HEAD OFFICE: TOKYO BLDG., 2-7-3, MARUNOUCHI, CHIYODA-KU, TOKYO 100-8310, JAPAN KB79K741H01 KB79K741H01_cover.pm6 2 08.8.