
MXZ-SM42NAMHZ Installation Manual


11
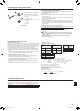
4.4. Refrigerant piping (Fig. 4-8)
Remove the service panel D (three screws) and the front piping cover A (two
screws) and rear piping cover B (two screws).
1 Perform refrigerant piping connections for the indoor/outdoor unit when the
outdoor unit’s stop valve is completely closed.
2 Vacuum-purge air from the indoor unit and the connection piping.
Evacuation
Evacuate with the valve of the outdoor unit closed and evacuate both the connec-
tion piping and the indoor unit from the service port provided on the valve of the
outdoor unit using a vacuum pump. (Always evacuate from the service port of both
liquid pipe and gas pipe.) After the vacuum reaches 650 Pa [abs] [0.0943 psi/5
Torr], continue evacuation for at least one hour or more. Then, stop the vacuum
pump and leave it for 1 hour. Ensure the degree of vacuum has not increased. (If
the degree of vacuum increase is larger than 130 Pa [0.01886 psi/1.0 Torr],
water might have entered. Apply pressure to dry nitrogen gas up to 0.05 MPa
[7.25 psi] and vacuum again.) Finally, seal in with the liquid refrigerant through
the liquid pipe, and adjust the gas piping to obtain an appropriate amount of the
refrigerant during operation.
* Never perform air purging using refrigerant.
3 After connecting the refrigerant pipes, check the connected pipes and the
indoor unit for gas leaks. (Refer to 4.5. Refrigerant pipe airtight testing method)
4 Vacuumize the refrigerant lines through the service port of the liquid and gas
stop valves. And then open the stop valves completely (for both the liquid and
gas stop valves). This will completely connect the refrigerant lines of the indoor
and outdoor units.
• If the stop valves are left closed and the unit is operated, the compressor
and control valves will be damaged.
• Use a leak detector or soapy water to check for gas leaks at the pipe con-
nection sections of the outdoor unit.
• Do not use the refrigerant from the unit to purge air from the refrigerant
lines.
• After the valve work is completed, tighten the valve caps to the correct
torque: 20 to 25 N·m [14 to 18 ft·lbs] (200 to 250 kgf·cm).
Failure to replace and tighten the caps may result in refrigerant leakage. In
addition, do not damage the insides of the valve caps as they act as a seal
to prevent refrigerant leakage.
5 Use sealant to seal the ends of the thermal insulation around the pipe connec-
tion sections to prevent water from entering the thermal insulation.
Refrigerant pipes are protectively wrapped
• The pipes can be protectively wrapped up to a diameter of ø90 mm (3-9/16") before
or after connecting the pipes. Cut out the knockout in the pipe cover following the
groove and wrap the pipes.
Pipe inlet gap
• Use putty or sealant to seal the pipe inlet around the pipes so that no gaps remain.
(If the gaps are not closed, noise may be emitted or water and dust will enter the
unit and breakdown may result.)
Note:
<Triple Evacuation>
• Evacuate the system to 4,000 microns from both service valves. System
manifold gauges must not be used to measure vacuum. A micron gauge
must be used at all times.
-
Break the vacuum with Nitrogen (N2) into the discharge service valve to 0 PSIG.
• Evacuate the system to 1,500 microns from the suction service valve.
-
Break the vacuum with Nitrogen (N2) into the discharge service valve to 0 PSIG.
• Evacuate the system to 500 microns. System must hold the vacuum at 500
microns for a minimum of 1 hour.
• Conduct a rise test for a minimum of 30 minutes.
4.5. Refrigerant pipe airtight testing method
(1) Connect the testing tools.
• Make sure the stop valves A B are closed and do not open them.
• Add pressure to the refrigerant lines through the service port C of the liquid
stop valve A and the gas stop valve B.
(2)Donotaddpressuretothespeciedpressureallatonce;addpressurelittleby
little.
1Pressurizeto0.5MPa[73PSIG],waitveminutes,andmakesurethepres-
sure does not decrease.
2Pressurizeto1.5MPa[218PSIG],waitveminutes,andmakesurethe
pressure does not decrease.
3 Pressurize to 4.15 MPa [601 PSIG] and measure the surrounding tempera-
ture and refrigerant pressure.
(3)Ifthespeciedpressureholdsforaboutonedayanddoesnotdecrease,the
pipes have passed the test and there are no leaks.
• If the surrounding temperature changes by 1°C [1.8°F], the pressure will
change by about 0.01 MPa [1.5 PSIG]. Make the necessary corrections.
(4) If the pressure decreases in steps (2) or (3), there is a gas leak. Look for the
source of the gas leak.
4. Installing the refrigerant piping
Fig. 4-9
Fig. 4-10
Fig. 4-11
A Valve body F Completely closed
B Unit side G Completely open
C Service port H Refrigerant piping side (On-site installation)
D Handle IDirectiontherefrigerantowsin
E Cap J Valve stem
C
(1)
1
2
H
B
A
E
C
F
D
G
B
C
J
I
H
E
(2)
B
C
EA
D
Fig. 4-8
A Front piping cover
B Piping cover
C Stop valve
D Service panel
E Bendradius:100mm-150mm(3-15/16″–5-7/8″)
A Stopvalve<Liquidside>
B Stopvalve<Gasside>
C Service port
D Open/Close section
E Local pipe
F Sealed, same way for gas side
G Pipe cover
H Do not use a wrench here.
Refrigerant leakage may result.
I Use two wrenches here.
A
B
H
I
C
D
E
F
G
C
en
RG79F368H03_01en.indd 11 2021/10/05 17:04:24
012