Back to Index Air-Conditioners INDOOR UNIT D PER L’UTENTE VOOR DE GEBRUIKER FÖR ANVÄNDAREN PARA O UTILIZADOR E F FOR USER FÜR BENUTZER POUR L’UTILISATEUR PARA EL USUARIO GB PEH-P400, 500MYA OPERATION MANUAL BEDIENUNGSHANDBUCH I For safe and correct use, please read this operation manual thoroughly before operating the air-conditioner unit. Zum sicheren und einwandfreien Gebrauch der Klimaanlage dieses Bedienungshandbuch vor Inbetriebnahme gründlich durchlesen.
[Fig. 2.0.1] [Fig. 2.0.2] B C B A A Air outlet B Air inlet C Air filter TEMP. ON/OFF A 3 5 A Wireless remote controller (option) B Remote controller [Fig. 5.0.1] [Fig. 3.0.
Contents 1. Safety precautions ...................................................................................... 1.1. Installation ................................................................................. 1.2. During operation ........................................................................ 1.3. Disposing of the unit .................................................................. 2. Names and functions of various parts ........................................................ 3.
1.2. During operation In case of failure Warning: Caution: • • • • • Do not use any sharp object to push the buttons, as this may damage the remote controller. Do not twist or tug on the remote controller cord as this may damage the remote controller and cause malfunction. Never remove the upper case of the remote controller. It is dangerous to remove the upper case of the remote controller and touch the printed circuit boards inside. Doing so can result in fire and failure.
3. Operation Drying (dehumidifying) mode : Disabled in the heating The drying mode efficiently reduces the humidity in the room so that the room temperature is not lowered excessively. When the selected room temperature is reached in the Low setting, the airflow will stop for ten minutes and then will resume for three minutes to keep the humidity low. How to use the wireless remote controller (option) Replacing the Batteries and how to set the current time [Fig. 3.0.1] (P.
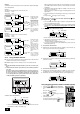
Remote controller-Button 8 1 9 TEMP. 2 MENU 3 BACK Opening the door. ON/OFF MONITOR/SET PAR-21MAA ON/OFF FILTER DAY CHECK TEST OPERATION CLOCK 0 CLEAR A B C 4 GB 1 0 Filter A Test Run button Up B Check button (Clear button) C Airflow Up/Down button Timer Menu button (Monitor/Set button) 3 Mode button (Return button) 4 Set Time buttons Back 5 Timer On/Off button (Set Day button) 6 Louver button ( Operation button) To preceding operation number.
2. When reaching room temperature of your choice B Both the compressor and indoor fan stop. C When stop continues for 10 minutes, the compressor and indoor fan are operated for 3 minutes to keep the humidity low. D 3 B 1 ˚C ˚C C SIMPLE TEMP. ON/OFF 3 2 A 1 MENU 2 BACK PAR-21MAA MONITOR/SET ON/OFF FILTER DAY CLOCK CHECK TEST OPERATION CLEAR For heating Press the 2 [operation mode] button to bring up the “ HEAT” display.
s How to Set the Day of the Week and Time... 3 Day of the Week Setting 2 1. Press the TIME SUN 4 Time Setting Set Time button A to show display 2. or 2. Press the Timer On/Off (Set Day) button 9 to set the day. * Each press advances the day shown at 3 : Sun → Mon → ... → Fri → Sat. 3. Press the appropriate Set Time button A as necessary to set the time. * As you hold the button down, the time (at 4) will increment first in minute intervals, then in ten-minute intervals, and then in one-hour intervals.
Timer Settings SUN TIMER ON OFF ˚C WEEKLY 1 1. Be sure that the weekly timer indicator is visible on the screen (at 1). 2. Press the Timer Menu button B so that “Monitor” is indicated on the screen (at 8). 3. Press the Timer On/Off (Set Day) button 9 as necessary to select the day you wish to view. 4. Press the or Operation button (7 or 8) as necessary to change the timer operation shown on the display (at 9). * Each press will advance to the next timer operation, in order of time setting. 5.
When something other than the Auto Off Timer is displayed, set it to AUTO OFF TIMER using the function selection of remote controller (see Installation Manual). 2. Hold down the Timer Menu button B for 3 seconds, so that the “Set Up” appears on the screen (at 2). (Note that each press of the button toggles the display between “Set Up” and “Monitor”.) 3. Press the appropriate Set Time button A as necessary to set the OFF time (at 3). 4. Press the Filter button 4 to lock in the setting.
It is possible to combine both OFF and ON timers. • ON/OFF button of the remote controller during timer mode to Pressing the stop the unit will cancel the timers. • If the current time has not been set, the timer operation cannot be used. 3.8.2. 3.7. Locking the remote controller buttons (Operation function limit controller) ■ If you wish, you can lock the remote controller buttons. You can use the Function Selection of remote controller to select which type of lock to use.
4. The smart way to use Even minimal steps to care for your air conditioner can help make its use far more effective in terms of air-conditioning effect, electricity charges, etc. Prevent intrusion of heat during air-cooling • Set the right room temperature • In cooling operation, a temperature difference of about 5°C between indoors and outdoors is optimum. • If the room temperature is raised by 1°C during air-cooling operation, about 10% electric power can be saved.
6. Troubleshooting ● “PLEASE WAIT” is displayed in the remote controller. • An automatic startup test is being performed (will last for about two minutes). ● A ticking noise is heard from inside of the unit. • This sound is made when internal parts of the unit expand or contract when the temperature changes. ● An error code is displayed in the remote controller. • A self-diagnostic function is being performed to preserve the air conditioner. * Do not attempt to make repairs yourself.
7. Installation and transferring works, and checking Regarding place for installation Consult with your dealer for details on installation and transferring the installation. Regarding transfer of installation • Caution: Never install the air conditioner where there is a risk of leakage of flammable gas. If gas leaks and accumulates around the unit, fire can result. GB Caution: When moving or reinstalling the air conditioner, consult with your dealer.
This product is designed and intended for use in the residential, commercial and light-industrial environment. The product at hand is based on the following EU regulations: • • Low Voltage Directive 73/23/EEC Electromagnetic Compatibility Directive 89/ 336/EEC Please be sure to put the contact address/telephone number on this manual before handing it to the customer. HEAD OFFICE: MITSUBISHI DENKI BLDG.