
Indoor Service Manual


21
OCH640D
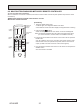
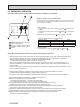
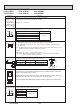
[Procedure]
1. Press the CHECK button twice.
• "CHECK" lights, and refrigerant address "00" blinks.
• Check that the remote controller's display has stopped before continuing.
2.
Press the TEMP
buttons.
• Select the refrigerant address of the indoor unit for the self-diagnosis.
Note: Set refrigerant address using the outdoor unit’s DIP switch (SW1).
(For more information, see the outdoor unit installation manual.)
3. Point the remote controller at the sensor on the indoor unit and press the
HOUR button.
• If an air conditioner error occurs, the indoor unit's sensor emits an inter-
mittent buzzer sound, the operation lamp blinks, and the check code is
output. (It takes 3 seconds at most for check code to appear.)
4. Point the remote controller at the sensor on the indoor unit and press the
ON/OFF button.
• The check mode is cancelled.
ON/OFF
TEMP
FAN
VANE
MODE
CHECK
LOUVER
TEST RUN
AUTO STOP
AUTO START
h
min
RESET
SET
CLOCK
CHECK
CHECK
display
Temperature
button
CHECK
button
Refrigerant
address
display
HOUR
button
ON/OFF
button
<Malfunction-diagnosis method at maintenance service>
9-2. MALFUNCTION-DIAGNOSIS METHOD BY REMOTE CONTROLLER
<In case of trouble during operation>
When a malfunction occurs to air conditioner, both indoor unit and outdoor unit will stop and operation lamp blinks to inform
unusual stop.
■IR wireless remote controller
Continue to the next page