
Engineering Manual
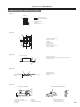

Wired Remote Controller
PAR-32MAA
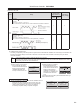
Table1. Function setting options
(4) LOSSNAY setting (City Multi only)
This setting is required only when the operation of City Multi units is interlocked with LOSSNAY units. This setting is not available for the
Mr. Slim units. Interlock settings can be made for the indoor unit to which the remote controller is connected. (They can also be
confirmed or deleted.)
[3] Use the F1 or F2 button to move
the cursor to select the mode
number, and change the setting
number with the F3 or F4 button.
[4] When the settings are completed,
press the SELECT button to send
the setting data from the remote
controller to the indoor units.
[5] When the transmission is
successfully completed, the screen
will return to the Function setting
screen.
Individual items
(Unit No. 1 through 4)
Note:
• Make the above settings on Mr. Slim units as necessary.
• Refer to the Instructions Book when it is necessary to set the settings for City Multi units.
• Table 1 summarizes the setting options for each mode number. Refer to the indoor unit Installation Manual for the
detailed information about initial settings, mode numbers,
and setting numbers for the indoor units.
• Be sure to write down the settings for all functions if any of the initial settings has been changed after the completion of
installation work.
Mode No. Mode Settings Setting No. Unit numbers
01 Automatic recovery after power failure Disable 1
Set "Grp." for the Unit number.
These settings apply to all the connected
indoor units.
Enable (Four minutes of standby time is required after the restoration of power.) 2
02
Thermistor selection
(indoor temperature detection)
Average temperatu
re reading of the indoor units in operation 1
Thermistor on the indoor unit to which the remote controller is connected (fixed) 2
Built-in sensor on the remote controller 3
03 LOSSNAY connection Not connected 1
Connected (without outdoor air intake by the indoor units ) 2
Connected (with outdoor air intake by the indoor units ) 3
04 Power voltage 240 V 1
220 V, 230 V 2
05 AUTO mode Enable (Automatically the unit achieves effective energy saving operation.) 1
Disable 2
07 Filter sign 10
0 hours 1
Set "1, 2, 3, 4, or All" for the Unit number.
These settings apply to each indoor unit.
• If "1, 2, 3, or 4" is set for the Unit number,
the settings apply only to the specified
indoor unit regardless of the number of
connected indoor units (one through four
units).
•
If "ALL" is set for the Unit number, the
settings apply to all the connected indoor
units regardless of the number of
connected indoor units (one through four
units).
2500 hours 2
Not displayed 3
08 Fan speed Silent mode (or standard) 1
Standard (or Hig
h ceiling 1) 2
High ceiling (or High ceiling 2) 3
09 Outlet 4 directional 1
3 directional 2
2 directional 3
10 Optional parts No 1
(High-efficiency filter) Yes 2
11 Vane No vanes (or the vane setting No.3 is effective.) 1
Equipped with vanes (The vane setting No.1 is effective.) 2
Equipped with vanes (The vane setting No.2 is effective.) 3
Note:
• Use the centralized controller to make the settings if it is connected.
• To interlock the operation of the indoor units with the LOSSNAY units, be sure to interlock the addresses of ALL indoor
units in the group and that of the LOSSNAY unit.
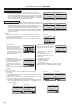
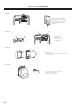
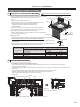
[Button operation]
[1] When "Lossnay" on the Service
menu is selected, the remote
controller will automatically begin
searching for the registered
LOSSNAY addresses of the
currently connected indoor unit.
[2] When the search is completed,
the smallest address of the
indoor units that are connected
to the remote controller and the
address of the interlocked
LOSSNAY unit will appear. "--"
will appear if no LOSSNAY unit
i
s interlocked with the indoor
units.
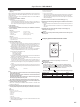
If no settings need to be made, press the RETURN button to go
back to the Service menu.
To make LOSSNAY interlock setting
[3] Enter the addresses of the indoor unit and the LOSSNAY unit to be
interlocked, with the F1 through F4 buttons, select "Set" in the
"Function", and press the SELECT button to save the settings.
"Sending data" will appear on the screen. If the setting is
successfully completed, "Setting completed" will appear.
Function setting
Cursor Cursor
Request:
Ref. address
Mode 7
Mode 8
Mode 9
Mode11
Unt # 1
Lossnay
IU address
Lossnay address
Collecting data
Lossnay
Cursor Address
Select:
IU address
Lossnay address
Function Set/Conf/Del.
LossnayLossnay
Return:
IU address
Lossnay address
IU address
Lossnay address
Sending data Setting completed
Function setting
Ref. address
Sending data
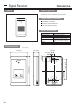
PEAD-AA4, PEA, SEZ
Function
Setting
Mode No.
( )RF thermostat
setup function No.
Initial setting
(Factorysetting)
23
(123)
11
(111)
Heater
control
Heater OFF
Inlet air temp.
set temp
Heater ON
Inlet air temp.< set temp - 4.5°F(2.5°C)
•The fan will stop and the heater will turn off when [DEFROST] or [ERROR] is displayed.
1 - ●
Heater OFF
Inlet air temp.
set temp
Heater ON
Inlet air temp.< set temp - 4.5°F(2.5°C)
•The fan will drive and the heater will turn off when [DEFROST] is displayed.
2 -
221