
Engineering Manual


How to Use / How to Install
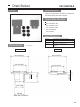
Centralized Drain Pan PAC-SG63DP-E
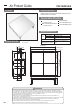
(1) When installing on installation frame
1) The installation frame must have structure and strength that can sufficiently
support the outdoor unit and drain pan. Securely install the outdoor unit and drain
pan so that they cannot fall or drop as a result of earthquake, strong wind, etc.
2) The drain socket of drain pan is at the center in the longitudinal direction.
When constructing the installation frame, be careful that no part of the frame
interferes with the socket.
3) The drain pan is tightened with the outdoor unit. Punch approx.
φ
13 holes in the
installation frame at pitches to install the outdoor unit.
4) Fix the frame, drain pan and outdoor unit together to join them firmly (at the 4 points).
The bolt length must be no more than 60 mm.
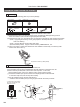
(2) When installing on foundation
●Since concentrated drain disposal is necessary, make the foundation at least 150 mm high measured
from the ground as shown in the figure below.
If it is less than 150 mm, drain piping will not be possible because the drain socket protrudes 48 mm.
1
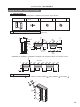
Installation Method
(1) When connecting steel pipe:
Connect 3/4B internally threaded pipe.
(2) When connecting vinyl pipe (soft):
Use a
φ
25 mm internal dia. pipe, and fix the connected
section with a hose band, etc.
(3) When connecting PVC pipe (hard):
Use VP-20 and connect with a joint for PVC pipe.
※In all cases, seal the socket threaded section securely
with a seal tape, etc., and make sure that water does not leak.
2
Drain Piping
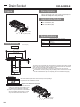
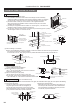
●
The refrigerant pipe can be laid in from four directions: front, right, rear and bottom. When laying, be sure to perform the following:
(1) Piping from the bottom:
Cut out the rubber bush to match the thickness of
refrigerant pipe insulator. Pass the refrigerant pie
through the rubber bush and fit it into the burring hole.
Seal it with adhesive that is equivalent to Cemedyne 366
(to be procured at local site) to prevent water leak.
3
Refrigerant Piping
(2)Piping from other directions:
Block the burring hole of the bottom piping section in
the drain pan with rubber bush. Seal it with adhesive
that is equivalent to Cemedyne 366 (to be procured
at local site) to prevent water leak.
Installation
Drain socket
(must be at the rear
of outdoor unit)
Reinforce members
equally at the positions
on the left and right.
Reinforcing member at the center is unacceptable
since it will hit the drain socket.
Height of
drain pan
Drain pan
Frame
30
18 or less
Double nuts
(to be procured at local site)
Washer
(to be procured at local site)
Outdoor unit installation
support
Drain pan
Frame
(to be constructed at local site)
M10x50 bolt
(to be procured at local site)
Foundation bolt
(M10, 48 mm long or less)
150 or more
150 or more
Front of outdoor unit Rear of outdoor unit
Drain pan
Foundation
Elbow
Socket
length
48
48
3/4B (20A)
external thread
φ27.2
Vinyl pipe
(to be procured at
local site)with φ25
internal dia.
Hose band
(to be procured
at local site)
Securely seal with seal tape.
Lay the drain pipe so that it slants at least
1/100 downward.
PVC pipe (VP-20)
Cut out to match the
thickness of insulator
Rubber bush
Refrigerant pipe
Insulator
Seal
Seal
Drain pan
Drain pan
Burring hole
Burring hole
Rubber bush
Joint for PVC pipe
(to be procured at
local site)
Adherence
(to be procured at
local site)
Outdoor unit
Drain pan
Frame
(to be constructed
at local site)
Passage
※For PAC-SG64DP-E only
300