
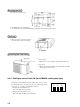
Specifications


152
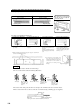
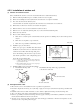
5) Connecting the drain pipes
a) Insert the drain hose as far as possible through the lower section of the side of the unit, and secure it with clamps.
b) The drain pipes should be set in a downward slope (over 1/100), and it should not have any bumps or traps along its
route.
c) The indoor drain pipes must be insulated.
6) Securing the wireless receiver
Note (1) Conduct the installation correctly, and ensure
that the water is draining correctly. It may lead
to water leaks.
a) With a (–) screwdriver, secure the installation frame to the grooves on either sides of the wireless receiver.
b) Refer to the installation Instructions for each separately sold part, regarding the installing location of the wireless
receiver.
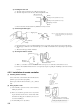
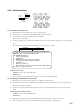
4.5.2 Installation of remote controller
(1) Mounting method of battery
Uncover the remote control switch, and mount the batteries
(UM-4 × 2 pieces) in the body regularly.
(Fit the poles with the indication marks, , & . without
fail)
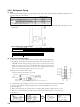
(2) Fixing to pillar or wall
(a) Conventionally, operate the remote control switch by
holding in your hand.
(b) In the case of stationary operation service as by mount-
ing on the holder for the remote control switch, make
sure that the locating place is satisfactory for access ser-
vice before installing it.
(c) Avoid installing it on a clay wall etc.
Tapping screw
Drain hose
Bumps
Traps
Opposite
Clamp
Wireless receiver
Installation frame
Flat head
machine screw
Holder (remote control switch)
Adjust the installation to vertical attitude.
Avoid projecting the screw head.
Wood screw
ø3.5 × 16
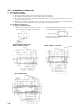
4) Installing the main unit
a) Attach the washers and nuts to the ceiling suspension bolts.
b) Attach the suspension tool to the above nuts, and tighten the nuts.
c) If it is not leveled, the float switch may malfunction or may not start.
M8 nut
M8 spring lock washer
M8 large washer (standard accessory)
M8 large washer (standard accessory)
M8 nut
M8 suspension bolt
Main frame
Cover
Battery