ENGLISH ESPAÑOL ITALIANO DEUTSCH FRANÇAIS LCD Projector User Manual SL1 MODEL SL1U EN – 1
CAUTION RISK OF ELECTRIC SHOCK DO NOT OPEN CAUTION: TO REDUCE THE RISK OF ELECTRIC SHOCK, DO NOT REMOVE COVER (OR BACK) NO USER-SERVICEABLE PARTS INSIDE REFER SERVICING TO QUALIFIED SERVICE PERSONNEL. The lightning flash with arrowhead symbol, within an equilateral triangle, is intended to alert the user to the presence of uninsulated “dangerous voltage” within the product’s enclosure that may be of sufficient magnitude to constitute a risk of electric shock.
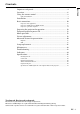
ENGLISH Contents Important safeguards ...........................................................................4 Overview ............................................................................................... 6 Using the remote control ......................................................................8 Battery installation ......................................................................................................... 8 Installation .................................................
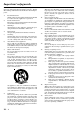
Important safeguards Please read all these instructions regarding your LCD projector and retain them for future reference. Follow all warnings and instructions marked on the LCD projector. 1. Read instructions All the safety and operating instructions should be read before the appliance is operated. 2. Retain instructions The safety and operating instructions should be retained for future reference. 3. Warnings All warnings on the appliance and in the operating instructions should be adhered to. 4.
Do not operate if smoke, strange noise or odor comes out of your projector. It might cause fire or electric shock. In this case, unplug immediately and contact your dealer. Never remove the cabinet. Do not touch Air outlet grille and Bottom plate which becomes hot. Do not touch them or put other equipment in front of Air outlet grille. The heated Air outlet grille and Bottom plate may cause injury or damage to other equipment. Also, do not set the projector on the desk which is easily affected by heat.
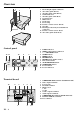
Overview 11 10 9 5 8 1 2 3 4 5 6 7 8 9 10 11 12 Front height adjuster buttons Air outlet grille (Front) Air inlet grille (Side-Front) Terminal board Air inlet grille (Side-Rear) Control panel IRIS sensor Zoom ring Focus ring Remote control sensor (Front) Speaker Kensington Security Lock Standard connector 13 Remote control sensor (Rear) 14 Air outlet grille (Side-Rear) 6 7 4 2 3 1 13 12 14 Control panel 12 11 LAMP VOLUME 2 9 COMPUTER AUTO POSITION MUTE 3 8 7 MENU ENTER 5 6 SOURCE
2 1 2 Lamp cover Adjustment foot Caution: Do not replace the lamp right after using the projector. The lamp is very hot.
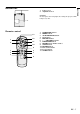
Using the remote control Battery installation Use two AAA size batteries. 1. Remove the back cover of the remote control by pushing the battery compartment door in the direction of the arrow. 2. Load the batteries making sure that they are positioned correctly (+ to +, and - to -). • Load the batteries from - spring side, and make sure to set them tightly. 3. Replace the back cover. 1 2 3 Important: • Do not combine a new battery with an old one. • Load batteries in the correct position.
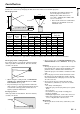
Installation Height Picture size can be set by changing the distance between the screen and the projector. Front projection To find the approximate distance between the projector and screen: Width Screen Multiply the width of the screen A B x 1.8 (min.) , Multiply the width of the screen x 2.2 (max.). Screen • Refer to the chart for recommended distances in maximum zoom and A=B minimum zoom.
Basic connections This projector can be connected to equipment such as PC, VCRs, video cameras and DVD players. Important: • Make sure that your equipment is turned off before connection. • Plug in firmly and unplug by holding the plug, not by pulling the AC power cord. • If connected units are set too close to one another, the image may be affected. • Refer to the user manual of each component for details of connections.
ENGLISH Projector + Personal computer RGB cable for PC to COMPUTER IN computer S-VIDEO RS-232C MAIN L COMPUTER IN R VIDEO AUDIO IN VIDEO IN AC IN COMPUTER OUT to monitor port to COMPUTER OUT to AUDIO IN PC audio cable (option) to PC audio output AUDIO OUT MONITOR OUTPUT RGB cable for PC (option) When outputting to both a PC monitor and the projector. Important: • When you use a long RGB cable instead of the cable provided, the picture quality may be deteriorated.
Preparing the projector for operation Getting ready for projection Adjusting the angle of projection 1. Connect the power cord provided to the projector. 2. Connect the power cord to the wall power outlet. 3. Remove the lens cap. For the best result, project onto a flat screen with a 90 degree angle to the floor. If necessary, tilt the projector by adjusting two foot adjustments on the bottom of the projector. Warning: • Do not look directly into the lens when projector is “ON”.
ENGLISH To operate projector power ON 2•9 S-VIDEO RS-232C MAIN L COMPUTER IN R VIDEO AUDIO IN VIDEO IN AC IN COMPUTER OUT 4 POWER V 3•7•8 4 COMPUTER LAMP C VOLUME VIDEO COMPUTER AUTO POSITION button MUTE button AUTO POSITION MUTE MENU ENTER SOURCE 3•7•8 MENU ENTER AUTO POSITION button AUTO POSITION 16:9 STILL MUTE MUTE button EXPAND KEYSTONE VOLUME TEMP VIDEO 1. Turn on the equipment connected to the projector. 2.
To operate projector power ON (Continue) Turning off the projector 7. Press the POWER button. The message “POWER OFF? YES : PRESS AGAIN” appears on the screen. • To exit from this mode, press any button except POWER, STILL and VOLUME + and - buttons. 8. Press the POWER button again. The light source lamp will be turned off. Pressing the POWER button second time will shut off the light source lamp, but the exhaust fan continues to operate for 60 seconds to cool down the light source lamp and LCD panels.
Menu operation CONTRAST BRIGHTNESS sRGB COLOR MATRIX *1 COLOR TEMP. COLOR TINT SHARPNESS INSTALLATION *2 IRIS KEYSTONE AUTO POWER ON AUTO POWER OFF SPLASH SCREEN BACK COLOR LAMP MODE IMAGE REVERSE FEATURE MENU POSITION EXPAND MODE AUDIO MODE VIDEO SIGNAL ANAMORPHIC LANGUAGE RESET ALL SIGNAL MEMORY CALL HORIZ.POSITION VERT.POSITION FINE SYNC.
Menu operation (continued) 1 IMAGE opt. CONTRAST ......... Adjusts the picture contrast. The contrast becomes higher as the XGA60 number increases. BRIGHTNESS ..... Adjusts the image brightness. The image becomes brighter as IMAGE CONTRAST 0 the number increases. BRIGHTNESS 0 sRGB .................... Select ON to display an image emphasizing on the color reproducibility. OFF sRGB • When sRGB is ON, COLOR MATRIX, can’t be adjusted. COMPUTER COLOR MATRIX • When sRGB is ON, the image will become darker.
4 SIGNAL MEMORY CALL ........ Use to select AUTO, USER 1 or USER 2. See below. HORIZ. POSITION .... Use to adjust the horizontal position of the image. VERT. POSITION ..... Use to adjust the vertical position of the image. FINE SYNC. ....... Use to synchronize the projector with PC input signals so that the image is not blurred. TRACKING ......... Use to avoid image noise such as wide stripes. COMPUTER INPUT ....
Picture adjustment Adjusting the image 6. Repeat steps 4 and 5 for more adjustments. You can adjust the picture by using the IMAGE menu. opt. XGA60 • When using the setting which has been already prepared, select desired position VIDEO or COMPUTER in step 2. When the source is selected to VIDEO or S-VIDEO, VIDEO will be selected automatically. When the source is selected to COMPUTER, COMPUTER will be selected automatically. • When not using Color matrix adjustment, select OFF in step 2.
Although this projector sets proper signal systems automatically for the image signal from personal computers, it cannot be applied to some of personal computers. In this case, press the AUTO POSITION button. If the images are still not projected correctly, use the MENU display to adjust the projected images. opt. XGA60 SIGNAL MEMORY CALL A U AUTO HORIZ. POSITION 0 VERT. POSITION 0 FINE SYNC.
Advanced features for presentation Expand Still By pressing the EXPAND button on the remote control, you can magnify the detailed image of the picture. How to stop the picture temporarily (still picture). 1. Press the STILL button on the remote control. The picture will be freezed temporary. Using the Expand mode 1. Press the EXPAND button. • You can magnify different areas of the active picture by pressing the {, }, $, % button.
The lamp is designed to project the image on the LCD panels. When the lamp no longer functions, replace it with a new one. 7. Put the handle back to the holding point. • Make sure that the handle is locked. Caution: • Do not remove the lamp immediately after turning off the lamp of the projector, you may get burned because of the high temperature of the lamp. • For lamp replacement, press the power button to power off, then wait for 60 seconds in stand-by mode to allow the lamp and LCD panels to cool.
Maintenance Caution: Be sure to turn off the projector and unplug the power cord from the wall outlet before you perform any maintenance on the projector. Cleaning the air-filter Clean the air-filter frequently. If the filter or ventilation grille become clogged with dirt or dust, the temperature inside the projector may rise and shut off the power (the TEMP indicator starts to blink red). 1. To remove the filter cover, press the ridged area gently, push the cover in the direction of the arrow and lift. 2.
The following offers solutions to some of the common problems you may encounter. We suggest that you consult this chart before contacting your dealer. PROBLEMS The power is off. CAUSE • The air inlet grille, outlet grille or air filter is clogged with dust or some objects. POWER indicator does not light up. • Power cord is unplugged from the outlet. • Power cord is disconnected from the projector. • The main switch is turned off. • The lamp lid is open. POWER indicator blinks red.
Indicators The projector has three LED Indicators which shows the working condition of the projector. The following offers solutions to possible problems. If a problem persists, turn the projector off and consult your dealer.
Specifications LCD projector ENGLISH Type Model Rated power supply Rated input LCD panels SL1U AC100V - 240V, 50 / 60Hz 2.3 A 0.7-inch LCD panel: 3 pieces (for R, G, B) Pixels 800 × 600 = 480,000 pixels Total 1,440,000 pixels Active pixel rate: 99.99 % or more (each panel) Colors Projection lens Light source lamp Picture size PC compatibility 16,770,000 colors F 1.9 - 2.2 f = 27.0 mm - 32.
Specifications (continued) Connectors PC analog RGB input Use to input video signals (analog RGB) of a personal computer. 5 12 1 10 RS-232C input 6 15 11 (Pin assignment of Mini D-SUB 15P jack) Use to control the projector with the personal computer. Use the provided RS- 3 5 232C cable (Mini DIN 8P-D-SUB 9P) for the connection. 6 8 PIN NO. SPEC PIN NO. SPEC PIN NO.
Signal mode resolution (H x V) horizontal frequency (kHz) Vertical frequency (Hz) Normal mode (H x V) Real mode (H x V) TV60 – 15.73 59.94 800 x 600 – TV50 – 15.63 50.00 800 x 600 – 1080i – 33.75 60.00 800 x 450 – 720p – 45.00 60.00 800 x 450 – PC98 640 x 400 24.82 56.42 800 x 500 640 x 400 CGA70 640 x 400 31.47 70.09 800 x 500 640 x 400 CGA84 640 x 400 37.86 84.14 800 x 500 640 x 400 CGA85 640 x 400 37.86 85.08 800 x 500 640 x 400 VGA60 640 x 480 31.
Manufactured by Mitsubishi Electric Corporation 1 Zusho Baba, Nagaokakyo-City, Kyoto Japan 871D341A60 Printed in Japan
LCD Projector XL1U SL1U Control projector by using a personal computer This projector can be controlled by connecting a personal computer with RS-232C terminal.
3) Control sequence (1) Send the command from a personal computer to the projector. (The commands must be sent at least 400ms apart.) (2) The projector will send a return command 400ms* after it has received an end code. If the command is not received correctly, the projector will not send the return command. (3) The personal computer checks the command and confirms if the command which has been sent has been executed or not. (4) This projector sends various codes other than the return code.
6) Remote commands Some remote control operations can be done by remote command codes. Button's name on remote + VOLUME – VOLUME KEYSTONE EXPAND MUTE { } $ % MENU ENTER AUTO POSITION STILL ASCII r06 r07 r43 r02 ra6 r53 r2b r4f r59 r54 r10 r09 ra4 HEX 72h 72h 72h 72h 72h 72h 72h 72h 72h 72h 72h 72h 72h 30h 30h 34h 30h 61h 35h 32h 34h 35h 35h 31h 30h 61h 36h 37h 33h 32h 36h 33h 62h 66h 39h 34h 30h 39h 34h [Example] Display MENU selection bar.
ITEM SPLASH SCREEN BACK COLOR LAMP MODE IMAGE REVERSE MENU POSITION EXPAND MODE AUDIO MODE VIDEO SIGNAL ASCII SS BB LM IR MP EX AU VS HEX 53h 42h 4Ch 49h 4Dh 45h 41h 56h 53h 42h 4Dh 52h 50h 58h 55h 53h ANAMORPHIC LANGUAGE SC LG 53h 4Ch 43h 47h RESET ALL MEMORY CALL HORIZ. POSITION VERT. POSITION FINE SYNC. TRACKING COMPUTER INPUT HOLD HOLD BEGIN HOLD END CLAMP POSITION CLAMP WIDTH HORIZ. PIXELS VERT LINES VERT.