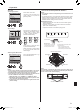
SPLIT-SYSTEM HEAT PUMP SLZ-KF09, KF12, KF15, KF18NA OPERATION MANUAL FOR USER For safe and correct use, please read this operation manual thoroughly before operating the air-conditioner unit. MANUEL D’UTILISATION POUR L’UTILISATEUR Pour une utilisation correcte sans risques, veuillez lire le manuel d’utilisation en entier avant de vous servir du climatiseur.
Contents 1. Safety Precautions .................................................................2 2. Parts Names ...........................................................................3 3. Operation ...............................................................................6 4. Timer.....................................................................................13 5. Care and Cleaning................................................................14 6.
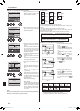
2. Parts Names ■ Indoor Unit Fan steps Vane Louver Filter Filter cleaning indication Wireless remote controller model No. setting SLZ-KF·NA 3 steps Auto with swing – Long-life 2,500 hr 002 ■ SLZ-KF·NA 4-way Ceiling Cassette Filter Vane Air outlet Air intake ■ Wired Remote Controller Controller interface 5 The functions of the function buttons change depending on the screen. Refer to the button function guide that appears at the bottom of the LCD for the functions they serve on a given screen.
2. Parts Names Display The main display can be displayed in two different modes: “Full” and “Basic”. The factory setting is “Full”. To switch to the “Basic” mode, change the setting on the Main display setting. (Refer to operation manual included with remote controller.) * All icons are displayed for explanation. 2345 6 8 2 9 Fri 6 Fri 3 3 ) 7 Room 83 F 8 9 0 Set temp. Cool 1 ! 7 83 F 1 Mode Cool 4 Temp. @ 1 Mode Fan Set temp. 83 4 F Temp.
2.
2. Parts Names Notes (Only for wireless remote controller): ■ When using the wireless remote controller, point it towards the receiver on the indoor unit. ■ If the remote controller is operated within approximately 2 minutes after power is supplied to the indoor unit, the indoor unit may beep twice as the unit is performing the initial automatic check. ■ The indoor unit beeps to confirm that the signal transmitted from the remote controller has been received.
3. Operation ■ Operation status memory Remote controller setting Operation mode Operation mode before the power was turned off Preset temperature Preset temperature before the power was turned off Fan speed Fan speed before the power was turned off ■ Settable preset temperature range Operation mode Preset temperature range Cool/Dry 19 – 30 °C, 67 – 87 °F Heat 17 – 28 °C, 63 – 83 °F Auto 19 – 28 °C, 67 – 83 °F Fan/Ventilation Not settable 3.2. Mode Selection Fri Room 83 F Cool Set temp.
3. Operation 3.4. Fan speed setting Room 83 F Cool Set temp. Mode Temp. 83 F F1 F2 Fan F3 page Main Main menu Vane·Louver·Vent. (Lossnay) High power Timer Weekly timer OU silent mode Main display: Cursor Page Fri F1 F4 Press the [F4] button to go through the fan speeds in the following order. Auto F2 F3 Press [F3] to go to the previous page. Press [F4] to go to the next page.
3. Operation 3.5.2 Vane < How to set the fixed up/down air direction > Select "Vane·Louver·Vent. (Lossnay)" from the Main menu (refer to page 8), and press the [SELECT] button. Main Main menu Vane·Louver·Vent. (Lossnay) High power Timer Weekly timer OU silent mode Main display: Cursor F1 F2 Page F3 F4 Notes: ● This function cannot be set depending on the outdoor unit to be connected. • For SLZ-KF.
3. Operation ■ Manual vane angle (Wired remote controller) 1 Select “Maintenance” from the Main menu (refer to page 8), and press the [SELECT] button. Main Main menu Maintenance Initial setting Service Main display: Cursor F1 F3 F4 2 Select “Manual vane angle” with the [F1] or [F2] button, and press the [SELECT] button. Maintenance menu Auto descending panel Manual vane angle 3D i-See sensor Main menu: Cursor F3 F4 Manual vane angle Ref. address Unit No.
3. Operation ■ Confirmation procedure Manual vane angle Ref. address Unit No. Identify unit Check button Input display: Cur. Address Check F1 F2 F3 F4 Manual vane angle Ref. address Unit No. Function setting for unit with vane fully open. Return: F1 F2 F3 F4 Manual vane angle No communication Check Unit state. Return: F1 F2 F3 F4 1 First, confirm by setting “Ref. address” to 0 and “Unit No.” to 1. • Move the cursor to “Ref. address” or “Unit No.” with the [F1] button to select.
3. Operation 3 When Direct/Indirect is selected, set each air outlet. Select the air outlet with the [F1] or [F2] button, and change the setting with the [F4] button. After changing the settings for all of the air outlets, press the [SELECT] button to save the settings. * In order to enable this function, the airflow direction must be set to “Auto”.
3. Operation 3.6.4 Seasonal airflow function 1 Select the setting with the [F4] button. OFF → Cooling only → Heating only → Cooling/Heating → OFF… Seasonal airflow Seasonal airflow Cooling/Heating Select: F1 After changing the setting, press the [SELECT] button to save the setting. F2 F3 F4 OFF: The function is disabled. Cooling only: When the thermostat turns off during cooling mode, the vanes move up and down.
5. Care and Cleaning ■ Filter information Fri Cool Room 83 F Set temp. 83 F Mode Temp. Auto Fan F2 F3 Press the [F4] button to reset filter sign. Please clean the filter. Press Reset button after filter cleaning. F1 Reset F2 F3 F4 Select "OK" with the [F4] button. Filter information F1 F2 F3 OK F4 A confirmation screen will appear. Filter information Navigating through the screens • To go back to the Main menu .......................
6. Emergency Operation for Wireless Remote-controller When the remote controller cannot be used When the batteries of the remote controller run out or the remote controller malfunctions, the emergency operation can be done using the emergency buttons on the grille. A DEFROST/STAND BY lamp B Operation lamp C Emergency operation cooling switch D Emergency operation heating switch E Receiver Starting operation • To operate the cooling mode, press the button C for more than 2 seconds.
7. Trouble Shooting Having trouble? Air conditioner operates without the ON/OFF button being pressed. Air conditioner stops without the ON/OFF button being pressed. Remote controller timer operation cannot be set. “PLEASE WAIT” appears in the remote controller display. An error code appears in the remote controller display. Draining water or motor rotation sound is heard. The vanes do not move or the indoor unit does not respond to input from the wireless remote controller.
8. Installation, relocation and inspection Warning: If the air conditioner operates but does not cool or heat (depending on model) the room, consult your dealer since there may be a refrigerant leak. Be sure to ask the service representative whether there is refrigerant leakage or not when repairs are carried out. The refrigerant charged in the air conditioner is safe.
Index 1. Consignes de sécurité ..........................................................18 2. Nomenclature .......................................................................19 3. Fonctionnement ....................................................................22 4. Minuterie ...............................................................................29 5. Entretien et nettoyage ..........................................................30 6. Fonctionnement d’urgence de la télécommande sans fil ..
2. Nomenclature ■ SLZ-KF·NA ■ Unité interne Plafonnier à Cassette 4 volets SLZ-KF·NA Modes du ventilateur Ailette Louvre Filtre Témoin de nettoyage du filtre Réglage du nº de modèle de télécommande sans fil 3 modes Auto avec variation – Longue durée Filtre Ailette Grille de refoulement d’air 2.500 heures 002 Admission d’air ■ Télécommande filaire Interface de la télécommande 5 Les fonctions réalisées par les touches varient en fonction de l’écran.
2. Nomenclature Afficheur L’écran principal peut être affiché dans deux modes différents : “complet” et “basic”. Le réglage usine est “complet”. Pour passer au mode “basic”, changez-le dans l’écran principal. (Reportez-vous au manuel d’utilisation inclus avec la télécommande.) * Toutes les icônes sont affichées pour la compréhension. 2345 6 8 Fri 6 Room 83 F 8 0 1 1 Fri 3 3 ) 7 9 2 9 ! 7 Set temp. Cool 83 F Mode Cool 1 4 Temp. Mode Fan Set temp.
2.
2. Nomenclature Remarques (Pour télécommande sans fil uniquement) : ■ Pour utiliser la télécommande sans fil, pointez-la vers le récepteur de l’appareil intérieur. ■ Si la télécommande est utilisée dans les deux minutes qui suivent l’alimentation de l’appareil intérieur, l’appareil peut émettre deux bips successifs indiquant que le contrôle automatique initial est en cours. ■ L’appareil intérieur émet des bips pour confirmer que le signal transmis par la télécommande a été reçu.
3. Fonctionnement ■ Mémoire de l’état de fonctionnement réglage de la télécommande Mode de fonctionnement Température programmée Vitesse du ventilateur Mode de fonctionnement avant la mise hors tension Température programmée avant la mise hors tension Vitesse du ventilateur avant la mise hors tension ■ Plage de réglage de la température Mode de fonctionnement Froid / Déshu. Chaud Auto Ventil.
3. Fonctionnement 3.4. Réglage de la vitesse du ventilateur 83 F Cool Set temp. Mode Temp. 83 F F1 F2 Fan F3 Page Main Main menu Vane·Louver·Vent. (Lossnay) High power Timer Weekly timer OU silent mode Main display: Cursor Page Fri Room F1 F4 Pressez [F4] pour changer la vitesse du ventilateur, dans l’ordre suivant. Auto F2 F3 Pressez [F3] pour revenir à l’écran précédent. Pressez [F4] pour aller à la page suivante.
3. Fonctionnement 3.5.2 Vane Sélectionnez “Vane·Louver·Vent. (Lossnay)” (Vane·Volet·Vent (Lossnay)) dans le Menu général (voir page 24), et appuyez sur la touche [CHOIx]. Main Main menu Vane·Louver·Vent. (Lossnay) High power Timer Weekly timer OU silent mode Main display: Cursor F1 F2 Page F3 F4 Fri Swing Off Vane Vent.
3. Fonctionnement ■ Angle de rotation des volets (Télécommande filaire) 1 Sélectionnez “Maintenance” dans le Menu général (voir page 24), et appuyez sur la touche [CHOIx]. Main Main menu Maintenance Initial setting Service Main display: Cursor F1 Page F2 F3 F4 2 Sélectionnez “Manual vane angle” (Angle de volet manuel) avec les touches [F1] ou [F2], et appuyez sur la touche [CHOIx]. Maintenance menu Auto descending panel Manual vane angle 3D i-See sensor F2 F3 F4 Manual vane angle Ref.
3. Fonctionnement ■ Procédure de vérification Manual vane angle Ref. address Unit No. Identify unit Check button Input display: Cur. Address Check F1 F2 F3 F4 Manual vane angle Ref. address Unit No. Function setting for unit with vane fully open. Return: F1 F2 F3 F4 Manual vane angle No communication Check Unit state. Return: F1 F2 F3 F4 1 Réglez d’abord “Ref. address” (Adresse réf.) sur 0 et “Unit No.” (No.Unité) sur 1. • Déplacez le curseur sur “Ref. address” (Adresse réf.) ou sur “Unit No.
3. Fonctionnement 3 Quand Direct/Indirect est sélectionné, réglez chaque sortie d'air. Sélectionnez la sortie d'air à l'aide de la touche [F1] ou [F2], et changez le réglage à l'aide de la touche [F4]. Après avoir modifié les réglages pour toutes les sorties d'air, appuyez sur la touche [CHOIx] pour enregistrer les réglages. * Pour pouvoir activer cette fonction, le sens du flux d'air doit être réglé sur “Auto”.
3. Fonctionnement 3.6.4 Fonction Flux d'air saisonnier 1 Sélectionnez le réglage à l'aide de la touche [F4]. OFF (Arrêt) → Cooling only (Refroidissement uniquement) → heating only (Chauffage uniquement) → Cooling/Heating (Refroidissement/chauffage) → OFF (Arrêt)… Seasonal airflow Seasonal airflow Cooling/Heating Select: F1 F2 F3 Une fois le réglage modifié, appuyez sur la touche [CHOIx] pour enregistrer le réglage. F4 OFF (Arrêt) : La fonction est désactivée.
5. entretien et nettoyage ■ Information filtre Fri Cool Room 83 F Set temp. 83 F Mode Temp. Auto Fan F2 F4 Appuyez sur la touche [F4] pour réinitialiser le témoin d’état du filtre. Filter information Please clean the filter. Press Reset button after filter cleaning. F1 Reset F2 F3 F4 Choisissez “OK” avec la touche [F4]. Filter information Reset filter sign? Cancel F1 F2 F3 F4 Un écran de confirmation s’affiche. Naviguer dans les écrans • Pour revenir au Menu général ..................
6. Fonctionnement d’urgence de la télécommande sans fil Lorsqu’il n’est pas possible d’utiliser la télécommande Lorsque les piles de la télécommande sont usées ou lorsque la télécommande ne fonctionne pas correctement, vous pouvez activer le mode de fonctionnement d’urgence à l’aide des touches d’urgence situées sur la grille.
7. Guide de dépannage En cas de problème : Le climatiseur fonctionne sans que la touche “ON/OFF” (Marche/Arrêt) soit sollicitée. Voici la solution. (L’appareil fonctionne normalement.) ■ La fonction de marche de la minuterie a-t-elle été réglée ? Appuyez sur la touche “ON/OFF” (Marche/Arrêt) pour l’arrêter. ■ Le climatiseur est-il relié à une télécommande centralisée ? Veuillez consulter les personnes responsables du contrôle du climatiseur.
8. Installation, deplacement et inspection Avertissement : Si le climatiseur fonctionne sans refroidir ou sans chauffer la pièce (en fonction du modèle), contacter le revendeur car il pourrait alors y avoir une fuite de gaz réfrigérant. Toujours demander au représentant du service technique s’il n’y a pas de fuite de réfrigérant après une intervention technique. Le réfrigérant présent dans le climatiseur est sûr et normalement il ne doit pas y avoir de fuite.
Contenido 1. Medidas de Seguridad..........................................................34 2. Nombres de las piezas .........................................................35 3. Manejo ..................................................................................38 4. Temporizador ........................................................................45 5. Mantenimiento y limpieza .....................................................46 6.
2. Nombres de las piezas ■ Unidad interior ■ SLZ-KF·NA Modelo empotrado en techo de 4 direcciones SLZ-KF·NA 3 pasos Automático oscilante – Pasos del ventilador Deflector Rejilla Filtro Filtro Deflector Larga duración Indicación de limpieza de filtro 2.500 horas Ajuste del n.º de modelo del controlador remoto inalámbrico 002 Salida de aire Entrada de aire ■ Controlador remoto cableado Interfaz del controlador 5 Las funciones de los botones de función cambian dependiendo de la pantalla.
2. Nombres de las piezas Pantalla La pantalla principal se puede visualizar en dos modos diferentes: “Completo” y “Básico”. Por defecto, viene configurada a “Completo”. Para cambiar al modo “Básico”, cambie la configuración en la configuración de la pantalla principal. (Consulte el manual de instrucciones incluido con el controlador remoto.) * Todos los iconos se muestran para explicar su significado.
2.
2. Nombres de las piezas Notas (solo para el controlador remoto inalámbrico): ■ Cuando utilice el controlador remoto inalámbrico, apunte hacia el receptor de la unidad interior. ■ Si el controlador remoto se utiliza unos dos minutos después de encender la unidad interior, esta puede pitar dos veces, ya que estará realizando la comprobación automática inicial. ■ La unidad interior pitará para confirmar que ha recibido la señal transmitida desde el controlador remoto.
3. Manejo ■ Memoria del estado de funcionamiento Modo de funcionamiento Temperatura predeterminada Velocidad del ventilador Configuración del controlador remoto Modo de funcionamiento antes de apagar la unidad Temperatura predeterminada antes de apagar la unidad Velocidad del ventilador antes de apagar la unidad ■ Rango de temperatura predeterminada configurable Modo de funcionamiento Frío/Secar Calor Auto Ventilador/Ventilación 3.2. Selección Modo Fri Room 83 F Cool Set temp. Auto Mode Temp.
3. Manejo 3.4. Ajuste de la velocidad del ventilador Room 83 F Set temp. Mode Temp. 83 F F1 F2 Fan F3 Página Main Main menu Vane·Louver·Vent. (Lossnay) High power Timer Weekly timer OU silent mode Main display: Cursor Page Fri Cool F1 F4 Presione el botón [F4] para ver las velocidades del ventilador en el siguiente orden. Auto F2 F3 Presione [F3] para ir a la página anterior. Presione [F4] para ir a la siguiente página.
3. Manejo 3.5.2 Lama Seleccione “Vane·Louver·Vent. (Lossnay)” (Lama·Deflector·Vent. (Lossnay)) en el Menú principal (consultar la página 40), y presione el botón [ACEPTAR]. Main Main menu Vane·Louver·Vent. (Lossnay) High power Timer Weekly timer OU silent mode Main display: Cursor F1 F2 Page F3 F4 Fri F1 Swing Off Vane Vent.
3. Manejo ■ Ángulo lama manual (Controlador remoto cableado) 1 Seleccione “Maintenance” (Mantenimiento) en el Menú principal (consulte la página 40) y presione el botón [ACEPTAR]. Main Main menu Maintenance Initial setting Service Main display: Cursor F1 F2 F3 F4 2 Seleccione “Manual vane angle” (Ángulo lama manual) con los botones [F1] o [F2], y presione el botón [ACEPTAR]. Main menu: Cursor F2 F3 F4 Identify unit Check button Input display: Cur.
3. Manejo ■ Procedimiento de confirmación Manual vane angle Ref. address Unit No. Identify unit Check button Input display: Cur. Address Check F1 F2 F3 F4 Manual vane angle Ref. address Unit No. Function setting for unit with vane fully open. Return: F1 F2 F3 F4 Manual vane angle No communication Check Unit state. Return: F1 F2 F3 F4 1En primer lugar, confirme ajustando “Ref. address” (Codificación) a 0 y “Unit No.” (Nº Unid.) a 1. • Mueva el cursor a “Ref. address” (Codificación) o “Unit No.
3. Manejo Direct/Indirect setting : Direct : Indirect : Indirect : Direct Select: Outlet F1 F2 Angle F3 F4 3 Si selecciona Directo/Indirecto, configure cada salida de aire. Seleccione la salida de aire con el botón [F1] o [F2], y cambie el ajuste con el botón [F4]. Después de cambiar la configuración de todas las salidas de aire, pulse el botón [ACEPTAR] para guardar la configuración. * Para activar esta función, la dirección del flujo de aire debe ajustarse a “Auto”.
3. Manejo 3.6.4 Función Flujo de aire estacional 1 Seleccione la configuración con el botón [F4]. DESACTIVADO → Solo refrigeración → Solo calefacción → Refrigeración/ Calefacción → DESACTIVADO... Seasonal airflow Seasonal airflow Cooling/Heating Select: Después de cambiar la configuración, pulse el botón [ACEPTAR] para guardarla. F1 F2 F3 F4 DESACTIVAR: la función está desactivada.
5. Mantenimiento y limpieza ■ Información Filtros Fri Cool Room 83 F Set temp. 83 F Mode Temp. Auto Fan Main Main menu Restriction Energy saving Night setback Filter information Error information Main display: Cursor Page F1 F2 Presione el botón [F4] para restaurar la señal de filtro. Please clean the filter. Press Reset button after filter cleaning. F3 F4 Filter information Seleccione “OK” con el botón [F4].
6. Funcionamiento de emergencia del controlador remoto inalámbrico Cuando no puede utilizar el controlador remoto Cuando se agoten las pilas del controlador remoto o éste tenga algún fallo, puede llevar a cabo el funcionamiento de emergencia mediante los botones de emergencia que se encuentran en la rejilla del controlador.
7. Localización de fallos ¿Problemas? El acondicionador de aire funciona sin haber pulsado el botón ON/OFF (ENCENDIDO/APAGADO). Aquí tiene la solución. (La unidad funciona normalmente). ■ ¿Está ajustado el temporizador de encendido? Pulse el botón ON/OFF (ENCENDIDO/APAGADO) para detener el funcionamiento. ■ ¿El acondicionador de aire está conectado a un controlador remoto central? Consulte a la persona encargada de controlar el acondicionador de aire.
8. Instalación, reubicación e inspección Atención: Si el acondicionador de aire funciona pero no genera fresco ni calefacción en la habitación (dependiendo del modelo), consulte con su distribuidor ya que puede tratarse de una fuga de refrigerante. Debe preguntar al responsable del mantenimiento si existe o no una fuga de refrigerante cuando se lleve a cabo la reparación. El refrigerante cargado en el acondicionador de aire es seguro y normalmente no tiene fugas.
A4_white_tombo.
A4_white_tombo.
This product is designed and intended for use in the residential, commercial and light-industrial environment. Please be sure to put the contact address/telephone number on this manual before handing it to the customer. HEAD OFFICE: TOKYO BUILDING, 2-7-3, MARUNOUCHI, CHIYODA-KU, TOKYO 100-8310, JAPAN BH79A345H01 BH79A345H01_cover.