
Operation Manual


13
4.Timer
■ Timer functions are different by each remote controller.
■ For details on how to operate the remote controller, refer to the appropriate operation manual included with each remote controller.
Notes:
Anypersonatthefollowingplacescannotbedetected.
● Alongthewallonwhichtheairconditionerisinstalled
● Directlyundertheairconditioner
● Whereanyobstacle,suchasfurniture,isbetweenthepersonand
theairconditioner
Apersonmaynotbedetectedinthefollowingsituations.
● Roomtemperatureishigh.
● Apersonwearsheavyclothesandhis/herskinisnotexposed.
● Aheatingelementofwhichtemperaturechangessignicantlyis
present.
● Someheatsources,suchasasmallchildorpet,maynotbesensed.
● Aheatsourcedoesnotmoveforalongtime.
The3Di-Seesensoroperatesonceapproximatelyevery3minutes
tomeasuretheoortemperatureanddetectpersonsintheroom.
● Theintermittentoperatingsoundisanormalsoundproducedwhen
the3Di-Seesensorismoving.
● WhenMARemoteControllerisusedtocontrolmultiplerefrigerant
systems,NooccupancyAuto-OFFcannotbeused.
3.Operation
1 Select the setting with the [F4]
button.
OFF → Cooling only → Heating
only → Cooling/Heating → OFF…
After changing the setting, press
the [SELECT] button to save the
setting.
OFF: The function is disabled.
Cooling only: When the thermostat
turns off during cooling mode, the
vanes move up and down.
Heating only: When the thermostat
turns off during heating mode,
the vanes move to the horizontal
air ow direction to circulate the air.
Cooling/Heating: The function is
enabled during both cooling mode
and heating mode.
* In order to enable this function,
the air ow direction must be set
to “Auto”.
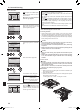
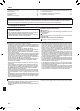
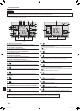
3.6.4 Seasonalairowfunction
F1 F2 F3 F4
Seasonal airflow
Select:
Seasonal airflow
Cooling/Heating
B
A
D
C
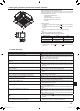
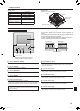
Weeklyschedule(Wirelessremotecontroller)
■ The weekly schedule can be set to four operation patterns for each day of the week. The settings include the
on and off times and the set temperature.
<Editingmode>
1. Switching to the editing mode
1 Press the
button when the unit is operating or stopped.
blinks. (Fig. 1)
2. Selecting the setting pattern
1 Press the button to select the setting pattern number.
Each time the
button is pressed, the pattern number A changes in the following order: 1 → 2 → 3 → 4.
3. Selecting the day of the week
1 Press the
button to select the day of the week to set.
Each time the button is pressed, the day of the week B changes in the following order: Mon → Tue
→ Wed → Thu → Fri → Sat → Sun → All days.
4. Selecting the operation settings
1 Push the button to select the operation on or off setting. (Fig. 2)
( ) is lit.
Each time the button is pressed, the setting changes in the following order: → .
2 Press the button to select the operation time. (Fig. 3)
The operation time blinks.
Set the operation time using the buttons.
• The operation time can be set in 10-minute increments.
3 Push the button to select the set temperature. (Fig. 4)
The set temperature blinks.
Set the temperature using the buttons.
• When setting the off operation, the temperature cannot be set.
When the AUTO (dual set point) mode is enabled, press the button to switch between the upper limit
C and the lower limit D. (Fig. 5)
4 By pressing the button, the pattern number settings for the displayed day of the week are deleted.
5 Repeat steps 2–4 to select the settings for each day of the week.
<Transmittingthesettings>
Point the transmission area of the wireless remote controller towards the receiver on the indoor unit and operate
the controller. Con rm that the indoor unit beeps 7 times.
Press the button.
<Enablingtheweeklyschedule>
Press the button.
The weekly schedule operates when is on.
• The weekly schedule does not function when the On/Off timer is enabled.
The weekly schedule operates when all of the On/Off timer settings have been executed.
Note:
●
Whenusingtheweeklytimer,pleasesetthewirelessremotecontrollerinthesignalreceivableareaof
thereceiverontheindoorunit.
Fig.2
Fig.3
Fig.4
Fig.5
Fig.1
BH79A345H01_en.indd 13 2018/05/25 14:59:44