DPX System Operating Instructions 555 Theodore Fremd Ave., Rye, NY 10580 • 914-925-3261 • http://techsupport.mitsubishiimaging.
Purup-Eskofot A/S Copenhagen Division Industriparken 35-37 DK-2750 Ballerup Denmark Tel.: Fax.: (+45) 4473 6666 (+45) 4473 6767 DPX System - Operating Instructions Doc. No.: 089-202-090 555 Theodore Fremd Ave., Rye, NY 10580 • 914-925-3261 • http://techsupport.mitsubishiimaging.
Whilst every care has been taken in the preparation of this manual, no liability will be accepted by Purup-Eskofot A/S arising out of any inaccuracies or omissions. Interference with the equipment besides normal operation and user maintenance described in the Operating Instructions Manual, must be carried out by a technician, who has been trained/educated on the equipment in question.
555 Theodore Fremd Ave., Rye, NY 10580 • 914-925-3261 • http://techsupport.mitsubishiimaging.
Table of Contents DPX System Operating Instructions Contents Description . . . . . . . . . . . . . . . . . . . . . . . . . 2 Computer-to-Plate System (CtP) Time Saving . . . . . . . . . . . . . . . . . . . . . . . . . . . 2 Perfect Accuracy. . . . . . . . . . . . . . . . . . . . . . . . 2 Intelligent Optimization . . . . . . . . . . . . . . . . . . 2 High Quality Register . . . . . . . . . . . . . . . . . . . . 2 Cost-Effective Production . . . . . . . . . . . . . . . . .
555 Theodore Fremd Ave., Rye, NY 10580 • 914-925-3261 • http://techsupport.mitsubishiimaging.
DPX System - Operating Instructions Computer-to-Plate System (CtP) 1.Description Computer-to-Plate System (CtP) The DPX SYSTEM digital platesetter produces press-ready plates for a variety of printing jobs. The entire process only takes a few minutes and is carried out in full daylight. This highly versatile platesetter is capable of managing a variety of colour demands, satisfying a wide range of imaging needs.
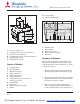
The DPX SYSTEM Unit DPX System Operating Instructions M. Activator tank N. Activator thermo sensor Fig. 2 E. F. G. H. I. K. Processor module door Locking pawl for processor module door Plate exposure module door Locking pawl for plate exposure module door Roll magazine 2 (rear) Roll magazine 1 (front) Interior of Machine A B. C. D. E. F. G.
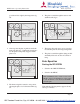
DPX System - Operating Instructions posed from left to right by the imagesetter, fig. 3G. Fig. 4 4. After exposure the plate is guided towards the drum exit guide, fig. 5. During the forward motion the plate is temporarily stopped, and the plate is cut. Basic Operation 6. The plate is carried through the activator and stabilizer tanks, fig. 6. Fig. 6 7. The input rollers and sensors are now ready to feed another plate into the imagesetting drum. 8.
RIP Display DPX System Operating Instructions 3. Press CTRL + ALT and keep them pressed while pressing the DELETE key. The Log-In screen will appear ensuring the correct setup. The default setup is normally the correct one. If this default setup is incorrect, please contact your local support engineer. 3. Click the Shut down radio button and then the OK button. 4. Press Enter. The system automatically starts up. 4. Click the YES button. 5.
DPX System - Operating Instructions Output Controller RipMate The RipMate handles communication to the frontend, interprets PostScript and sends the plates through the DPX SYSTEM unit. PlateSetter Monitor The Rip Monitor displays the state and progress of the functions of the machine. For detailed information, please refer to the section “Monitoring DPX SYSTEM”. During normal operation 4 programmes are needed.
Start/stop processing DPX System Operating Instructions To make the Output controller window active, click on it or open it as described in the section “Output Controller”. 1. Point at Disable Output and press the left mouse button. Active Queue Stop Output This queue shows all jobs ready for processing. The jobs will be processed in top-down order. Held Queue Start Output This queue shows already processed jobs and the jobs which have generated an error.
DPX System - Operating Instructions 3. Press the left mouse button and hold it down while pulling the job from the Held Queue to the Active Queue. Release the mouse button. The job has now been moved from the Held Queue to the Active Queue and will be exposed according to its position in the queue. By placing the job at the top of the Active Queue, it will be exposed before the other plates. Removing/Deleting a Job 1.
Monitoring the RIP DPX System Operating Instructions Missing calibration A selected calibration is no longer present. PostScript™ fault A bad or too complicated PostScript file has been sent. Monitoring the DPX SYSTEM Unit BUSY/INFO Information about which function the DPX SYSTEM is performing at a given point of time. 2. Otherwise, select Start Inputs from the RipMate menu in RipMate. The above example shows the DPX SYSTEM in stand-by mode with no plates being processed.
DPX System - Operating Instructions Liquid Level: The level in the activator tank is to low. Change the chemistry or refill the replenishment bottles Drive Load: The processor stopped due to over- load of the processor motor. Check whether there is a plate in the processor section. Dryer Exit: Jam in the processor section. Open the processor and make sure that no plates are jammed. Loader Jam: Jam in the exposure section.
Changing Plate Material DPX System Operating Instructions 5. Place the empty core on the floor, and place the empty spool on top of it. Take a new roll of material and mount it on the spool. Place the end caps again. The information reflects the currently loaded cassette. 4. Select the magazine which should be loaded by activating the small radio button to the left of the magazine. Changing material roll 1. Open the magazine lid by pressing the switch (fig.
DPX System - Operating Instructions Changing Plate Material 5. Press OK button to save the changes. The rolls in the magazine which are about to be loaded will now start running. They will run for 30 seconds which allows the operator plenty of time to align the material. 2. If the length is zero enter the number of metres just loaded. 6. Remove the white tape from the roll and position the leading edge of the roll at the nip of the inlet rollers at the bottom of the magazine.
Emptying Punch Waste DPX System Operating Instructions 7. Click Form Feed. 8. Click YES to form feed a plate. Repeat the last two steps until all exposed material is fed. 3. Pull out the waste box as shown by turning the small key on the front of the box. 9. Click OK. 4. Start the system as described in the section “Starting the DPX SYSTEM” 10. Iconise the RipMagager by clicking the following button in the upper right corner. Developer Unit 11. To expose, start processing again.
DPX System - Operating Instructions Developer Unit 5. Unplug the cable for the heating element underneath the processor module. 6. Release the draining hoses and insert each one into a separate empty container. Open the taps. 2. Remove the grid on the dryer section. 3. Each processor rack can be lifted approx. 3 cm at the front and pulled out approx. 5 cm, thus releasing the gear wheels from the drive unit at the back. 7. When the unit is empty, shut off the taps and fit the hoses into their holders.
Filling of the Developer Unit 4. Lift the two processor racks from the tanks and clean them with a soft brush and lukewarm water. DPX System Operating Instructions 3. Remove the cover of the processor module to gain access to the two processor tanks. 4. Close the draining hose taps. 5. Pour 16 litres of stabilizer liquid into the righthand tank and approx. 1 litre into the blackcapped replenishment bottle.
DPX System - Operating Instructions Warning: Never turn on the power unless the processor module is filled or the power plug for the heating element is removed, as this may cause overheating and damage to the processor module. Troubleshooting Imagesetter not found If “Imagesetter not found” is displayed in the RipManager window during startup, the DPX SYSTEM does not report on the SCSI chain. Troubleshooting 1. Check that the door to the plate exposure module door (fig 2. E) is closed.
Troubleshooting DPX System Operating Instructions TEM, due to Windows NT system or another programme. 1. Try repeating the job. Undefined command “set calibration” The current plate setup can not find a calibration. This might be due to the setup of the calibration or how the received PostScript job was set up. Refer to the RipMate user guide for further information. Font not found The system is set up to refuse processing a plate when a font is missing in the PostScript job. 4.
DPX System - Operating Instructions Troubleshooting If the processor unit cannot be pulled out, a plate is jammed either between the buffer and the processor unit or between the exit tray and the processor unit. Use the long jam knife (mounted on the inside of the exposure module door) to cut the jammed plate from one of the following holes: 3. Check the two punch tubes and punch tools for punch waste. Make sure they can move freely by turning them by hand. 4. Close the exposure module door (fig 2.
Troubleshooting DPX System Operating Instructions 6. Lift off the air guide. 5. Lift the dryer module as shown on the picture. Check if there is a plate in the dryer section. If not, close the exposure module door (fig. 2. E) and continue exposing. Warning: Observe closely the mounting of the two guides. If they are not put back in exactly the same position, it might cause a jam. 7. Lift off the material guide. When all guides are removed the operator can freely remove any jammed material. 8.
DPX System - Operating Instructions 2.Technical Troubleshooting Specifications DPX SYSTEM Digital Platesetter Operation Condition Type: Max. plate format: Max. image/ exposure area: Imaging technology: Light source: Plate material: Resolution: Screen ruling: Digital Plate Exposure System 460 x 550 mm / 16.5 x 21.6" Operation temperature range: 18°C-28°C Humidity: 25% - 80% RH non condensing 436 x 546 mm / 16.3 x 21.
555 Theodore Fremd Ave., Rye, NY 10580 • 914-925-3261 • http://techsupport.mitsubishiimaging.