
Operating instructions
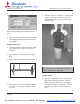
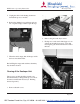

4. Lift the two processor racks from the tanks and
clean them with a soft brush and lukewarm
water.
5. Clean the activator and stabilizer tanks by
pooring clean water into the tanks while the
draining hoses is open.
6. Let the water run off the racks before replacing
them in the tanks.
7. Put the racks back in the tanks and replace the
grid on the dryer section.
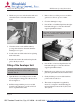
Filling of the Developer Unit
When the rear right door is opened, the power to
the heating element in the activator tank is auto-
matically shut off.
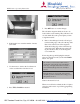
1. Open the front cover of the processor module
by activating the locking pawl at the bottom of
the rear right door.
2. Pull the carriage with the processor module
forward to the extreme stop position. Lift off
the two replenishment bottles.
3. Remove the cover of the processor module to
gain access to the two processor tanks.
4. Close the draining hose taps.
5. Pour 16 litres of stabilizer liquid into the right-
hand tank and approx. 1 litre into the black-
capped replenishment bottle.
Important: Avoid any splashing into the activator
tank as even small amounts of stabilizer will de-
stroy the activator.
6. Pour 16 litres of activator liquid into the left-
hand tank and approx. 1 litre into the blue-
capped replenishment bottle.
7. Replace the cover on the processor section and
place the replenishment bottles in their holders.
8. Gently slide the processor module back into
position and close the door.
9. The activator temperature is regulated by
means of a computer-controlled heating ele-
ment and must be between 20°C (68°F) and
30°C (86°F).
Page 14
Filling of the Developer Unit DPX System Operating Instructions
555 Theodore Fremd Ave., Rye, NY 10580 • 914-925-3261 • http://techsupport.mitsubishiimaging.com