English First Steps with your This guide describes the basic operations of the Trium dual band GSM/GPRS telephone Eclipse. Edition 1, 2002. © Mitsubishi Electric Telecom Europe, 2002 RaymanBowling and RaymanGarden are published by Ludigames. Ludigames and Ludigames logo are trademarks of Ludigames S.A. © 2001 Ludigames. Rayman is a trademark of Ubi Soft Entertainment. Rayman logo and character is a trademark of Ubi Soft Entertainment.
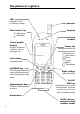
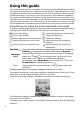
The phone at a glance LED Indicates a call or battery charge Side shuttle key Alert tones Backlight Colour graphic display Displays telephone numbers, menus, messages, etc. Left softkey (programmable) Antenna Earpiece Infrared module Cursor key Navigates around the memories and menus Send your own Vcard Voice memo Menu Phonebook Call/SEND key Dials displayed number or name and answers calls.
SAR THIS ECLIPSE PHONE MEETS THE EU REQUIREMENTS FOR EXPOSURE TO RADIO WAVES. Before a phone model is available for sale to the public, compliance with the European R&TTE directive (1999/5/CE) must be shown. This directive includes as one essential requirement the protection of the health and the safety for the user and any other person. Your mobile phone is a radio transmitter and receiver.
Introduction Thank you for purchasing the Trium Eclipse dual band mobile telephone. The mobile telephone described in this guide is approved for use on both the GSM 900/ 1800 and GPRS networks. Services and display messages may be different dependant upon your operators implementation.
Table of contents 1. Using this guide ............... 6 2. Quick Start ........................ 8 Preparing the phone for operation ........................... 8 Basic Operations ................... 8 3. Safety information ......... Vehicle safety ...................... Care and maintenance ........ Your responsibility .............. Security codes ..................... Code supplied by the airtime service provider ................ Code supplied by the manufacturer ................... Emergency calls ......
Using this guide Please take time to read this user guide. It contains a lot of useful information about your phone and the way that it operates on the network. The GSM network is now worldwide and allows you to make and receive calls to and from other countries (called roaming) as if you were in your home country. Some features included in this guide are called network features and are supplied by service providers.
Roaming. Is displayed when the phone is logged on to a network different from its home network. Short message service (SMS). Is displayed when one or many short messages have been received and have not been read. It flashes when the SMS message bank is full and cannot store new messages. The availability of this feature is network dependent. Voice mail. Is displayed when a voice mail message has been received and stored by the networks voice mail centre.
Quick Start In order to become familiar with the phone straightaway follow these simple steps. Preparing the phone for operation Please refer to page 14. Basic Operations Turning on the phone 1 2 3 Press and hold down . The audible power tone is played. When switching on for the first time, may appear for a few seconds. This is quite normal. The standard display will appear afterwards. A switch on tone will be heard. When switching on for the first time, enter the date & time.
• Pressing allows you to beam “My card” through IrDA. • Pressing gives access to Voice memo listening (short press) or recording (long press). • Pressing gives access to the main menu. • Pressing gives access to the Phone book. Keypad lock When activated (turned on) keypad lock prevents accidental calls or actions being made by user when the phone is carried in a pocket, briefcase or handbag. When on keypad lock does not prevent calls being received, which are answered in the normal way.
Receiving a call When a call is received, the phone will ring. The LED on the top of the phone will flash green and the flashing will be shown. The backlight will also come on if the phone was set to do so or if in silent mode. To accept (answer) the call: Press . 4 If the ring tone volume is set to zero (off) or if the phone has been set to 'Vibrate' mode, no audible sound will be heard. To reject, or return the busy signal to the caller: Press . Ending a call Press .
Safety information • Respect national regulations on the use of mobile telephones in vehicles. • Road safety always comes first! Always give your full attention to driving. • If equipped with a correctly installed vehicle kit allowing "hands free" operation and you need to make or receive a call, ensure that it is done sensibly and safely. Use pre-programmed numbers where possible and keep calls short and routine.
When not in use lock, turn off the phone and remove the battery. Security codes The phone and SIM card are delivered to you pre-programmed with codes that protect the phone and SIM card against unauthorised use. When requested to enter any of the codes, key in the number (appears as * asterisks in the display) and press OK . Keying mistakes can be erased by pressing Clear . If you enter the wrong code an appropriate message will be displayed.
In Europe, provided the phone has GSM service, emergency calls can be made using the European standard emergency number, 112. Emergency calls can even be made if the phone is PIN or electronically locked or call barred. In some countries local emergency numbers can still be used for emergency purposes but the phone may have to contain a valid SIM card. When making an emergency call remember to give all the necessary information as accurately as possible.
Preparing the phone for operation SIM card Before you can use your phone a valid SIM card must be inserted into the SIM card holder. Inserting the SIM card Unpack the phone and insert the SIM card into the holder. 1 Insert the SIM card gently as shown with the gold contacts facing down and the bevelled corner of the card at the top left. 2 Press the SIM card down. If the SIM card has been inserted the wrong way round or is damaged, Check SIM! will be displayed.
Replace the battery cover. Low battery warning When the battery becomes too low for the current operations, a temporised warning screen is displayed, and a low battery warning tone will sound (in the buzzer if no call, in the ear-piece during a call), in order to inform you. If you are on a call terminate the call and turn off the phone by pressing and holding down . Recharge the battery as shown below or swap it for a charged one. Do not turn off the phone by removing the battery.
Charging indicators when the mobile is off If the mobile is Off, the charging process is confirmed by a large animated display on the screen. At end of charging, the screen indicates charge ended with a full battery icon. During the charging process, the LED is red. At the end of the process, the red becomes steady green. Charging indicators when the mobile is on During charging, the battery icon cycles: When charging is completed, the icon remains steady with all bars full.
Basic operations Making and receiving calls The phone can only make and receive calls when it is switched on, unlocked, has a valid SIM card inserted and is located in an area that has GSM network service coverage. If the phone cannot find a network the display remains blank. Making calls 1 Enter the desired telephone number using the numeric keys ( and ). - 2 Press to dial (send) the number. The dialled number together with the animated icon will be shown in the display.
phone will flash green, the backlight will come on and the flashing will be shown. If the ring tone volume is set to zero (off) or 'Vibrate', no audible sound will be heard. To accept (answer) the call: Press . Pressing No ring will stop the sound of the ring tone allowing you to silence the phone and go out of a room before pressing . If you wish to use the the hands free mode in the same time, press Speakon . When accepted will be displayed. Proceed with the call in the normal way.
4 5 6 7 Select City, enter the name of your town and press OK to validate. Select World Clock, enter the time zone (GMT) and press OK to validate. Select Daylight saving rule, select Winter time or Summer time (+1 hr) and press Select to validate. Then press End to validate the time settings. Select Date & time, enter the date in the format shown and press OK to validate. Enter the time and press OK to validate. (If required use and ). Press Exit or to return to the standby display.
• When data (vCards or vCalendar) are received from the IrDA port, will be displayed. Press Read to view the new inbox information. • When a new Push message is received, will be displayed. Press Read to view the new message. More detailed information are available on Getting more out of your Eclipse. The display will show the quantity and type of messages: Press Read to select the type of message to be read. Press Select view the message if more than one indicators are displayed.
There are two methods of entering text characters and numbers in the display. The Multitap or Multipress key method and the quicker intuitive method, called T9 text input, which involves fewer key presses than the multitap method. T9 ( ) text entry A press on will swap between T9 text entry and the Multitap method. To enter text with T9: 1 Press the key with the required letter once only. Do not be put off if the character you want is not immediately displayed.
A brief press on any key will display the first character associated with that key as well as show all the other available characters at the top of the display. The characters available, which are language dependent, are shown below: Key Character Lower case Upper case 1., -'@:? abc2 ABC2 def3 DEF3 ghi4 GHI4 jkl5 JKL5 mno6 MNO6 pqrs7 PQRS7 tuv8 TUV8 wxyz9 WXYZ9 0 0 Short press swaps next letter between upper or lower case. Long press swaps all next letters between upper or lower case.
2 Press Select . Example To enter Card in the display, • Press and select Messages. • Select Write new. Messages (SMS) Reading a received SMS message while in standby display Press Read to read the new received messages (inbox). Reading stored SMS messages 1 2 Press 3 Press text. . Select Messages. Select Inbox to display the first message header. or select Options Basic operations • Press and hold until is displayed. Press briefly three times, C will appear in the display.
Sending a new SMS message to one addressee 1 2 3 4 5 6 7 Press . Select Messages. Select Write new. You can either choose a draft text or enter the message text and press OK . A press on will swap between T9 (predictive) text entry and the Multitap (traditional) method. Select Send. Choose a message template and then enter the destination number or select Names to choose a number from a phonebook entry. Press to validate your choice. Press OK . Sent confirmation will be given.
Managing card and phonebook numbers After selecting Phonebook press Options Item Read Add name Voice dialling Statistics Groups My card Own numbers Fixed dialling for the following menu: Function To access all the cards (SIM or Phone). To create a new entry. To assign a voice pattern to a phone number. To access storage status. To manage all phone groups. To read the personal card. To read the mobile station ISDN number (international number of the mobile subscriber). To access the fixed dialling numbers.
able) and the last 10 received answered numbers (if available) are stored by the phone in the calls log memory location menu: 1 2 3 4 5 Press . Select Calls & Times. Select Calls log. Select Last dial, Unanswered or Received. Use Press or to scroll to the number required. to dial the number. Voice dialling Phone numbers can also be recalled with your voice. Please refer to Getting More out of your Eclipse to learn how to create a voice pattern and link it to a stored phone number.
Speed dialling Phonebook numbers can be assigned to keys dial those numbers. - which when held down will To assign phonebook numbers to the speed dialling keys, 1 Press 2 3 4 Select Phone settings. Select Keys. 5 Select Names to choose the phonebook entry and press to validate your choice. 6 Press Exit . Select Settings. Select Speed Dial. Use or to scroll to the next key. or to return to the standby display. Press and hold down the key ( ).
Hands free mode You can use the phone handsfree feature when you are attending a meeting (when you wish to share the conversation with the audience) or you are in your car. Turning the handsfree feature on During conversation, Press Speak.on to turn the handsfree feature on during the calling process. When receiving a call, Press Speak.on to accept the incoming call. Turning the handsfree feature off Press Speak.off . 4 The headset, when connected, disables the built-in hands-free function.
Holding and retrieving a call To put a call on hold during conversation: Press . To retrieve a call: Press . To make a second call when one call is on hold: 1 Enter a number in the display. Press 2 After the second call has been established press between the two calls. to dial the number. 3 To end either the current call or the held call select End active or End held in the Options menu. The remaining call is automatically retrieved. 4 Press to end all remaining calls.
2 Select Call waiting. 3 Select Activate or Cancel. After some time (your request is sent to the network) the display will confirm your request. 4 Press Exit or to return to the standby display. Action when receiving a second call When a second incoming call is received you will hear a 'double beep'; an animated phone icon will be displayed as well as the phone number if available.
Description Auto DTMF Allows a DTMF string to be entered in the active call only. Private with Allows you to hold a private conversation with one of the conference participants Hold|Retrieve Holds or retrieves the conference call. Speaker on/off Allows you to activate or deactivate the hands free ("off" if the hands free is active). Mute/Unmute Turns the microphone on or off. End_X Allows to end a call with one of the participants. End all Ends all the calls.
4 Press Exit or to return to the standby display. Language selection To select the language of your choice: 1 Press 2 Select Phone settings. Select Language. 3 Use Press 4 . Select Settings. or to select a language from the displayed list. to validate. Press Exit or to return to the standby display. Softkeys - programming the softkeys To program the softkeys: 1 2 3 4 5 Press 6 Press Exit . Select Settings. Select Phone settings. Select Keys. Select Softkeys functions.
Install a downloaded melody 1 On receipt of a melody, press Options . Then, select Install. If any space is left, the melody is automatically stored in the imported melodies directory. If there is not enough space left, you are asked to choose which melody to replace, among the set of modifiable melodies on the mobile. 2 Press Exit to return to the standby display. Once stored, a message is displayed. The melody can be played immediately and selected via the tones settings menu.
Voice Memo The Eclipse mobile lets you to record one or several memos of up to 120 seconds total. Each memo is a part of this stock of time, and may be of any duration, provided the global limit cannot exceed this limit of 120 seconds. To record a voice memo or a phone conversation, . 1 Press and hold 2 A beep will sound and the display will show the recording time left. The recording will then start. A second beep will sound if the end of the recording time has been reached.
for the WAP™ gateway then press OK to validate. Select Home page and edit a URL address, then press OK to validate. 6 Select Activate security (Never, Automatic or Always requested for secure transactions such as mobile banking), then press Select to validate. 7 Select a Normal port corresponding to the connection or Secure port for a secure connection, then press OK to validate. 8 Select Send Characteristics to send or not the UA profile, to the remote server and press Select to validate. Press End .
Going online To gain access to the online services offered by your network operator: 1 Press 2 Select Home page. 3 Connecting to followed by your proxy name will be displayed whilst access is taking place. . Select Internet. Once connected you will be presented with your internet provider's or operator's choice of menu options. The icon at the top of the display indicates a 'live' connection; the icon indicates a WAP™ connection with GPRS (operator dependent).
The menu (MMI) system Use the round cursor key to access the menu system. Your menu options can vary. Some may not appear. This depends on your network operator and your subscription. Access to the menus Press to view all stored telephone numbers. Press to enter the main menu. Hold down Exit or , to exit the menus (if no call is in progress).
Using the headset Connecting the headset Insert the headset plug in the phone headset connector as shown below. 4 While inserting the headset plug in the phone heasdet connector make sure the Trium logo ( ) appears on top. Otherwise the headset will not work properly. Using the headset Place the headset earpiece in your ear. The headset microphone is then at convenient level of operation. You can answer, reject and end calls using or (see page 9). Adjust the earpiece volume level using and .
Index A Alert tones ............... 27 Auto-disconnect ...... 35 B Basic operations ....... Calling ................ Making a call ...... Push ................... Receiving a call ... SMS .................... Unanswered call . Voice mail .......... Battery ..................... Charging ............ Fitting ................ Low battery warning ........... 14 17 17 19 17 19 19 19 13 15 14 15 C Call Conference ......... 30 Holding .............. 29 Multi-party ......... 30 Retrieving ...........
P Packets access .......... Phone Book Store .................. Phone lock Code ................... Phone number ......... Phonebook ............... Voice dialling ...... Phonebook card options .................. Phonebook numbers Managing ........... PIN/PIN2 codes ......... Programmable Softkeys .............. Speed dialling ..... PUK/PUK2 Codes ...... Push parameters ...... R 35 24 12 35 24 26 25 25 12 32 27 12 35 Rayman Bowling ...... 33 Rayman Garden ....... 33 Reading an SMS message ..........
English Getting More Out of your This guide describes the operation of the Trium dual band GSM/GPRS telephone Eclipse. Edition 1, 2001. © Mitsubishi Electric Telecom Europe, 2002 RaymanBowling and RaymanGarden are published by Ludigames. Ludigames and Ludigames logo are trademarks of Ludigames S.A. © 2001 Ludigames. Rayman is a trademark of Ubi Soft Entertainment. Rayman logo and character is a trademark of Ubi Soft Entertainment.
Menu map Internet Games Rayman Bowling Rayman Garden •Home page •Push inbox •Bookmarks •Other site •Profile list •Settings l l Network Services Connectivity Infrared port Inbox Statistics •Applications •Services •Information l l l Phone Book Office Tools Diary Voice memo Calculator Currency converter World clock Alarm clock •Read •Add name •Voice dialling •Statistics •Groups •My card •Own numbers •Fixed dialling l l l l l l Settings Tones Graphics themes Voice Mail Phone settings GSM Services Br
Table of contents 1. Network Services........... 4 4. Calls & Times ............... 18 SIM application tool kit ............. 4 SDN numbers stored in the SIM ........................................ 4 Information numbers ................ 4 Calls log .................................. 18 Call times ................................ 18 2. Phone Book.................... 5 Storing names and telephone numbers ................................. 5 Free space in the phonebooks ..
Network Services Your network operator may provide value added services and contact phone numbers. These services and phone numbers will be stored in your SIM and if available will modify the menu of the phone to be included under the item Network serv. at the beginning of the menu (contact your service provider for details).
The phone and the SIM have areas of memory used for storing data (names, telephone numbers...) known as the phonebook. The phone has the capacity to store up to 255 "extended" cards (called "phone phonebook cards"). These cards may contain the following information: family name, first name, company name, job title, icon, home phone number, work phone number, cellular phone number, fax phone number, voice dialling, address, e-mail and groups.
Field Family name First name Company name Job title Icon 6 7 8 9 Enter the requested data. Confirm each entry by pressing OK . Select an icon among 9 predefined icons, using the direction keys and confirm by pressing OK , or directly press the key ( ) corresponding to the required icon. In this example pressing would select . Press OK to validate. Select the Numbers field.
14 15 16 17 Enter the requested data. Confirm each entry by pressing OK Press OK to validate. Select the E-mail field. Enter the e-mail address. Confirm the entry by OK . Select the Groups field (see "Creating a group of cards", p. 9). 18 . Use or to scroll through the groups list. Press Select to associate the highlighted group to the card. 200 Press End , then select Yes to store the card with all its information in the phonebook. Stored will be briefly displayed.
7 Select the Voice dialling field. Press New to start the voice dialling pattern recording. You will then be asked to say the name at least twice. Pronounce the name as clearly as possible. Should the voice patterns match Stored will appear in the display. Press Exit or to return to the standby display.
If several numbers are defined for this card, another screen allows selecting which number to call (Home, Work, Cellular, Fax).
To enter My Card data set, 1 Press . Select Phone Book. 2 Select My Card. An empty phonebook card will be displayed. 3 Enter your personnal data. (see section Storing names and telephone numbers, page 5). This menu item allows displaying and updating My Card. (My Card data set can also be sent by IrDA, from the standby display, by directly pressing ).
Select Fixed dialling. Select Add new. You will be prompted to enter the PIN2 number if it has not been entered yet. It is now possible to add new numbers as well as edit, delete, copy, move, as well as send by IrDA. 4 Wild card spaces can be used with the numbers stored in the FDN list. For example the number +441707 278_ _ 9 will allow calls to all numbers between 278009 to 278999 to be dialled. The number can be edited and dialled in the standby display.
To remove all phone numbers from the voice dialling list, 1 2 3 4 Press . Select Phone Book. Select Voice dialling. Select Delete all. Press Exit or to return to the standby display. To call a phone number using a voice pattern, 1 Press and hold . 2 You will then be asked to say the name. Pronounce the name as clearly as possible. 3 12 The dialled number together with the animated icon will be shown in the display. When the call is connected a ringing tone will be heard in the earpiece.
The SMS message service enables you to send or receive short text messages of up to 160 characters to or from other mobile phones provided with the same capability. The messages are not sent directly to the other mobile phone but go via a message centre provided by your network operator. You can also store, edit and forward messages as well as saving any of the numbers they may contain.
Turning on or off the message alert tone Each time a message is received a new SMS alert tone will sound. To turn on or off this tone, 1 2 3 Press . Select Messages. Select Alert. Select On or Off. Press Exit or to return to the standby display. Preparing the phone to send SMS messages You can write and send text messages. Before doing so the networks message centre number (obtainable from your service provider) needs to be stored: 1 2 3 Press . Select Messages. Select Settings. Select Message centre.
1 2 3 4 5 Press . Select Messages. Select Draft texts. Select the draft text to wish to modify and press Edit Edit the text and press OK . Press Exit or to return to the standby display. . Sending a new SMS message to one addressee 1 2 3 4 5 6 7 Press . Select Messages. Select Write new. You can either choose a draft text or enter the message text and press OK . Select Send. Choose a message template and then enter the destination number or select Names to choose a number from a phonebook entry.
4 5 Select Store. Press Exit or to return to the standby display. Messages in the outbox The outbox contains unsent draft messages, stored sent messages as well as sent but undelivered messages, identified by their headers. These messages can be selected from the outbox menu and can be modified and resent as new SMS messages in the normal way. To select an outbox message, 1 2 3 4 Press . Select Messages. Select Outbox and use or to scroll to the desired message.
If your network operator provide SIMs that allow users to store pre-programmed message templates, then Msg templates will appear in the Messages - Settings menu. Templates are sets of pre-programmed settings to be used when sending messages. Each of these templates can be given a name for easy identification and can be selected and used whenever required. To create a message template, 1 2 3 Press . Select Messages. Select Settings. Select Msg templates. Choose any blank template ([...]).
Calls & Times Access the Calls & Times menu to check the details of individual incoming and outgoing calls, the duration of the last call or the total time for all previous calls. Calls log This feature stores details (identity, time and date and call duration) of the last 10 numbers dialled, the last 10 unanswered calls and the last 10 received calls. The call logs are common for both Line 1 and Line 2. 1 2 3 4 Press . Select Calls & Times. Select Calls log. Select Last dial, Unanswered or Received.
If the call timers have been reset (see Call timer - reset, page 20) the date of the last reset of the counters will briefly be displayed. Use or to view all the timer information. The call type and the accumulated times of outgoing and incoming calls will be displayed. Pressing Details calls etc. Press or Exit Press Exit or will display details of roaming and international to return to the previous display. to return to the standby display.
4 5 6 Select On (or Off). Select the period (between 1 and 59 mins). Press OK to validate the entry. Press Exit to the standby display. or to return Call timer - reset This feature enables you to reset all the call timers. You will need the 4 digit lock code to operate this feature. 1 2 3 4 5 Press 6 Press Exit . Select Calls & Times. Select Call timers. Select Reset. Select Yes or No. Enter the phone lock code and press OK confirmed. or . The action will be to return to the standby display.
Select Units. Press Exit or to return to the standby display. 4 When the cost type is set to units the credit limit and the remaining credit are shown in units. Setting the credit limit - in units or currency After setting the currency and cost per unit, if required and available on your subscription, you are also able to set a credit limit in units or an amount in the currency of your choice. When the credit limit is reached the phone will be prevented from making and receiving all chargeable calls.
Alternate line service - selecting line 2 (subscription service) Some GSM 1800 operators support the use of a second line for users. You can have two mobile phone numbers e.g. a business and a personal line. To select the line for outgoing calls, 1 Press 2 Select Line selection. The current line selection will be displayed. 3 Use or 4 Press Exit . Select Calls & Times. or to scroll to the line required and press Select to validate your choice. or to return to the standby display.
Tones Alert mode To avoid disturbing others you can turn off the audible incoming ring tone as well as all alert and alarm tones from the Alert tones menu. 4 If you choose the 'Vibrate' or 'Vibrate then ring' option, the vibrating option replaces all the alert and alarm tones. To modify the alert mode, 1 Press . Select Settings. 2 Select Tones. 3 Select Alert tones. 4 Select Ring, Silent, Vibrate, Vibrate & ring or Vibrate then ring to validate your choice. or to return to the standby display.
The present feature proposes to see the list of these melodies and the memory status about their storage. You can delete a selected melody after acknowledgement. To consult the melodies list: 1 Press . Select Settings. 2 Select Tones. 3 Select Download. Select List. The list of imported melodies is displayed. 4 Use or to select the melody of your choice. The melody is played after no user action during 2 seconds. To remove the selected memory, press Delete then confirm the deletion by Yes.
Ramping is a feature that when turned on will cause the incoming ring tone to gradually increase to the maximum volume level if the call is not answered after the first ring. 1 Press . Select Settings. 2 Select Tones. 3 Select Volume. 4 Select Ramping. 5 Select On or Off. or to return to the standby display. 6 Press Exit 4 When turned on the volume of the incoming ring tone will start from the current ring volume and rise to the maximum volume until answered.
3 4 5 Select Number. When prompted enter the number manually or from a stored memory. Press OK to validate your entry. Press Exit or to return to the standby display. 4 If you subscribe to the 'Line 2' service the voice mail centre number will need to be stored separately for that line. The voice mail number is automatically assigned to speed dial location number 1 (see Speed dialling on page 28).
3 4 Use or to select a language from the displayed list. Press Select to validate. Press Exit or to return to the standby display. 4 To reset the phone to the language of the SIM enter *#0000#. To reset the phone language to English enter *#0044#. Backlight - setting The backlight can be adjusted to suit the surrounding light conditions. To modify the backlight, 1 Press . Select Settings. 2 Select Phone settings. Select Display. 3 Select Backlight.
To program a softkey, 1 Press . Select Settings. 2 Select Phone settings. Select Keys. 3 Select Softkeys functions. 4 Select Left softkey or Right softkey. on the softkey option of your choice. 5 Press Select or to return to the standby display. 6 Press Exit 4 (......) in the display means that a previously SIM dependent or subscription service assigned to that softkey is no longer available. For example Line 2 selection.
Select Phone settings. Select Auto features. Select Auto-retry. Select On or Off. Press Exit or to return to the standby display. When activated, Auto-retry and a countdown timer to the next call attempt will appear in the display. An auto-retry warning tone will sound each time a new call attempt is made. If the automatic redialling is successful proceed with the call as normal. Pressing Exit or any key during the retrying process will cancel auto-retry and end the dialling process for that call.
Select Phone settings. Select Default settings. Select Yes or No. Press Exit or to return to the standby display. The following are the factory default settings: Feature Factory setting Alert Tones Ring Trium 3 (line 1) Ring Tones Trium 3 (Alarm) Volumes, Ring, Key, Speech Mid values and Alarm. Backlight and Contrast Mid value Any Key, Auto-Retry and Auto Off Answer features.
7 Press Select or to validate your selection. The display will confirm your request. Press Exit or to return to the standby display. 4 1. If the 'On no reply' option is selected you will be requested to enter a delay period of 5, 15 or 30 seconds (network dependent). 2. Call diverts for both Line 1 and Line 2 must be set for each line. During call divert programming, only the line currently selected is affected by the call divert selected.
2 3 Select GSM Services. Select Receiving caller ID. The network will return either Presentation available or Presentation unavailable. Press Exit or to return to the standby display. Sending my ID On networks which allow caller line identity you can disable the sending of your own number, on a call by call basis, by adding #31# before the number you are calling. Alternatively you can ask your service operator to always disable the sending of your mobile number.
Select GSM Services. Select Mode of operation. Select Standard. Press Exit or to return to the standby display. • Modem mode In this mode the mobile has the behaviour of a class C mobile: it tries to attach to GPRS networks only (and not to GSM networks). It can only receive packets data calls and voice calls are barred. This behaviour is the same whatever are the network capabilities. However if the GPRS services are lost, the mobile automatically returns to the Standard mode of operations.
To view the forbidden list or show the home network, 1 Press . Select Settings. 2 Select GSM Services. Select Network. 3 Select either Forbidden or Home network. A list of the forbidden networks or the home network will be displayed. or to return to the standby display. 4 Press Exit Selecting manual search There may occasions when you wish to select a specific network, which has better coverage in your current location for example. 1 Press . Select Settings. 2 Select GSM Services. Select Network.
Select - All outgoing - Int'nal calls - Int'nal excl. home Incoming - All incoming - Roaming only Meaning All outgoing calls will be barred All outgoing international calls only will be barred All outgoing international calls except to other subscribers within your home network All incoming calls will be barred All incoming calls when not on the home network Select the option using or . Press Select . Select Activate. Enter the password and press OK . The network will confirm the selection.
To enter a message type in the selection list Up to 5 message types can be entered into the selection list. 1 2 3 4 5 6 7 Press . Select Settings. Select Broadcast. Select Message types. Press Options . Select Modify by list (or Modify by code if type number is known). Scroll to the message type required. Press Select to validate your selection. The display will confirm your choice.
Press Exit or to return to the standby display. Message types put into the selection list can be deleted and changed. 1 2 3 4 5 Press . Select Settings. Select Broadcast. Select Message types. Press Options . Select Modify by list, Modify by code or Delete. Press Exit or to return to the standby display. Broadcast language All the broadcast messages can be shown in several languages. To select the language of your choice, 1 2 3 4 5 Press . Select Settings. Select Broadcast. Select Language.
To turn on or off the phone lock code, Press . Select Settings. Select Security. Select Phone lock enable or Phone lock disable. The phone lock code will be requested to authorise your selection. or to return to the standby display. 5 Press Exit 1 2 3 4 4 When phone lock is on emergency calls can still be made. PIN code Your SIM is provided with a 4-8 digit PIN code to protect it from unauthorised usage. When enabled the PIN code will be asked for each time the phone is turned on.
The PUK (PIN unblock key) is an 8 digit code supplied by your service provider. It is used to 'unblock' a PIN whose code has been entered incorrectly three times. A PUK code cannot be changed. When requested enter the PUK code and press OK . You will then be asked to enter a new PIN code. Follow the display prompts to reset the PIN code. 4 If you enter the wrong PUK code 10 times in succession your SIM card cannot be used again. Contact your service provider for a new card.
Certificates Certificates are used for network exchange/exchange security. To display a certificate, 1 Press . 2 Select Settings. Select Security. 3 Select Certificate. Enter the 4 digit lock code (default code 0000) and press OK . Select List. The list of certificate subjects is displayed. 4 Press Options , then select View.
The Office Tools menu contains a diary, a voice/phone recorder, a calculator and a currency-converter, a world clock and an alarm clock. Diary The Diary is divided into three parts: • The calendar which manages all the events • The task list, which manages all the tasks • The statistic feature which provides information about the memory capacity for the whole diary. An event can be compared to an appointment. Conflicts are possible. Example: a meeting.
3 Select Options day. .
1 2 3 Press . Select Office Tools. Select Diary. Select Calendar. Select Options . Select Week view to display all the events scheduled for a selected week. This screen displays an array containing the days of the week (horizontally) and the hours of the day (vertically). It is divided into three parts, according to the time intervals: from midnight to 8 o’clock in the morning, from 8 o’clock in the morning to 4 o’clock in the afternoon and from 4 o’clock in the afternoon to midnight.
To view monthly entries, 1 2 3 Press . Select Office Tools. Select Diary. Select Calendar. Select Options . Select Month view to display all the events scheduled for a selected month. This screen displays the whole month in one array. The initials of the days are displayed horizontally, on top of the array. If the selected month is the current one, today's number is rounded and coloured. If a day owns at least one event a graphical information is displayed.
This feature enables you to store up to 100 tasks to be done (Todo), scheduled with a beginning and a due date and time, with or without a reminder alarm set on the due time. Tasks can be sent through the IrDA port. To enter a new task, 1 2 3 4 5 Press . Select Office Tools. Select Diary then select Tasks list. Select New task.
Press Valid to acknowledge the alarm or press Snooze the alarm after the snooze period. to repeat Statistics This feature displays the memory state, for the calendar. The current numbers of existing events and tasks are given and a chart is displayed for the events and for the tasks. Up to 100 events and 100 tasks are allowed.
This feature enables you to perform simple calculations using + (plus), - (minus), * (multiplication), / (division) and % (percentage) functions. An integrated currency converter facility is also proposed. If the currency converter is initialised, numbers can be converted during calculations. To use the calculator, Press . Select Office Tools. Select Calculator. The calculator icon ( ) and 0 will be shown in the display. The phone is now ready to perform simple calculations.
Currency-converter This useful feature converts currencies. To use the converter however the currencies and the exchange rate first have to be set up. The conversion is calculated on the per unit exchange rate of the second currency selected. To select the currencies and the exchange rate, 1 2 3 4 5 6 Press . Select Office Tools. Select Currency converter. Select Settings. Enter the first currency name (e.g. Dollar). Press OK . Enter the second currency name (e.g. Yen). Press OK .
4 5 6 Select Options . Select Edit origin or Edit secondary The following fields are displayed: • City: significant town associated with the time difference • World clock: time difference with GMT (included in [-12:00; +14:00]) • Daylight saving rule. 2 values are available: Winter time and Summer time (+1hr) The rule is one hour in advance during summer time.
When the alarm time is reached an audible alert sounds for up to 1 minute and the LED will flash red. Alarm clock and a vibrating bell symbol will appear in the display together with the current time and the softkeys, Valid. and No ring . If the phone is off at the time of the alarm, the phone will automatically 'power on' and operate the audible and visual alerts described above. To use as a Reminder or Snooze Alarm, Press No ring , or any other key (except Valid. ) to stop the alarm.
Infrared port The infrared port allows you to exchange data between your mobile and other devices (provided they have an infrared port). To initiate a transfer via the infrared port, your mobile must be placed facing another infrared port before port opening starts. The two ports can then be opened and synchronised. The requested transfer can then be performed. Objects (vCards e.g.) are transferred one by one.
Inbox This feature allows the storing of data received from various entries: IrDA, WAP™, SMS. The objects are queued in the inbox and can be retrieved by object type: Task card, Event card, Business card, Root certificate, JAVA™ files and other “undefined” (not defined for the mobile) files. Specific dedicated downloads are not inserted in this queue (for example, for WAP™ provisioning using dedicated SMS, information goes directly to the target application and does not go through the inbox).
The availability and appearance of the games described hereafter depend on the services provided by your network operator. There are two games in the phone, Rayman Bowling and Rayman Garden. To play a game, 1 Press 2 3 Choose the game you wish to play and press Select 4 . Select Games. or . Select Level to choose the difficulty level. Select High Scores to view the best and last scores. Select Parameters to set if you wish sound effects or no sound and to select the volume level.
Internet/Wireless Application Protocol (WAP™) The Eclipse has a WAP™ internet browser to access services, such as stock buying, news, sports, weather, TV listings etc., supplied by your operator and/or your internet provider.The types of services offered depend on the internet provider and network operator. You must have a DATA subscription to access these services.
Before proceeding and if you have not already done so please enter the current time and date as described on page 48. The profile list can contain up to 10 profiles. To enter and store the profile details, 1 Press . Select Internet. 2 Select Profile list. 3 Select an empty profile ([...]) and press New . 4 Enter the Proxy name and press OK . 5 Select the Gateway settings. Enter the IP address and press OK . Enter the Home page address and press OK .
4 1. You can also access the Internet menu directly by pressing the Internet softkey from the standby display (provided you haven't personalised the left softkey). 2. If the PPP access phone number, login names and password, Home page http address and IP address are not predefined, these are obtainable from your network operator and/or internet provider. 3. Selecting PPP Access or Proxy again will allow you to change and/or modify any of your settings.
display (provided you haven't personalised the left softkey). Going online and onto the Net To gain access to the online services offered by your network operator, 1 2 3 Press . Select Internet. Select Home page. Connecting to followed by your proxy name will be displayed whilst access is taking place followed by the word Loading... (of the home page).
Use of whilst online In the absence of Options whilst online pressing nection will present an options menu as follows: Item Action Home page Bookmarks Other site + Reload Other site + New address Other site + New address Bango Other site + Address List Push Messages + Push inbox Settings Save pictures Disconnect Close session during a live con- Goes to and reloads the home page. Provides immediate access to the bookmark list as when not connected.
3 Select Bookmarks. The list of bookmarks is displayed in alphabetical order. Select an empty entry ([...]). Press New and enter the following: Option Alias Address 4 5 Press End Press Exit Action Name you want to give to your bookmark Home page address (if known) , then select Yes to confirm data storage. or to return to the standby display. 4 You can also access the Internet menu directly by pressing the Internet softkey from the standby display (provided you haven't personalised the left softkey).
immediately displayed or stored in the Push Inbox, according to the Push settings. At the end of the transmission the push reception session is ended. The Push Inbox lets you consult and delete the messages stored and allows a connection to a server, to retrieve the associated information. When the Push Inbox contains new message(s), an information message is displayed in the standby display with a direct access to the inbox. To set the push reception parameters, 1 Press . Select Internet.
Melodies download This feature makes use of the 'Digiplug' or the Nokia Smart Messaging system usage, for Trium phones. The principles are as follows: • Melodies are stored on a Web/WAP™ server, for mobile phones. In this server, melodies are available for phones other than Trium, as well as for Trium phones. This storage is Digiplug responsibility. • You can access this site by the Internet or WAP™. • When your phone type is selected, you can see a choice of melodies for download.
Appendix Glossary Expression Meaning AC/DC charger Active call ALS AoC APN CB CLA CLI Conversation mode CSD DES Diverting DN DTC DTMF FDN GPRS GSM HF http IN IP LCD LED MMI PIN/PIN2 PPP PUK/PUK2 Roaming (Rm) SDN 62 Alternating Current/Direct Current charger The call currently in conversation Alternate Line (Line 2) Service Advise of Charge - subscription service Access Point Name Cell Broadcast Cigarette Lighter Adaptor Caller Line Identity - displays callers telephone number When the phone is making or r
Expression Meaning SIM SMS SPN SR Standby mode URL WAE WAP™ WDP WML WMLS WSP WTAI WTP Subscriber Identity Module.
Problem Numbers cannot be entered in the display Phone switches on but there is no display Battery icon ( ) not flashing 1-2-3 during charging Flashing (......) softkey Possible cause and solution Keypad lock is on ( is displayed). Press and hold off. to turn Display contrast is turned down too low. Reset contrast (see page 27). Indicates a charging or battery problem. Turn off and disconnect the charger. Reconnect and try again. If the problem remains contact your dealer.
Problem Possible cause and solution Check your password You changed the call barring password or You changed the call barring service status. The entered password seems to be wrong or incorrect. Check your You made a request for a service that seems to be request impossible to fulfil. Check your You tried to activate a GSM service. You are requested to subscription check your subscription regarding the related service rights of use/access. Connection failure The connection cannot be established.
Problem No response Possible cause and solution You made a call to a remote user and no response has been received. Not allowed Your number/character entry is not allowed. Not allowed A call is tried, but cancelled due to fixed dialling control (fixed dialling) (the number dialled does not match with one of the fixed dialling numbers in memory). Not Available There is no more SIM storage. Number changed The called number has changed. PIN blocked A wrong PIN code has been entered 3 times.
Guarantee Pan European Service If you require service, then in the first instance, you should contact your supplier. Should you experience any difficulty then please contact your nearest MITSUBISHI location listed below for information on other service centres.
68
DECLARATION OF COMPLIANCE Name Address Town Postal code : Mitsubishi Electric Telecom Europe S.A.
Index A Access point names ............... Alarm Reminder ....................... Alarm clock ........................... Alert mode ............................ Alert tone Turning on/off ................ Alert tones ............................ Any key answer ..................... Auto Answer ........................... Retry .............................. Auto Switch Off .................... Auto Switch On ..................... Automatic search .................. B Backlight ...........................
Managing SMS messages ..... 13 Melodies ......................... 23, 61 Melodies download .............. 61 Menu map .............................. 2 Message templates ............... 17 Messages .............................. 13 Alert .............................. 14 Broadcast ....................... 35 Draft texts ................ 14, 15 Inbox ............................. 13 Msg Templates .............. 17 Outbox .......................... 16 Settings ................... 14, 17 Statistics .............