ENGLISH Directions for use This guide describes the operation of GSM or GSM/GPRS Trium Mondo telephones. Edition 1, 2001. © Mitsubishi Electric Telecom Europe, 2001 Whilst every effort has been made to ensure the accuracy of the instructions contained in this guide, Mitsubishi Electric reserves the right to make improvements and changes to the product described in this guide and/or to the guide itself, without prior notice.
papier-gb.
Table of contents • Composition of the Mondo pack 4 • Presentation of the unit 5 • Introduction • General safety 8 - Regular use of the stylus - Additional uses of the stylus - Use of the jog wheel 17 17 18 8 • Power supply - Batteries 19 • Vehicle safety 9 • Care and maintenance 9 • Your responsibility 9 • Security codes 10 • Code supplied by the airtime service provider Conception et réalisation du manuel : Qualimédia, Rennes (France).
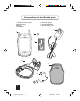
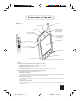
Composition of the Mondo pack 1- The Mondo and its stylus. 2- Backup battery. 3- Battery. 4- AC adaptor. 5- Desk top support. 6- Personal Handsfree. 7- Protective carry case. 4 1 2 3 5 7 6 4 papier-gb.
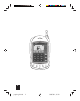
Presentation of the unit Figure 1 : 1- Aerial 13- Infrared port 12- Earpiece 2- Luminous indicator of battery charge and alarm signal 11- Connector for the personal hands free 3- Luminous indicator of network signal and call indicator 4- Touch screen 10- "Record" button 9- Jog wheel not programmable 5- Program buttons 6- Microphone 8- "On / Off" button 7- "Telephone" button fixed not programmable 1- Aerial.
4- Touch screen. 5- Program buttons: These buttons enable you to have rapid access to your three favourite applications. The applications programmed by default are Microsoft Inbox (left hand button), Microsoft Diary (centre button) and Microsoft Contacts (right hand button). If you wish, you may modify the initial programming of these three buttons. 6- Microphone. 7- "Telephone" button fixed not programmable: Ø When the telephone is not in use: Press for a short time to open the Telephone application.
14- Stylus Figure 2 : 15- "RESET" button 16- Housing for the battery and the SIM card 20- External aerial connector 19- Housing of the backup battery 17- PC connection port 18- Power supply socket 14- Stylus: For selecting items in the lists which are displayed on the screen, validate your selections, move objects or write on the touch screen. When the stylus is in its housing, the cover of the battery compartment is locked. Use your fingernail to extract the stylus from its housing.
Introduction Thank you for purchasing a GSM or GSM/GPRS Trium Mondo telephone. The mobile telephone described in this guide is approved for use on both the GSM 900 and 1800 networks. Services and display messages may be different dependant upon your operators implementation.
Vehicle safety • Respect national regulations on the use of mobile telephones in vehicles. • Road safety always comes first! Always give your full attention to driving. • Do not use a handheld phone whilst driving. If you don’t have a handsfree car kit, stop and park your vehicle safely before using your phone. • If incorrectly installed in a vehicle the operation of mobile telephones could interfere with the correct operation of the vehicle electronics, such as ABS anti-lock brakes or air bags.
Try to remember the phonelock and PIN codes associated with the use of this phone. Become familiar with and use the security features to block unauthorised use if your phone and/or SIM card are lost or stolen. Call your service provider immediately to prevent illegal use. When you are not using the telephone, close the Telephone application of your Mondo and activate the Safety mode if necessary.
Emergency calls In Europe, provided the phone has GSM service, emergency calls can be made using the European standard emergency number, 112. Emergency calls can even be made if the phone is PIN or electronically locked or call barred. In some countries local emergency numbers can still be used for emergency purposes but the phone may have to contain a valid SIM card. When making an emergency call remember to give all the necessary information as accurately as possible.
Commissioning You have just acquired your Mondo. Before using it, you must first carry out the following operations, in the order in which they are listed below: • Insertion of the SIM card and the battery 1- Remove the stylus from its housing (fig.1). This operation is necessary to unlock the cover of the battery housing. 2- Remove the battery housing cover (fig.2). 3- Open the SIM card holder (fig.3). 4- Insert the SIM card into its holder (fig.4).
fig.3 fig.5 fig.4 fig.6 fig.7 • Insertion of the backup battery IMPORTANT: This operation must only be carried out after the insertion of the battery (see above). 1- With the point of the stylus, lift up the cover of the backup battery housing (fig.1). 2- Insert the backup battery in its housing (fig.2). PLEASE NOTE: The positive pole (+) of the battery must be turned towards the front face of the Mondo. 3- Close the cover and return the stylus to its housing. fig.2 fig.1 13 papier-gb.
• Initial charging of the battery PLEASE NOTE: The instructions below only apply to the first time the battery is charged. To find out how to proceed for later recharges, see the corresponding section of this manual, on page 19. The initial charging of the battery may be carried out by means of the AC adaptor on its own, or with the desk top support (supplied). We recommend that you wait for the battery to be fully charged (3 to 4 hours) before using your Mondo for the first time.
- States of the charge indicator of the Mondo (reminder): Ø Flashing orange: Charging is in progress. Ø Continuous orange: Charging is finished. Safety instructions: • • • • • • • • Do not leave your Mondo connected to the AC adaptor any longer than necessary. Unplug the AC adaptor from the mains when you are no longer using it. Do not expose the battery to extremes of temperature and humidity. Avoid putting the battery into contact with metal objects (such as keys, paper clips, coins, chains, etc.).
• Location and time zone A town will be selected by default. Its name will appear in the first field. If this town corresponds to your country or your region, just tap on the Next key at the bottom of the screen to validate the selection. If not : 1- Tap with your stylus on the arrow at the right hand edge of the Town field to display the list of towns. 2- Tap and hold your stylus on the up or down black arrows to scroll through the list of towns.
Use of the stylus and the jog wheel • Regular use of the stylus Use your fingernail to extract the stylus from its housing (situated on the back of your Mondo). The stylus is specially designed not to dirty or damage the touch screen of your Mondo. You are strongly recommended to use it for navigating through the menus or tapping on the keys of the virtual keyboard.
• Use of the jog wheel 1- When you receive a call (Telephone application open): Ø Press on the wheel to answer if you want to take the call. You may also tap with your stylus on the key of the virtual keyboard in the Telephone application or press briefly the button on your Mondo. Ø Push the wheel upwards to refuse the call. You may also tap with your stylus on the application. key of the virtual keyboard in the Telephone Ø Push the wheel downwards to cut off the ringing tone before answering.
Power supply - Batteries • Battery charge indicators When the battery is almost discharged, your Mondo will warn you in several ways at once: • The message Battery low! will appear on the screen. • A warning tone will sound. • The symbol flashes on the screen (depending on the model). If you are using your Mondo (for example, you are having a telephone conversation or you are consulting your diary): 1- Close the applications in use immediately.
- To recharge the battery of your Mondo using the AC adaptor on its own: 1- Insert the plug (a) of the AC adaptor into the power supply socket (b) of the Mondo (fig.1). b a fig.1 2- Connect the AC adaptor to a mains socket and switch on. The luminous battery charge indicator will flash orange. 3- When the charge indicator becomes continuous orange, the battery is charged. Do not forget to switch off the mains and unplug the AC adaptor from the mains.
• Replacing a discharged or used battery WARNING: Make sure that all the applications have properly been closed before removing the battery from your Mondo. If you are connected to a computer, don’t forget to save your data before closing the applications in use. 1- Remove the stylus from its housing (fig.1). This operation is necessary to unlock the cover of the battery housing. 2- Remove the battery housing cover (fig.2). 3- Remove the discharged battery from its housing (fig.3).
• Replacing the backup battery IMPORTANT : To carry out this operation, it is essential for the main battery of your Mondo to be in position and sufficiently charged. When the backup battery is used up, a message will appear on the screen inviting you to replace it. When this occurs: 1- Close all the applications in use. 2- Remove the stylus from its housing (fig.1). 3- With the point of the stylus, lift up the cover of the backup battery housing (fig.2). 4- Remove the used battery from its housing.
• Use of the batteries and safety instructions - Batteries compatible with your Mondo: The Mondo will only operate with standard Lithium ion batteries (MA0570). - Lifetime of the batteries: A battery may be recharged several hundred times. However, it will wear out progressively. If you find that its performance (on standby or in communication) has clearly decreased compared to normal operation, you must consider replacing it with a new battery.
The Telephone Application 1- First steps • Opening the Telephone application To open the Telephone application, just press the program button lower part of your Mondo. , situated in the Ø If the screen of your Mondo is on standby, it activates itself automatically when you press the program button ; you do not need to press the button . Ø If another application is already open on the screen, you may also launch the Telephone application by selecting it with your stylus from the ÿ Start menu.
- The normal appearance of this screen is as follows: A B C 5 4 4 1 PLEASE NOTE*: If the Mode of Operation is set at Modem and if your Mondo is connected to a GPRS network, the small Telephone screen situated in the upper left hand corner of the screen of your Mondo will be presented with the following appearance: A C 2 6 3 1- "Answer" key. 2- "Hang up" key. 3- "Hands free" key. WARNING: Do not put the receiver to your ear when you are telephoning in hands-free mode.
Depending on individual cases, special symbols may be displayed on the Telephone screen saver: : SIM memory used. : Mondo memory used. : Roaming. This appears when your Mondo is connected to a network other than its local network. : Short text messages (SMS). This appears when one or more short text messages ( SMS ) have been received and have not been read. flashes when the storage capacity of the SIM card is not sufficient for recording new messages. Access to the SMS function depends on your operator.
Ø Your Mondo must be in a zone that is covered by the GSM network. If the place in which you find yourself is covered by the GSM network, the network signal indicator light will flash green (slowly). If not, this indicator will flash red (slowly) and the telephone screen (situated in the upper right part of the screen of your Mondo) will remain blank. - Making a call: 1- If the telephone application is closed, press the lower part of your Mondo.
- To end the call: Ø Press the jog wheel of your Mondo. You can also click on the keyboard or press briefly the button on your Mondo. key on the soft The call time counter will stop, and then disappear, as will the symbol . After a few seconds, the Telephone application screen saver will be displayed once more. You can speed up the display of the screen saver by tapping on the Exit function key as soon as you hang up.
Ø If the caller’s number is accessible, and if it corresponds to a number recorded in the folder of your Mondo, the name associated with this number will be displayed on the screen. Ø If the caller’s number is accessible, and if it does not correspond to any number recorded in the folder of your Mondo, the number will be displayed on the screen. Ø If the caller’s number cannot be determined, the message Number unknown will be displayed on the screen during the presentation of the call.
• Safety mode In places where it is requested to switch off mobile telephones, you can lock the closure of the telephone application by activating Safety mode. When Safety mode is activated, you can use other applications or manipulate your Mondo without any risk of opening the Telephone application by mistake. - To activate Safety Mode: 1- Tap on ÿ Start in the navigation bar. 2- Tap on Parameters in the list proposed to you. 3- Tap on Safety mode in the list of parameters.
Ø The name of the incoming mail server. Ø The name of the outgoing mail server. Ø Your e-mail user name and password. When you have these details, you can start to set the parameters for the Mondo GSM connection, following the instructions given below. Ø Stage 1: Setting the ISP telephone number parameters. 1- Click on ÿ Start to access the main menu. 2- Click on Parameters. 3- Click on the Connections tab at the bottom of the screen. 4- Click on Modem. 5- Click on Mondo GSM. 6- Click on Next.
2- Click on Internet Explorer. 3- Click on Tools at the bottom of the screen. 4- Click on Options. 5- Click on the Connections tab at the bottom of the screen. 6- Select Mondo GSM in the Type field. The Mondo GSM connection will be selected automatically when you connect to Internet. 7- Click on ok. PLEASE NOTE: If you do not set the Mondo connection as the default connection, you cannot disconnect from Internet Explorer. Ø Stage 5: Setting the Inbox application parameters for Mondo GSM connection.
- From the ÿ Start menu: 1- Click on ÿ Start to access the main menu. 2- Click on Programs. 3- Click on Connections. 4- Click on Mondo GSM. 5- Click on Connect. An information window is displayed during connection. When connection has been established, click on Hide status to close the information window. To disconnect from the ÿ Start menu: 1- Click on ÿ Start to access the main menu. 2- Click on Today. 3- Click on at the bottom right of the screen to display the connection status.
• Restoring the Mondo GSM connection If you accidentally delete the Mondo GSM connection, it can be restored as follows: 1- Close the Telephone application. 2- Open it again. This simple operation is all that is required to restore the Mondo GSM connection. However, you then need to reset the parameters for this connection using the information supplied by your ISP. The procedure is described in the section "Setting the pre-programmed Mondo GSM connection parameters".
3- SMS • Description of the SMS service The SMS service allows you to send and receive "mini-messages" (or "short messages"). These messages are forwarded to other subscribers to the GSM network or are received from various sources, depending on the operators of the network. To access this service, you must use the Microsoft Mailbox application (in order to configure, write, read and store the messages) and the Telephone application (in order to be able to send and receive messages via the GSM network).
The predefined periods are 12 hours, 1 day, 2 days and Maximum (the maximum period permitted by the operator). PLEASE NOTE: By creating a number of different templates, you can send messages in different formats by using different messaging centres. 2- Viewing or modifying a template from the SIM card: Message templates can be pre-programmed by your operator on your SIM card. In this case, the templates are displayed under the names "SIM card Template 1", "SIM card Template 2", etc.
4- Creating a new message template: 1- Open the Mailbox application. 2- Click on Tools. 3- Click on Options. 4- Click on SMS* in the list of services. 5- Click on New…. The Message template screen is displayed. 6- Enter the Name of the template you wish to create. PLEASE NOTE: You must choose a different name from the names already allocated to the existing templates. 7- Enter the Number of the messaging centre. 8- Select a message Format from the displayed list of options.
7- The "Acknowledgement" and "Reply requested" options: These options are common to all template messages: Ø Acknowledgement: This option is used to obtain information about the result of your transmission. The message may have been forwarded to the contact or it may have been discarded by the network if its period of validity has expired or due to an overload in the network. Ø Reply requested: This option is used to ask the contact to reply to the message you have forwarded to him.
6- If you wish to send copies of your message to other contacts, click on the arrow on the right of the screen to display the Cc: and Cci: fields. PLEASE NOTE: In this case, the message will be forwarded in successive transmissions (as many transmissions as there are contacts). 7- Click on the text area, then enter the text of your message. PLEASE NOTE: The maximum length of a message text is 160 characters.
- From the Read screen of the opened message: 1- Click on at the base of the screen. 2- Click on Reply or on Reply to All. In both cases, the page for composing your message is displayed on the screen. The telephone number of the contact is displayed in the To: field, so you do not have to enter it manually. The header and the text of the original message are displayed in the text field (you can hide these if you wish). 3- Input your reply.
- The "Outbox" folder: This folder contains all the messages which are currently been transmitted or are ready to be sent. If the Telephone application is open when a message is being sent, it is only temporarily stored in the Outbox folder. It is then transferred to the Sent Items folder as soon as the transmission has been completed. If the Telephone application is closed when a message is being sent, the message cannot be sent.
1- Click and hold on the header of the message you wish to delete. 2- Click on Delete to move the message to the Deleted Items folder. PLEASE NOTE: The messages stored in the Deleted Items folder can be viewed, amended, moved or sent, just like the other messages. - To permanently delete a message: 1- Open the Deleted Items folder. 2- Click and hold on the header of the message you wish to permanently delete.
MICROSOFT Applications You can access all the Microsoft applications on your Mondo by selecting them from the menu ÿ, or by pressing the corresponding program buttons. These program buttons enable you to have rapid access to your three favourite applications. The applications that are programmed by default are Microsoft Inbox (left hand button), Microsoft Calendar (centre button) and Microsoft Contacts (right hand button).
Ø Microsoft Reader For reading electronic books on your Mondo. Download books to your Mondo from your desk top computer or your favourite Web site for electronic books. Then use Microsoft ActiveSync to copy the book files to your Mondo, then use Microsoft Reader to read them. Ø Microsoft Tasks For monitoring tasks that need completing within a specified time period. Tasks which have not been done on time are displayed in heavy print within the list.
Appendix Accessory: - The Personal Handsfree Connection (fig.1): Insert the jack (a) of the Personal Handsfree into the audio socket (b) of your Mondo. Use (fig.2): 1- Place the earphones (c) in your ears. The microphone (d) is then situated at the level of your mouth. 2- Attach the clip (e) to your clothing. 3- Adjust the sound volume of your Mondo, as required. c a e d b PLEASE NOTE: In addition to the jack (a) provided in Personal handsfree, the audio connector (b) can accept a 2.
Trouble shooting Problem Possible cause and solution Impossible to activate the screen of your Mondo. Check that the battery is fully charged and correctly connected to the phone. The setting of the contrast of the display is perhaps too low. Adjust the contrast. The flashing orange charge indicator is not on and the flashing battery icon is not displayed. A charging or battery problem. De-activate and disconnect the charger. Reconnect it and try again. There may be no mains supply. Check mains supply.
Pan-european GSM End-user Guarantee Conditions 1. You can benefit from this guarantee only if you are the original end-user purchaser. 2. MITSUBISHI guarantees that for a period of twelve (12) months from the date of purchase from your dealer, the Product shall be free from defects in materials and workmanship.
DECLARATION OF COMPLIANCE Name Address Town Postal code : Mitsubishi Electric Telecom Europe S.A.