IMMERSIVE SOUND LED LCD HDTV with Integrated Sound Projector MODELS 154 Series 164 Series 265 Series BASIC OWNER’S GUIDE This manual provides basic connection, setup, and operating instructions. Please visit our website at www. Mitsubishi-tv.com to view or download a detailed owner’s guide that fully describes the features of this TV. Follow the Support link to the Product Documents page. • • • • For questions: -- Visit our website at www.mitsubishi-tv.com. -- E-mail us at MDEAservice@mdea.com.
CAUTION RISK OF ELECTRIC SHOCK DO NOT OPEN CAUTION: TO REDUCE THE RISK OF ELECTRIC SHOCK, DO NOT REMOVE COVER (OR BACK). NO USER SERVICEABLE PARTS INSIDE. REFER SERVICING TO QUALIFIED SERVICE PERSONNEL. The lightning flash with arrowhead symbol within an equilateral triangle is intended to alert the user of the presence of uninsulated “dangerous voltage” within the product’s enclosure that may be of sufficient magnitude to constitute a risk of electric shock to persons.
Contents Cleaning Recommendations Important Safety Instructions.. . . . . . . . . . . . . . . . 4 . . . . . . . . . . . . . . . . . . . . . . . . 5 . . . . . . . . . . . . . . . . . . . . . . . . . . 6 Stand Installation.. Wall-Mounting. . 1 Basic Setup and Operation Before You Begin.. . . . . . . . . . . Remote Control. . . . . . . . . . . . . Setting Up and Using TV Inputs.. Basic TV Operation. . . . . . . . . . . . . . . . . . . . . . . . . . . . . . . . . .
Important Safety Instructions Please read the following safeguards for your TV and retain for future reference. Always follow all warnings and instructions marked on the television. 1) E XAMP LE OF ANT E NNA G R OUNDING Read these instructions. 2) Keep these instructions. ANT E NNA LE AD IN WIR E G R OUND C LAMP ANT E NNA DIS C HAR G E UNIT (NE C AR T IC LE 810-20) 3) Heed all warnings. 4) Follow all instructions. 5) Do not use this apparatus near water.
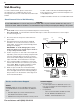
Stand Installation • • CAUTION Using this TV with other than the authorized accessories may cause the TV to become unstable, which can cause damage to the product or possible injury. At least TWO PEOPLE are required to install the stand. Support the TV near the corners as shown. Failure to follow these recommendations may result in personal injury and damage to the product. Note • 40- or 46-inch TV: If planning to wall-mount the TV, there is no need to install the stand.
Wall-Mounting To order a wall-mount kit, please contact Peerless Industries, Inc. at (800) 473-3753 or visit www.peerlessmounts.com. Order wall-mount kit model ST650. To order a wall-mount kit from Mitsubishi Digital Electronics America, Inc., please visit www.mitsuparts.com or call (800) 553-7278. Complete installation instructions are included with the kit. Stand Removal Prior to Wall-Mounting CAUTION At least TWO PEOPLE are needed to safely remove the stand.
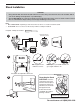
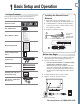
1 Basic Setup and Operation Package Contents 7 Installing the Remote Control Batteries Please take a moment to review the following list of items to ensure that you have received everything. 1. Remove the remote control’s back cover by Remote Control Two AA Batteries 2. AA 3. AA gently pressing in the tab and lifting off the cover. Load the batteries, making sure the polarities (+) and (-) are correct. For best results, insert the negative (-) end first. Snap the cover back in place.
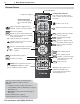
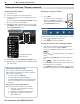
1. Basic Setup and Operation Remote Control Emitter-Bulb End Sleep Timer, page 21 Number/letter keys Channel tuning, page 10 Pass-code entry, page 29 Adds a separator in digital channel numbers. Clears some menu entries. TV CAB/SAT DVD AUDIO VCR Press the key for the device type to control. Leave in TV mode for normal TV viewing. Powers TV on or off. LAST Returns to the previous channel. MUTE Mutes the TV speakers. TOOLS Displays shortcuts for the number keys.
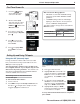
1. Basic Setup and Operation First-Time Power-On 1. Press the TV key to ensure that the remote control is in TV mode. TV TV 2. Aim the emitter (bulb) end of the remote control at the TV and press the POWER key . Wait for the Welcome screen. 3. If you wish to change the menu language to Español, press . Welcome Screen Energy Options • • Mitsubishi recommends the Home setting, which uses power within ENERGY STAR® guidelines. The Retail setting looks best under bright lighting.
1. Basic Setup and Operation Setting Up and Using TV Inputs, continued Setting Up Other Inputs 1. Power on the TV. 2. Power on the devices to ensure detection. 3. Connect one device to the TV, making note of the 4. Selecting an Input to Watch 1. Press INPUT. If you have only two connected devices, the INPUT key switches between them without displaying the Input Selection menu. TV input jack. The TV will display the New Device Found screen if the connection type is detectable.
1. Basic Setup and Operation 11 Basic TV Operation Picture Settings Audio Controls 1. To get the best picture under different viewing con- Changing the Audio Output ditions, set the Picture Mode first before changing other video settings. See page 24 for a description of the options. a. Press VIDEO. b. Press until the Picture Mode option displays. To switch from the internal TV speakers to an external sound system: 1. Press AUDIO. 2. Press to display the Sound 3. option. Press to change.
1. Basic Setup and Operation Basic TV Operation, continued The FORMAT Key and Picture Shape Repeatedly press the FORMAT key to cycle through displays available for the current program. The TV will remember the format you last used on each input. Important Black bars at the edges of the screen are common in HD pictures. Black bars are not a defect of the TV. • Black bars are added by broadcasters to fill the 16:9 screen area while preserving the original aspect ratio of the picture.
2 TV Connections 13 Input and Output Jacks Calibration Microphone Input (265 series, page 23) DIGITAL Audio OUTPUT (page 15) AVR/surround OUTPUT (page 26) SUBWOOFER OUTPUT CENTER-CH INPUT See the detailed owner’s guide at www.mitsubishi-tv.com. NetC OUT/IR IN (265 Series. NetCommand/IR external controller jack. See the detailed owner’s guide at www.mitsubishi-tv.com.
2. TV Connections Y Pb Pr Component Video Device HDMI Device Mitsubishi recommends using high-speed HDMI cables to connect newer devices incorporating HDMI technology.
2. TV Connections A/V Receiver A/V Receiver with HDMI Output Most setups require either an optical audio cable or analog stereo audio cables. To send audio from TV channels received on the ANT input or devices connected directly to the TV, you must use one of the connections shown below. The TV makes all audio available in digital and analog formats: • Analog audio coming into the TV is available as output in digital stereo format on the DIGITAL AUDIO OUTPUT jack.
2. TV Connections Antenna or Cable TV Service Connect the incoming cable to the TV’s ANT input. Antenna or Direct cable (no cable box) IN ANT OUT Older cable box or Composite video cable Cable TV service or 2. Not recommeded. Other connection types provide better quality audio and video. 1b. 1a. VCR or DVD Recorder to an Antenna or Wall Outlet Cable Required: 1. Video cables 1a. Component video cables (red/blue/green) or 1b. Composite video cable (usually yellow) 2.
3 TV Features 17 Adding Favorites Sample Favorites menu. Switch to favorite channels or inputs using number keys. 1. Press INPUT and switch the TV to the input you want to add. If adding a channel, switch to the ANT input and tune to the channel. 2. Press the FAV key. 3. Move the highlight to the number position you want to assign to the channel or input. 4. Press ENTER. Removing The FAV key gives you quick access to favorite program sources.
3. TV Features VUDU Internet Services Internet services provided by VUDU™ let you access many popular on-line applications. In addition to free content, VUDU’s movie service lets you buy and rent movies through the TV. Visit www.VUDU.com to learn more about available movie titles, prices, recommended bandwidth, and services offered. For a list of recommended routers and switches, see the Support > FAQ section at VUDU.com.
3. TV Features VUDU Internet Services, continued Wireless Audio Playback Using VUDU Internet Services 164 and 265 Series. The TV’s built-in speaker array can play audio from a handheld device using Bluetooth® A2DP (stereo audio) wireless technology. After establishing internet connectivity, press the INTERNET key to display offerings from VUDU. Press ENTER to launch the desired application. Pairing the TV with an Audio Device INTERNET Getting Started with VUDU Movies 1.
3. TV Features Camera Images and Music Files USB Media Player Menu USB Media Setup Menu Use the USB Media Setup menu to set up play of a slide show or playlist. USB Media menu, Photos option selected Displaying the Menu Note: Back up the data on your USB drive before connecting it to the TV. Mitsubishi is not responsible for any file damage or data loss. IMPORTANT Always stop playback with (STOP) or change to a different TV input before disconnecting your USB device. 1.
3. TV Features Camera Images and Music Files continued Photos and Moving Video as Composite Video 21 Sleep Timer The Sleep Timer turns the TV off after the length of time you set. To set the TV to turn on at a certain time of day, see the Setup > Timer menu on page 27. Setting the Sleep Timer Connect the camera to the TV using a composite video cable and control the slide show or movie through the camera. The display resolution will be standard-definition (480i). 1. Press SLEEP. 1.
3. TV Features Sound Projector Positioning the TV The TV’s built-in speaker array can be set up to reflect sound off the room walls to create a surround sound effect. • Center the seating area in front of the TV and at least six feet away. • Arrangements that give good results: • If the room is an odd shape, locate the TV to take best advantage of wall reflections. 2. Enter the room dimensions and layout information requested in the screen.
3. TV Features Sound Projector, continued 3. Adjusting Beam Angles a. Adjust Center Beam Angle until sound is about equal in both ears. b. Adjust Left Beam Angle to maximize sound heard from the front left side. c. Adjust Right Beam Angle to maximize sound heard from the front right side. d. Adjust Left Surround Beam Angle to where the sound seems to come from the left rear side. If this cannot be achieved, make the setting the same as that for Left Beam Angle. e.
4 24 TV Menus Press MENU on the remote control to open the main menu and access these settings. Picture Picture Video Settings in this menu are saved for the current input only. To make picture adjustments: From the Picture > Video menu 1. Press to highlight an option 2. Press to adjust. Picture Mode While watching TV 1. Press the VIDEO key. 2. Press to select a video option. 3. Press to change the setting. Brilliant For use under bright light.
4. TV Menus 25 Picture, continued Picture Reset • • Resets sound and picture adjustments for the current input. Highlight the Reset icon and press ENTER twice to perform reset. Reset has no effect on universal settings (Balance, Listen To, Language) or on Advanced picture settings. Picture Perfect (PerfectColor™/PerfecTint™) 265 Series. Sliders let you adjust the saturation (intensity) Picture Advanced Advanced Modes. Contact your professional installer for setup.
4. TV Menus Sound, continued Analog Listen To Stereo (For ANT analog Mono channels) SAP Sound Global Analog Audio Out The TV plays stereo broadcasts in stereo and mono broadcasts in mono. Reduces background noise. Use when receiving a weak stereo audio signal. Second Audio Program. Selects an additional monaural sound track. Settings in this menu apply to all inputs. These settings affect audio from the AVR/SURROUND jacks. Fixed Use with an analog A/V receiver.
4. TV Menus 27 Setup Setup Language • Setup Clock • Select either English or Spanish for on-screen menus. Select the language for a digital program from the ANT input (if available). Set the TV clock to: • Use the TV Timer to power on the TV automatically at a preset time • Receive correct updates to ChannelView listings Note: When the Daylight Saving Time change occurs, you must open this menu and set the TV’s clock ahead or back.
4. TV Menus Inputs Inputs Name • • • • Lets you assign or change names of inputs appearing in the Input Selection menu. Lets you turn the Ant and Bluetooth inputs On/Off (to display or hide them in the Input Selection menu); a paired device is cleared from memory when the Bluetooth icon is turned off. Lets you delete unused HDMI inputs from the Input Selection menu. Highlight the input and press ENTER to see the name choices. Inputs Learn 265 Series.
4. TV Menus 29 Lock Parental Menu The TV comes from the factory with the rating locks turned off and with pre-set U.S. ratings TV-PG and movie rating PG. You must turn on blocking for U.S. ratings to activate these rating restrictions. You will be prompted to enter a pass code when you select Lock on the main menu. Lock Important Notes on Rating Locks • Parental menu rating locks apply only to channels and signals received on the ANT and composite VIDEO jacks.
Appendices Appendix A: Programming the Remote Control 3. Enter the first five-digit code listed for your equip- Programming the Remote Control 1. Change the control mode to match the device type. TV CAB/SAT 4. AUDIO DVD VCR TV CAB/SAT AUDIO DVD VCR Mode Affected Device Cab/SAT Cable Box, DTV Receiver, Satellite Receiver VCR VCR, DVR, DVD Player/Recorder DVD DVD Player/Recorder, DVR, VCR Audio A/V Receiver, Audio Amplifier, CD Player 5.
Appendices 31 Appendix B: Troubleshooting To contact Mitsubishi customer service, see page 6. TV Reset Comparison Guide You can resolve many common TV problems using the reset functions described in the following table. IMPORTANT Before you change sound or picture settings: If picture or sound settings seem wrong for a broadcast channel (a channel from the ANT input, a cable box, or satellite receiver), first check other channels from the same input before changing settings.
Appendices Appendix B: Troubleshooting, continued Reset Name When to Use How to Use Resulting Action Control-Panel Lock Release To re-enable the control-panel buttons after activation of the Control-Panel Lock Press and hold the INPUT button on the control panel for ten seconds. If the TV is powered off, you can now press the POWER button to turn it on. Allows the control panel to be unlocked if the remote control is misplaced.
Appendices 33 Appendix B: Troubleshooting, continued Common Picture Problems 3. Symptom Remarks A color program appears as a black and white image, or the colors are dim, or the screen is black. • • • 4. Picture from an HDMI input is noisy (poor quality). • • If using component video, check that the red, green, and blue input cables are correctly connected to the red, green, and blue component video jacks.
Trademark and License Information Mitsubishi TV Software END-USER LICENSE AGREEMENT FOR EMBEDDED SOFTWARE IMPORTANT – READ CAREFULLY: This License Agreement is a legal agreement between you (either an individual or an entity) and Mitsubishi Digital Electronics America, Inc. (MDEA) for all software pre installed and/or provided along with this television (“Software”). By utilizing this television and Software, you agree to be bound by the terms of this License Agreement.
Trademark and License Information 35 GNU General Public License Version 2, June 1991 Copyright (C) 1989, 1991 Free Software Foundation, Inc. 675 Mass Ave, Cambridge, MA 02139, USA Everyone is permitted to copy and distribute verbatim copies of this license document, but changing it is not allowed. Preamble The licenses for most software are designed to take away your freedom to share and change it.
Trademark and License Information 10. If you wish to incorporate parts of the Program into other free programs whose distribution conditions are different, write to the author to ask for permission. For software which is copyrighted by the Free Software Foundation, write to the Free Software Foundation; we sometimes make exceptions for this.
Trademark and License Information 37 remain obligated to ensure that it is available for as long as needed to satisfy these requirements. e) Convey the object code using peer-to-peer transmission, provided you inform other peers where the object code and Corresponding Source of the work are being offered to the general public at no charge under subsection 6d.
Warranty Mitsubishi LCD Flat Panel HDTV Limited Warranty MITSUBISHI DIGITAL ELECTRONICS AMERICA, INC. (“MDEA”) warrants to the original purchaser of this LCD Flat Panel HDTV that if purchased from an authorized MITSUBISHI Audio/Video Dealer, should it prove defective by reason of improper workmanship and/or material: a. Parts. All parts (except any software incorporated into this HDTV) are warranted for a period of one year from the date of the original purchase at retail.
Warranty 39 wall mountings, or set-ups, any adjustments of user controls (including contrast, brightness, color, tint, fine tuning, sharpness), other adjustment necessary to prepare the unit for display or use, connection with any external audio receiver, antenna, cable or satellite systems, or service of products purchased or serviced outside the U.S.A. Please consult the operating instructions contained in the Owner’s Guide furnished with the product for information regarding user controls. 3.
Website: www.mitsubishi-tv.com E-mail: MDEAservice@mdea.com Call Consumer Relations for operational or connection assistance at 800-332-2119 To order replacement or additional remote controls or NetCommand IR emitters, Visit our website www.mitsuparts.com or call 800-553-7278 SYSTEM RESET If the TV does not respond to the remote control, control-panel buttons, or will not power on/off, press and hold the POWER button on the control panel for ten seconds.