
Operating instructions


11
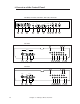
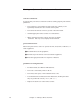
„ Some Conventions Used in this Guide
Mitsubishi is pleased to provide you with an easy-to-follow, useful owner’s
guide. You will find that different types of information are treated in differ-
ent ways.
Pay particular attention to topics bulleted by a red arrow and either an
Important or a Warning label. These terms are used sparingly in the owner’s
guide. They are intended to highlight information which should be carefully
read.
If you will be activating TV GUIDE Plus+, take careful note of all information
with the TV GUIDE Plus+ signal cues. These directions are exclusively for
your use. They should not be followed or used if you will not be using this
feature.
TV GUIDE Plus+
signal cue. Information is exclusively for TV GUIDE Plus+
users.
22 Chapter 2: Connecting Your TV
„ Basic Connections
This section explains the basic connections you will need to make
between your TV, antenna and VCR. You will see there are differ-
ent connections shown depending on the type of antenna you are
using, whether or not you have a cable box, or if you will be using
TV GUIDE Plus+. Choose the type of connection for the type of
equipment you have.
If you have difficulty making any of the connections to your TV, you
may want to contact your Mitsubishi dealer or your local cable
company.
This section explains the following connections:
• TV + antenna or cable without a cable box
• TV + cable with a cable box
• TV + separate UHF and VHF antennas
• TV + VCR + antenna or cable without a cable box
• TV + VCR + cable with a cable box
• TV + stereo audio system
• TV + Mitsubishi products with A/V Network terminals
æWarning: You should unplug your TV and any other components before
connecting them.
28 Chapter 2: Connecting Your TV
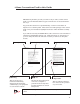
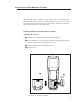
procedure
† Connect the incoming cable to the ANT-A terminal on back of
the TV.
¢ Connect one end of a coaxial cable to the CABLE LOOP-OUT
terminal on the back of the TV.
£ Connect the other end of the coaxial cable to the ANTENNA IN
terminal on the VCR.
® Connect the second coaxial cable from the VCR ANT-OUT to
TV ANT-B.
© Connect an RCA pin-type video cable to the VIDEO OUT
terminal on the back of the VCR. Connect the other end of this
cable to one of the VIDEO INPUT terminals on the back of the
television.
⁄Important: If you are connecting a Super VHS (S-VHS) VCR, use an S-Video
cable instead of an RCA pin-type video cable. Connect this S-Video
cable to the S-VIDEO OUT terminal on the VCR. Connect the
other end of this cable to the S-VIDEO INPUT terminal on the
back of the TV.
§ Connect a set of RCA pin-type audio cables to the AUDIO OUT
terminals on the back of the VCR. Use the red cable to connect
the right (R) channel and the white cable for connecting the left
(L) channel.
¶ Connect the other ends of this cable to the AUDIO INPUT
terminals on the back of the TV.
| If you plan to use TV GUIDE Plus+, connect the IR emitter
cable to the IR/G LINK. Place one of the emitter ends in front
of the VCR. For more detail concerning the placement of the
emitter lenses, see the
TV GUIDE Plus
+
Operating Guide.
⁄Important: If your VCR is monaural (non-stereo), you only need to connect a
single RCA pin-type audio cable. Connect the cable to the audio
out terminal of the VCR, then connect the other end to the L (left)
audio input on the back of the TV.
⁄Important: If your VCR has a video channel switch, set it to “OFF/AV”. See
your VCR owner’s guide for details.
TV + VCR + antenna or cable without a cable box
(cont.)
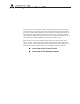
main topic or task
list of related topics or tasks
related topics or tasks
æWarning
This cue alerts you to
information describing
dangerous situations that
could damage your equipment
or cause electrical shock.
†, ¢, etc.
The step-by-step instructions
on how to accomplish a
particular task are signaled
by white numbers on a black
background.
⁄Important:
This cue indicates informa-
tion critical to the operation
of your new TV.
What's in Each Chapter