
Specifications


58
59
Using TV Disc & A/V Discs
TV Disc or A/V Disc Search
NetCommand is able to search to a specific time in a
recording on the TV Disc or an IEEE 1394 A/V Disc.
1. Start the desired track’s playback on the A/V disc.
2. Use the number buttons to enter the time code
position of hours followed by minutes. For example,
to enter one hour and twenty-two minutes (1:22)
into the track, enter 1, 2, 2.
3. Press ENTER to skip to the time code position.
4. To cancel the request or to start over, press
CANCEL instead of ENTER.
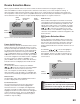
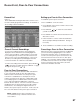
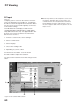
TV Disc & A/V Disc Track List Screen
Figure 15
When viewing the TV Disc or an A/V Disc, press GUIDE
to display its Track List. The Channel, Station, Date,
Time, Program name and whether it has been Watched
(Y=yes, N=no) will be displayed. Tracks will be listed in
date and time order and will vary in size.
Press ADJUST or to navigate through the Track
List. Press INFO to see the recording’s length and
the amount of memory it will use. Free disc space is
displayed in the title line. If the broadcaster has sent
detailed information regarding the program, it will also
display when you press INFO. To play a track, select it
on the list, then press ENTER. To change pages, press
CH or . To delete a track, select it on the list and
press CANCEL. Press CANCEL again to confirm.
Figure 15. Track List screen for TV Disc
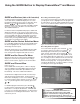
Archiving TV Disc Digital Recordings
To permanently store a COPY FREE digital recording
from the TV Disc on D-VHS or other IEEE 1394 device:
1. Press DEVICE on the remote control and select TV
Disc by pressing ADJUST , , or and then
ENTER.
Using the Remote Control with TV Disc or A/V Disc
after selecting from the Device Selection menu:
GUIDE: displays the Track List of recorded programs.
PLAY: resumes playback of paused program.
PAUSE: pauses or resumes playback of program.
FF/FWD: forward picture search, multiple presses
increase the speed.
REW/REV: reverse picture search, multiple presses
increase the speed.
ADJUST : skip backward 12 seconds per press.
ADJUST : skip forward 30 seconds per press.
ADJUST : skip to the end of the track.
ADJUST : skip to the beginning of the track.
REC: Display the Record Menu to schedule
recordings
If the TV Disc is the default digital record device
(Setup menu), you can also schedule recordings from
ChannelView.
2. Press ADJUST or to select a track. Then
press ENTER to start playing.
3. Press PAUSE to pause the playback.
4. Press REC (record) on the TV remote. The Record
To screen will display.
5. In the “Record to” section, review the destination
device (DVCR, VCR). Change if necessary.
6. Press REC a second time to initiate recording.
7. The TV Disc and destination device cannot be
viewed or used while recording. To view a different
device, press DEVICE and select.
Analog programs cannot be transferred from
the TV Disc and the TV Disc is not intended to
act as permanent storage of digital recordings.
Mitsubishi recommends you transfer important
digital recordings to an external device such as
a D-VHS VCR. Recordings stored on TV Disc
are lost and cannot be recovered if the TV Disc
requires replacement or repair. Mitsubishi is
not liable for lost recordings.
IMPORTANT