
Operation Manual


14 2. TV Setup
Note: Forconnectionandsetupofapersonalcom-
puter,seetheinformationlaterinthischapter.
1. Seechapter3,“TVConnections,”forrecommen-
dationsonconnectingyourdevices.
2. ConnectyourdevicestotheTV,makingnoteof
whichTVinputisusedforeachdevice.
TheTVandthedevicescanbeeitheronoroff
whenconnecting.
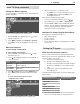
First select a
device type.
Next perform
IR “learning.”
Auto Input Sensing screen for most device types. The
Learn icon appears only on models with NetCommand.
3. PowerontheTVifnotalreadyon.WhentheTV
detectsaconnection,theAuto Input Sensing
screenopens.
• MostDeviceTypes:Specifythedevice
typeandthen,ifdesired,proceeddirectlyto
NetCommandsetupifavailable.
a. IntheAuto Input Sensingscreen,press
tomovethroughthedevicelisttoselect
thedevicetypeconnectedtotheinput.
Thedevicetypeyouselectherewillappear
intheInput Selectionmenu.
b. IfNetCommandIR“learning”isavailableon
yourTVmodel,youcanperform“learning”
noworatalatertime.Toperformnow,
highlighttheLearniconandpress
ENTER
.
Seechapter6,“NetCommand”formore.
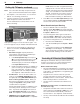
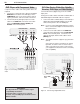
• A/V Receiver:TheTVcandetectaudiocon-
nectionsonthe
DIGITAL AUDIO OUT
jackand
theright(red)analog
AVR AUDIO OUTPUT
jack.
Note for Analog A/V Receivers:Whenyou
disconnectananalogA/Vreceiver,manually
changetheSpeakerssettingtoTVtohear
soundfromtheTVspeakers.
IfNetCommandIR“learning”isavailableforyour
TVmodel,perform“learning”noworatalater
time.Toperformnow,highlightth
eLearnicon
intheAuto Output Sensingscreenandpress
ENTER
.Seechapter6,“NetCommand”formore.
• HDMI Devices Compatible with the TV’s
NetCommand for HDMI Feature:Compatible
Setting Up TV Inputs, continued
HDMIdevicesareoftenrecognizedautomati-
callybytheTV.TheTV’sremotecontrolmay
operatesomedevicefunctionswithoutfurther
setup.Youcanaddmorecontrolfunctionsif
desired.ProgramtheTV’sremotecontrolor,
inthecaseofaYor734seriesTV,perform
NetCommandIR“learning”toaddfunctions.
4 Press
EXIT
toclosetheAuto Input Sensingscreen.
TheTVwillthendisplaytheAuto Input Sensing
screenforthenextconnectionitfinds.
More About Auto Input Sensing
• Chooseadifferentnameforeachinput.
• Antennainputs(
ANT 1/ANT 2
)areneverdetected,
althoughyoucanturnoffunusedantennainputsin
theInputs > Namemenu.
• Youcanchangethedevicetypeatalatertime
usingtheInputs > Namemenu.Any“learned”
NetCommandIRcodeswillbeerased,however.
• IfyouwishtochangedevicesonanHDMIinput:
1. DisconnecttheHDMIdevice.
2. TurnofftheHDMIinputintheInputs > Name
menu.
3. ConnectthenewdeviceandtheAuto Input
Sensingscreenwilldisplay.Ifyouwantthe
deviceunderNetCommandIRcontrol,perform
NetCommand“learning”forthenewdevice.
Controlling A/V Receiver Sound Volume
AlthoughtheTVdetectswhenyouconnectanA/V
receiver,youmustuseoneofthemethodsbelowto
controlsoundvolumefromtheA/Vreceiver.
With a Standard TV Setup
• RecommendedMethod:ProgramtheTV’sremote
controlforyourA/VreceiverandenabletheAudio
Lockfeature.SeeAppendixD,“Programmingthe
RemoteControl.”
• ProgramtheTV’sremotecontrolforyourA/V
receiverandsettheTVremote’sslideswitchto
the
AUDIO
positiontocontrolvolume.Settheswitch
backtothe
TV
positiontocontroltheTV.
• UsetheremotecontrolthatcamewiththeA/V
receiver.
With NetCommand Control of an A/V Receiver (Y
and 734 series only)
• SetupNetCommandcontroloftheA/Vreceiver’s
volumefunctionsintheInputs > AVRmenu.The
TV’sremotewillthenautomaticallycontrolA/V
receivervolume.Seechapter6,“NetCommand.”
• Useanyofthemethodsdescribedforthestandard
TVsetup.