ELECTRIC 3D DLP HOME-CINEMA TELEVISION TM MODELS WD-73640 WD-73C1 WD-73CA1 BASIC OWNER'S GUIDE This manual provides basic connection, setup, and operating instructions. For use of additional fea= tures of this television, please visit our website at www.Mitsubishi=tv.com to view or download a sup= plemental Owner's Guide. Follow the Support link to the Product Documents page. • For questions: Visit our website at www.mitsubishi=tv.com. E-mail us at TVSupport@mevsa.com.
FCC Declaration RISK OFELECTRICSHOCK DONOT OPEN CAUTION: TO REDUCE THE RISK OF ELECTRIC SHOCK, DO NOT REMOVE COVER (OR BACK). NO USER SERVICEABLE PARTS INSIDE. REFER SERVICING TO QUALIFIED SERVICE PERSONNEL. of Conformity Product: Projection Television Receiver Models: WD-73640 WD-73Cll WD-73CA1 Responsible Party: Mitsubishi Electric Visual Solutions America, Inc.
Contents Important Safety Instructions ................ 4 Basic Setup and Operation Package Contents ....................... 5 Installing the Remote Control Batteries ......... TV Overview ........................... 5 5 Before You Begin ........................ Remote Control ......................... 5 6 Setting Up and Using TV Inputs .............. 7 Basic TV Operation ....................... TV Menus ............................ 9 12 2 TV Connections Before You Begin ..................
important Safety instructions Please read the following safeguards for your TV and retain for future reference. Always follow all warnings and instructions marked on the television. EXAMPLE OF ANTENNA GROUNDING 1) Read these instructions. LEAD IN WIRE 2) Keep these instructions. 3) Heed all warnings. DISCHARGE (NEC ELECTRIC 4) Follow all instructions. 5) Do not use this apparatus near water. UNIT ARTICLE 810-20) SERVICE GROUNDING CONDUCTORS ,(NEC 6) Clean only with dry cloth.
BasicSetu and tion TV Overview Package Contents Please take a moment to review the following list of items to ensure that you have received everything. Sample TV controls and location of the STATUS indicator. See page 31. Remote Control Two AA Batteries Basic Owner's Guide Quick Setup Guide -- CH T + INPUT JL- ENTER Product Registration Card .Rear Connection Jacks .
1. Basic Setup and Operation Remote Control Aim the remote control at the TV screen. The TV can detect control signals over the entire screen area. Sleep Timer, page 19 (_ Powers TV on or off. Number/letter keys Channel tuning, page 8 Pass-code entry Adds a separator in digital channel numbers. Clears some menu entries. Returns to the previous channel. Mutes the TV speakers. Not used in this model. VOL Controls volume of TV speakers. CH Changes channels; moves to another PAGEpage in a menu or list.
1. Basic First-Time 1, Setup and Operation 7 Power-On Install batteries in the remote control. See page 5. Welcome Screen Energy Options Aim the emitter (bulb) end of the remote control at the TV and press the POWERkey (_. Wait for the Welcome screen. I If you wish to change the menu language to EspaSol, press Y then ENTER. 3_ Mitsubishi recommends the Home setting, which produces a picture suitable for home viewing and uses less power.
1. Basic Setting Setting Setup and Operation Up and Using TV inputs, continued Up Inputs with Auto Input Sensing Connection information starts on page 13. Learn more about Auto Input Sensing on page 24. 1, Power on the TV. More About the input Selection • To assign helpful names to the icons, see the Inputs > Name menu. • To remove unwanted Antenna or HDMI device icons from the Input Selection menu, see the Inputs > Name menu. • To rearrange the icons, use the Inputs menu.
1. Basic Setup and Operation 9 Basic TV Operation Picture Audio Controls Settings To get the best picture under different viewing conditions, set the Picture Mode first before changing other video settings. 1, Controlling Sound Volume Press V0L to adjust the sound level of the TV speakers. Press VIDEO. Press • until the Picture Mode option displays.
1. Basic Basic Setup TV Operation, and Operation continued The FORMAT Key and Picture Shape t to cycle through picture shapes for the current image. The TV will Press the FORMAT key you remember the format last used on each input. For more on TV formats and signal types, see the supplemental Owner's Guide at www.mitsubishi-tv.com. Sample Uses of the FORMATKey You can use the FORMATkey to display the image as originally intended or to reduce or eliminate black areas at the edges.
1. Basic Status Setup and Operation 11 Display ® © Press the INF0 key to see the on-screen status display. The most common displays are shown here. ® Sample information from the on-screen status display ® AntennaDVD DVR Game Sat.Rcvr. 1. Current Input. Examples: 2. Audio Indicator. Channel Numbers for Over=the=Air Reception or Reception by Direct Cable Note: TV speakers 3. All signals are automatically converted to 1080p for display.
1. Basic Setup and Operation TV Menus Press MENUon the remote control to open the main menu. Find detailed descriptions of all menus in the supplemental Owner's Guide at www.mitsubishi=tv.com. Picture Video Picture+ Reset Advanced 3D Mode Basic picture settings Specialized picture controls Reset of sound and picture adjustments for the current input Highly customized picture adjustments for each input. Mitsubishi recommends these adjustments be made only by a trained professional installer.
2 TVConnections Before You Begin Auto Input Sensing Surround Sound The TV's Auto Input Sensing feature automatically recognizes many connections and prompts you to identify the type of device connected. See pages 8 and 24 for more on Auto Input Sensing. The TV accepts PCM stereo or Dolby Digital 5.1 over the ANT and HDMI inputs and passes the audio out on the DIGITAL AUDIO OUTPUT jack. Connection Types Use the connection types available on your input devices that will give the best video quality.
2. TV Connections Input and Output Jacks ANT Coaxial antenna in 3ut (pa_e 16) H.--tml = m m | | 2 - (page 21) (page 17) _Y Composite video input (page 16) = m 2= -- ANT USB 3D GLASSES EMITTER _ ° HDMI (page 15, page 17) Inputs are HDMI HDCP compliant, For assistance -Y Pb Pr Component video input (page 15) DVI/PC AUDIO INPUT m | | ., _mnnnnnnmnmnmnmnnnnnnnnmm DIGITAL AUDIO OUTPUT TM HDMI ................. ....= 4 3D GLASSES EMITTER I I I USB DVI/PC For software updates only.
2. TV Connections 15 HDMI Device Y Pb Pr Component Examples: HDTV Cable Box, Satellite Receiver, or DVD/Blu-ray Player Examples: HDTV Cable Box, Satellite Receiver, or DVD/Blu-ray Player Required: If your source device has an HDMI output, use the connections for an HDMI device described on this page instead of component video. HDMI cable. Connect an HDMI cable from the TV to the device's HDMI output. HDMI-connectable devices provide video and audio through a single cable.
2. TV Connect_ns DVI Video Device Examples: Computer or Older A/V Device Note: This connection signals. can carry high-definition The HDMI connection (HDCP). video supports copy protection Connect a DVI device (digital only) to one of the TV's HDMI input jacks.
2. TV Connections A/V Receiver A/V Receiver Required: Digital coaxial audio cable Required: 17 with HDMI Output One HDMI cable To send audio from TV channels received on the ANT This option allows you to view and hear content from devices connected to an A/V receiver. The A/V receiver input or from devices connected must use this connection. can send audio and video to the TV over a single HDMI cable.
2. TV Connect_ns VCR or DVD Recorder to an Antenna or Wall Outlet Cable Required: • Video cables _f - Component video cables (red/blue/green) or Composite video cable (usually yellow) RCA-type analog audio cables Two-way RF splitter Two coaxial cables ANT TV panel Note: • Use composite video only if component video or HDMI are unavailable. A composite video connection cannot carry high-definition video signals.
3TVFeatures FAV (Favorites) The FAVkey gives you quick access to favorite program sources. Sources can be channels from the ANT input or devices connected to the TV. You can store up to nine favorites. Sleep Timer The Sleep Timer turns the TV off after the length of time you set. To set the TV to turn on at a certain time of day, see the Setup > Timer menu. Setting the Sleep Timer 1, Press SLEEP. Press SLEEPadditional times to increase the time in 30-minute increments up to the maximum of 120 minutes.
3. TV Features ChannelView Channel Listings ChannelView displays program descriptions sent by broadcasters. This information may be unavailable in some areas. ChannelView Custom Channel Banks About ChannelView ChannelView TM shows memorized channels on the ANT input. It displays channel names and program information for digital channels. No program information is displayed for analog channels. ChannelView allows you to set up three banks of custom channels for convenient access.
3. TV Features 21 3D Video To display 3D content, your Mitsubishi TV requires: Initial Setup • 1, • Active-shutter 3D glasses compatible with any one of the following: A matching external synchronization emitter connected to the TV's back panel DLP link If your 3D glasses came with a synchronization emitter, connect the emitter to the 3D GLASSES EMITTER jack. Place the emitter at the front of the TV where there is a clear path to the glasses. Note: No emitter is required if using DLP Link.
3. TV Features 3D Video, continued Watching 3D Video & If the image does not appear correct (e.g., objects appear to be moving in instead of out), open the Picture > 3D Mode menu. Highlight the Reverse setting for your glasses type and press ENTERto add a check. Z When finished watching 3D video: Active 3D glasses are required. All glasses in use at the same time must use the same control type. Halogen lights, fluorescent lights, or direct sunlight can interfere with operation of the glasses.
3. TV Features 23 3D Video, continued 3D Safety • • • Requirements 3D Glasses are NOT designed as sunglasses or safety glasses and do not provide protection. 3D glasses should be worn only when viewing 3D material. Do not wear the wireless glasses in any situations that require unimpaired visual perception. Children under the age of 5 should not view 3D programming. Under normal conditions, 3D viewing is safe for your movies or games. Some people may experience discomfort, however.
Appendices Appendix A: Auto Input Sensing About Auto Input Sensing This TV's Easy Connect TM Auto Input Sensing feature detects the following connections automatically: • • Analog video jacks HDMI inputs (when powered on) Tips on Auto Sensing • Choose a different name for each input. • The antenna input (ANT) is never detected. You can turn off the unused antenna input in the Inputs > Name menu. • Change the device type displayed in the Input Selection menu by using the Inputs > Name menu.
Appendices 25 Appendix B: TV Care Lamp-Cartridge CAUTION: Replacement If the television is on, press POWER to turn it off. Unplug the television and allow it to cool for at least one hour before attempting replace the lamp cartridge. A BURN DANGER! to HOT SURFACES INSIDE! Touch lamp cartridge handle only. Do not touch lamp or lamp cartridge housing. Keep lamp cartridge horizontal during removal. Do not tilt as glass may come out and cause injury.
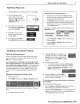
Appendices Appendix B: TV Care, continued Replacement Procedure Removing the Old Lamp Cartridge 1, Turn off TV power and unplug the TV. Allow the lamp to cool for at least one hour before proceeding. After the lamp has cooled, remove the cover of the lamp compartment, located on the back of the TV. Refer to figures 1 and 2. Use a #2 (medium) Phillips screwdriver to loosen the screws securing the cover.
Appendices 27 Appendix B: TV Care, continued Cleaning Recommendations Normally, light dusting with a dry, non-scratching duster will keep your TV clean. If cleaning beyond this is needed, please use the following guidelines: Care of the Remote Control Remote Control Tips ° For longer life, use alkaline batteries. ° Do not mix old and new batteries. ° Be within 20 feet of the equipment. ° Do not press two or more keys at the same time unless instructed to do so.
Appendices Appendix C: Troubleshooting TV Reset Comparison Guide You can resolve many common TV problems using the reset functions described in the following table. IMPORTANT Before you change sound or picture settings: If picture or sound settings seem wrong for a broadcast channel (a channel from the ANT input, a cable box, or satellite receiver), first check other channels from the same input before changing settings.
Appendices Appendix C: Troubleshooting, 29 continued System Reset If the TV does not turn on or off, does not respond to the remote control or controlpanel buttons, or has audio but no video. Press and hold the POWERbutton on the control panel for ten seconds. The TV will turn off. The green LED will flash quickly for about one minute. The changes you made most recently, before using SYSTEMRESET,may be lost.
Appendices Appendix C: Troubleshooting, continued Common Picture Problems Picture does not look like a high-definition picture. Compare the picture to the TV's test picture (Picture > Picture+ menu) to check if the source signal is supplying a lesser-quality image. Not all signals are high-definition signals. To receive high-definition programming from your cable or satellite provider, you must subscribe to the provider's high-definition service.
Appendices Appendix (24 Troubleshooting, 31 continued Front-Panel STATUS Light Key 0 Off O Steady On (D Slow Blinking (_) Fast Blinking i / • None O TVis powered off. Normal operation. Green O TVis powered Green O TV powered off, auto-on TV Timer is set. Normal operation. TV can be turned on at any time. Green Q TV just powered off and lamp is cooling. Sixty seconds after turning off TV, LED will start to blink.
Mitsubishi TV Software Mitsubishi TV Software END-USER LICENSE AGREEMENT FOR EMBEDDED SOFTWARE IMPORTANT - READ CAREFULLY: This License Agreement is a legal agreement between you (either an individual or an entity) and Mitsubishi Electric Visual Solutions America, Inc. (MEVSA) for all software pre installed and/or provided along with this television ("Software"). By utilizing this television and Software, you agree to be bound by the terms of this License Agreement. The Software and treaties.
Mitsubishi TV Software 33 GNU General Public License Version Copyright 2, June 1991 (C) 1989, 1991 Free Software Foundation, 675 Mass Ave, Cambridge, Everyone is permitted to copy and distribute verbatim copies Inc. MA 02139, USA of this license document, but changing it is not allowed. Preamble The licenses for most software are designed to take away your freedom to share and changeit.
Mitsubishi TV Software 10. Ifyou wishtoincorporatepartsoftheProgramintootherfree programs whose distribution conditions aredifferent, write to the author to ask for permission. For software which is copyrighted bythe FreeSoftware Foundation write to the Free Software Foundation;we sometimes makeexceptions for this.
Mitsubishi TV Software 35 remainobligatedto ensurethat it is availablefor as longas neededto satisfytheserequirements. e)Oonvey the objectcode usingpeer-to*peer transmission,providedyouinformotherpeerswherethe objectcode andCorresponding Sourceof the workarebeingofferedto the generalpublicat nochargeundersubsection 6d. Aseparableportionof the objectcode,whosesourcecodeis excludedfromthe CorrespondingSourceas a SystemLibrary,neednot beincludedinconveyingthe objectcode work.
Warranty Mitsubishi Home-Cinema Television Limited Warranty MITSUBISHI ELECTRIC VISUAL SOLUTIONS AMERICA, INC. ("MEVSA') warrants as follows to the original purchaser of this television from an authorized MITSUBISHI Audio/Video Dealer, should it prove defective by reason of against defects arising from improper workmanship and/or material: a. Parts. The lenticular (i.e.
Warranty d. To obtain a replacement 37 lamp, order the lamp directly from the MEVSA Parts Department at (800) 553-7278. 2. THIS LIMITED WARRANTY DOES NOT COVER: a. Up to .01% pixel outages (small dot picture elements that are dark or incorrectly illuminated). b.
Warranty Mitsubishi Home-Cinema Television Limited Warranty (Canada only) This limited warranty is valid only for products purchased, used and serviced in Canada. MITSUBISHI ELECTRIC VISUAL SOLUTIONS AMERICA, INC. ("MEVSA') warrants as follows to the original purchaser of this television from an authorized MITSUBISHI Audio/Video Dealer, should it prove defective by reason of against defects arising from improper workmanship and/or material: a. Parts. The lenticular (i.e.
Warranty 39 2. THIS LIMITED WARRANTY DOES NOT COVER: a. Up to .01% pixel outages (small dot picture elements that are dark or incorrectly illuminated). b.
H_ MITSUBISHI ELECTRIC Website: E-mail: www.mitsubishi-tv.com TVSupport@mevsa.com Call Consumer operational Relations for or connection assistance at 800-332-2119 To order replacement or additional remote controls or lamp cartridges, Visit our website www.mitsuparts.com or call 800-553-7278 SYSTEM RESET For Your Records If the TV does not respond to the remote control, control-panel buttons, or will not power on/off, press and hold the POWERbutton on the control panel for ten seconds.