
Operation Manual


EN-45
CLEAR key: ..... Deleting all the entered
characters.
• Youcanenternumbersbypressingthenumber
buttons (0 to 9) while holding down the NUM
button on the remote control.
• Thedefaultpasswordis“admin”.
5. Select OK, and NEW NETWORK PASSWORD
screen appears if the entered password is correct.
• Iftheenteredpasswordisnotcorrect,
CURRENT NETWORK PASSWORD screen
appears again.
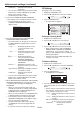
CONFIRM NETWORK PASSWORD
A
OK
caps
CLEAR
DEL
CANCEL
B C D E F G H I J K L M
N O P Q R S T U V W X Y Z
0 1 2 3 4 5 6 7 8 9
← →
↔
∗∗∗∗∗∗∗∗∗∗∗∗∗∗∗∗
NEW NETWORK PASSWORD
∗∗∗∗∗∗∗∗∗∗∗∗∗∗∗∗∗∗∗∗∗∗∗∗∗∗∗∗∗∗∗∗
6. Enter the NEW NETWORK PASSWORD and
CONFIRM NETWORK PASSWORD.
• Passwordcanbesetusingupto32characters
including alphabets (capital/small) or numeric
characters.
← key: ............. Shifting the position of enter
cursor to the left for each
character.
→ key: ............. Shifting the position of enter
cursor to the right for each
character.
key: ............... Shifting the position of
enter cursor between NEW
NETWORK PASSWORD
and CONFIRM NETWORK
PASSWORD.
DEL key: .......... Deleting the character in the
position of enter cursor for each
character.
caps/CAPS key:
Switching an alphabet character
to CAPITAL or small.
CLEAR key: ..... Deleting all the entered
characters.
• Youcanenternumbersbypressingthenumber
buttons (0 to 9) while holding down the NUM
button on the remote control.
7. When NEW NETWORK PASSWORD and CONFIRM
NETWORK PASSWORD are matched, the setting
is completed after changing the NETWORK
PASSWORD.
• WhenyouselectOKandthepasswordsyou
entered are matched, the setting change dialog
is displayed. After the dialog disappears, the
NETWORK menu is displayed.
• WhenyouselectCANCEL,theNETWORKmenu
is displayed without changing the password.
• Iftheenteredcontentisnotmatched,NEW
NETWORK PASSWORD screen appears again
after an error dialog is displayed.
• Thepasswordforthewebcontrolsoftware
of CRESTRON cannot be changed with this
setting.
• Itmaytakesometimetoreectthesettings.
Initial network settings (continued)
IP Settings
(See page 31 for menu setting.)
1. Display the NETWORK menu.
2. Press the or button to select IP CONFIG.
IP CONFIG
ENTER
3. Press the ENTER button.
• IPCONFIGmenuappears.
NETWORK
IP CONFIG
opt.
DHCP
IP ADDRESS
SUBNET MASK
DEFAULT GATEWAY
0. 0. 0. 0
MAC ADDRESS
SAVE SETTINGS
ON
0. 0. 0. 0
OK
0. 0. 0. 0
Setting or Clearing DHCP
1. Display the IP CONFIG menu.
2. Press the or button to select DHCP.
DHCP
ON
3. Press the or button to select ON or OFF.
• WhensettingDHCPtoON,IPADDRESS,
SUBNET MASK, and DEFAULT GATEWAY
cannot be set. If you set those settings, set
DHCP to OFF and perform the IP settings as the
following procedures.
• UntiltheexecutionofSAVESETTINGS,the
change is not saved.
IP Address Settings
1. Display the IP CONFIG menu.
2. Press the or button to select IP ADDRESS.
IP ADDRESS
0. 0. 0. 0
3. Press the ENTER button.
• IPADDRESSscreenappears.
IP ADDRESS
192 . 168 . 0 . 10
0
OK
CLEAR
DEL
CANCEL
1234567 8 9
← →
4. Press the direction buttons to move the key cursor,
select the numbers to enter, and press the ENTER
button.
• Setthenumericvaluewithintherangefrom0to
255. However, set the numeric value for the final
octet within the range from 1 to 254.
← key: Shifting the position of enter cursor to
the left.
→ key: Shifting the position of enter cursor to
the right.
DEL key: Deleting the character in the position
of enter cursor for each character.
CLEAR key: Deleting all the entered
characters.