
Operation Manual


EN-48
• Theimagewithintheouteredgesofthered
frame is captured.
• ThecapturedimageisdisplayedintheREAL
mode automatically.
CAPTURE : ENTER + ENTER
CANCEL : MENU
CAPTURE : ENTER X2
CANCEL : MENU
12.Adjust the size of the image to be captured so that
such image stays within the red frame.
• Press the , , or button to move the red
frame.
• You can’t move the red frame outside the
screen.
• Press the MENU button to cancel the
procedure.
CAPTURE : ENTER X2
CANCEL : MENU
13. Press the ENTER button twice.
• Image capture will start.
CAPTURE : ENTER X2
CANCEL : MENU
CAPTURING IMAGE !
• When the image capture completes, the
captured image will be displayed for 1 second.
Important:
• You can’t change the new startup screen back to
the original startup screen. (Even when you select
RESET ALL in the FEATURE menu, the factory
default screen isn’t available any longer.) When you
want to change the startup screen again, capture
another image.
• The captured image will be displayed from the
next startup. If the captured image isn’t displayed,
make sure that the setting of SPLASH SCREEN in
the INSTALLATION menu isn’t OFF. (See page 33.)
• When BACK COLOR in the INSTALLATION menu is
set to IMAGE, the captured image will be displayed
while no signal is supplied.
• Whennovideosignalissupplied,theprojector
takes some time to display the captured image.
• Some images can’t be captured correctly because
of their signal type.
Advanced features
Changing the image displayed at the
startup
You can display your desired image as the startup
screen (or splash screen). By setting the menu, you
can use such image instead of the background image
that is displayed when no video signal is supplied.
Important:
• You can’t set IMAGE CAPTURE when PASSWORD
FUNCTION in the FEATURE menu has been set to
SPLASH ID SCREEN to enable the password lock.
• You can’t set IMAGE CAPTURE when the
component video signal is inputted.
Setting procedure
(See page 31 for menu setting.)
1. Press the COMPUTER button to select the image
supplied to the COMPUTER/COMPONENT/VIDEO
IN terminal.
2. Display your desired image.
3. Display the INSTALLATION menu.
4. Select IMAGE CAPTURE by pressing the or
button.
5. Press the ENTER button.
• The setting menu will be displayed.
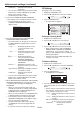
INSTALLATION
CUSTOM IMAGE CAPTURE
SIZE
BACK COLOR
CAPTURE
GRAY
x1
opt.
GO
Set the background color
(Set the background color only when you set the
image size to x1 or x2.)
6. Select BACK COLOR by pressing the or
button.
7. Select your desired color for the background
(GRAY, RED, GREEN, BLUE, BLACK, WHITE,
RED50%,GREEN50%,orBLUE50%)bypressing
the or button.
Set the image size
8. Select SIZE by pressing the or button.
9. Select x1, x2, or FULL by pressing the or
button.
x1 x2 FULL
Capture the image
10. Select CAPTURE by pressing the or button.
11.Press the ENTER button.
• A red frame appears. (The size of the red frame
is 320 x 240 pixels.)