
Operation Manual


EN-57
You can replace the lens on this projector. The lens
can be replaced with the separately sold option lens
according to the usage environment of the projector.
For details of the specification of the option lens,
contact your local dealer.
• Beforeyoureplacethelens,besuretoturnoffthe
projector and unplug the power cord from the wall
outlet.
• Beforeyoureplacethelens,besuretoresetthe
lens position to the center (the factory default
position).
When the lens position is moved from the center,
reset to the center position (the factory default
position) using the lens shift reset (see page 33).
The lens replacement may fail when the lens
position is moved from the center.
• Theprojectorandlensarecomposedofprecision
parts. Do not subject them to shock or excessive
force.
• Duringreplacement,donottouchthelenssurface
with your hands.
• Takesufcientcarenottoattachanydirtoroil
on the lens surface, and not to scratch the lens
surface.
• Donotreplacethelensinadustyplace.Dirtor
dust entering the projector causes a degradation of
an image quality.
• Donotleavethelensremovedfromtheprojector
for a long period of time. Dirt or dust entering the
projector causes a degradation of an image quality.
• Donottouchthesignalcontactofthelenswith
your finger. When dirt or dust adheres, it may cause
a contact failure.
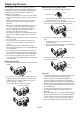
Removing the lens
1. Remove the lens ring by turning it counterclockwise
slightly.
Lens ring
2. Turn the lens counterclockwise until it stops while
pressing the lens release button on the top of the
cabinet as far as it will go, and then remove the
lens by pulling it out slowly.
•Donotdropthelenswhenremovingit.
Lens release button
Lens
Mounting the lens (option lens)
1. Remove the lens protective cap from the lens.
Lens
Protective cap
• Don’tattachtheprotectivecaptothelensafter
mounting the lens to the projector.
2. Insert the lens slowly as far as it will go with the red
mark on the lens pointed upward in the center.
Red mark
3. Turn the lens clockwise slowly until you hear it
click.
• Donotpressthelensreleasebuttonwhen
mounting the lens.
• Afteryoumountthelens,turnitcounterclockwise
and check that it isn’t removed.
4. Insert the lens ring with the part A pointed up and
then turn it clockwise.
Lens ring
Part A
Important:
• Donottransporttheprojectorwiththeoptionlens
mounted. The projector may be damaged.
• Withtheoptionlensmounted,thebrightness,
resolution, and color uniformity in the projected
image may differ from those with the standard lens.
• Withtheoptionlensmounted,theadjustableangle
in the keystone adjustment differs from that with
the standard lens.
• Inthekeystoneadjustmentwiththeoptionlens
mounted, the proper aspect ratio may not be
obtained.
• Whentheoptionlensismounted,projectedimages
may become distorted, have decreased resolution,
or have shadows at their corners if the projection
screen is set close to the top or bottom edge or
right or left edge of the effective projection area.
Replacing the lens