
Operation Manual

EN-8
2
1
123
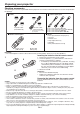
Preparing your projector (continued)
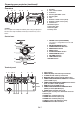
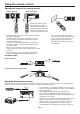
Bottom side
Indicators
1 Lock bar (SECURITY ANCHOR)
• Attachachain,etc.tothislockbartoanchor
the projector.
2 Adjustment feet
1 FILTER indicator
2 STATUS indicator
3 POWER indicator
2
29
22
23
25
15
13
16
17
18
19
12
21
20
3
14
27
28
26
4
5
1
6
7
8
24
9
10
11
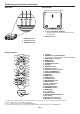
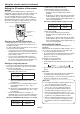
Remote control
1 Indicator
2 POWER button (ON/STANDBY)
The status is changed between ON and STANDBY.
3 COMPUTER 1, 2 buttons
4 MENU button
5 BLANK button
6 ZOOM/FOCUS button
7 ID button
8 MAGNIFY button
9 PinP/SPLIT button
*1
10 CE (Color Enhancer) button
11 TEST PATTERN button
12 AUTO POSITION button
13 SDI button
*2
14 HDMI button
15 VIDEO button
16 S-VIDEO button
17 DVI-D(HDCP) button
18 ENTER button
19 , , , buttons
20 ASPECT button
21 LENS SHIFT button
22 GEOMETRY button
23 NUM button
24 + , - buttons
*3
25 FREEZE button
26 SUPER RESOLUTION button
27 ALL button
28 Number (0 to 9) buttons
*4
29 Wired remote control jack
*1: The PinP/SPLIT button functions as the PinP button for this projector. (It doesn’t function as the SPLIT button.)
*2: The SDI button doesn’t work with this projector.
*3: The +, - buttons also function as the VOLUME button.
*4: To use the number buttons (0 to 9), press them while holding down the ID button or the NUM button.