XMP-300/305 Full-HD Open API digital signage media player User’s Manual About the XMP-300/305 Models This user’s manual covers both model variants each with different local storage technologies: XMP‐300 XMP‐305 HD network media player Solid‐state HD network media player Hard disk local storage Internal CF card local storage For general installations Certified for shock and vibration‐ tolerant installations 80GB capacity for up to 30 hours of HD video@8Mbps 4GB capacity for up to 102 minutes of
Contents 1. Introduction 1.1. Hardware features 1.2. Software Features 1.3. Package Contents 1.4. Front Panel Indicator Lights 1.5. Rear I/O Connections 1.6. Installation provisions 2. Configuring the XMP‐300 Media Player 2.1. System Connections 2.2. USB keyboard Configuration Menus 2.3. Connect the XMP‐300 to your network 2.4. Video Output Settings 2.5. Clock and Calendar Settings 2.6. Additional Settings 2.7. Factory Reset Button 2.8. Applying firmware upgrades 3.
1. Introduction This document describes the hardware and software operations of the XMP‐300/305 digital signage media players, system set up, and frequently asked questions. 1.1. Hardware features The XMP‐300/305 Media Player is a Full‐HD 1080p high definition digital signage player featuring industrial grade mechanical design and versatile open‐standard SMIL programmability. • • • • • • • • Full‐HD 1080p hardware decoding of MPEG, H.
1.3. Package Contents NMP‐550 Player Unit Ethernet cable AC Adapter and Cord Mounting Plate (x2) Screw (x4, not shown) Software CD RCA to 1/8” mini‐jack audio adapter 1/8” to 1/8” mini‐jack audio cable Quick Start Guide NOT INCLUDED: A USB keyboard is required for system setup 1.4. Front Panel Indicator Lights 1.5. Rear I/O Connections 1. 2. 3. 4. 5. 6. 7. 8. Ethernet port for network content update USB port for USB content update VGA port for analog video output HDMI 1.
1.6. Installation provisions The XMP‐300 is supplied with a pair of mounting plates for physical installation. 1. Attach the mounting plates to the bottom side of the player with 2 screws (supplied) on each side. Supplied Mounting Plates (x2) 2. The player with the mounting plates attached can be mounted using 4 screws (not supplied) at 76mm X 228mm (2.99” X 8.98”) spacing.
2. Configuring the XMP‐300 Media Player 2.1. System Connections 1 Attach a video cable (either VGA or HDMI) to your monitor. When using the VGA connection, your monitor should support XGA (1024x768) resolution or greater. For audio output, you will also need to connect a stereo RCA cable from the XMP‐300 to your monitor. When using an HDMI connection, audio is sent along with video over the HDMI cable, so no additional cables are required.
If you have already loaded media contents into the player, contents will play back immediately after boot up, and the “Copying from USB drive” screen will not be shown. You can still plug in a USB keyboard at any time during playback to enter the menu system. 2.2. USB keyboard Configuration Menus You must attach a USB keyboard to the XMP‐300 to configure the media player.
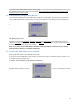
Press “Enter” on keyboard to Note IP address assigned by network. 2) Static – Manually Assign Network IP Address Highlight “Networking setting” and press “Enter” on the keyboard to select. Highlight “Static IP” below, press “Space bar” on the keyboard to fill in the star (*) at the Static IP brackets, and press “Enter” on the keyboard to select. Highlight “IP” and press “Enter” on the keyboard to modify.
2.4. Video Output Settings For best quality, set the output resolution to match your display’s native resolution to avoid image scaling and blur. If you are connecting to an LCD TV, the resolution setting is most likely 1366x768, 1280x720, or 1920x1080. If you are connecting a LCD computer monitor, projector, or plasma display, refer to the device specifications for the best matching setting. Press the space bar to fill in the star (*) before pressing the enter key for . 2.5.
2.7. Factory Reset Button The S/W RESET button located at the back of the media player can be used to restore factory settings. Use the button to restore default settings or reset an unstable player state. Performing a factory reset Warning: This procedure will restore all menu settings to factory default and also format the internal storage to factory conditions (all contents removed). To restore all factory settings and format the drive: 1. 2. 3. 4.
4.2. Playing a SMIL demo The demonstration files can be found in the Software and Documentation CD. Step 1: Prepare contents using a PC Prepare a formatted USB drive (using the “FAT32” file system option). Copy the entire sample SMIL directory with all its content files from Software and Documentation CD to the USB drive. Make sure the SMIL directory shows up in the root directory of the USB drive. Step 2: Upload contents to player Power up the XMP‐305/300. Booting takes about 60 seconds.
5. Technical Data 5.1.
Wall‐mount bracket VESA mounting kit (Optional) Power requirement 12V, 2A DC Power consumption Typical* 7W Environmental Operating temperature: 0 – 40° C / 32 – 104° F Humidity: 5 – 85% @ 40° C / 32 – 104° F non‐ condensing Dimensions 211x153x 43 (mm) (excluding projections) 8.3 X 6 X 1.7 (inches) (excluding projections) Weight 1.4kg 3 lbs. Safety UL‐approved AC adapters Certifications CE/FCC RoHS Warranty *typical usage when playing 1080P full resolution video Typical* 5W 1.14kg 2.
6. Appendix: FAQ For more frequently asked questions and solutions, search the online product knowledge base at www.IAdea.com/support . What can I do to improve Adfotain Manager Express performance on my PC? The latest Microsoft .NET 3.5 SP1 offers improved performance and bug fixes to Adfotain Manager Express. You can install the update via this internet browser link http://go.microsoft.com/fwlink/?LinkId=124150 or by searching for “.NET 3.5 SP1” At www.microsoft.com.
sometimes the videos you acquire may not be playable on all players. In this case, you should check your compression settings (bitrate, audio codec, and other parameters) and use a compatible setting. If the files can play on your PC but not on your player, you should recompress the file to ensure playback. For greatest compatibility, we recommend outputting to the WMV format (VC‐1 codec, 3 to 5 Mbps bit‐rate).