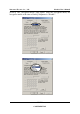
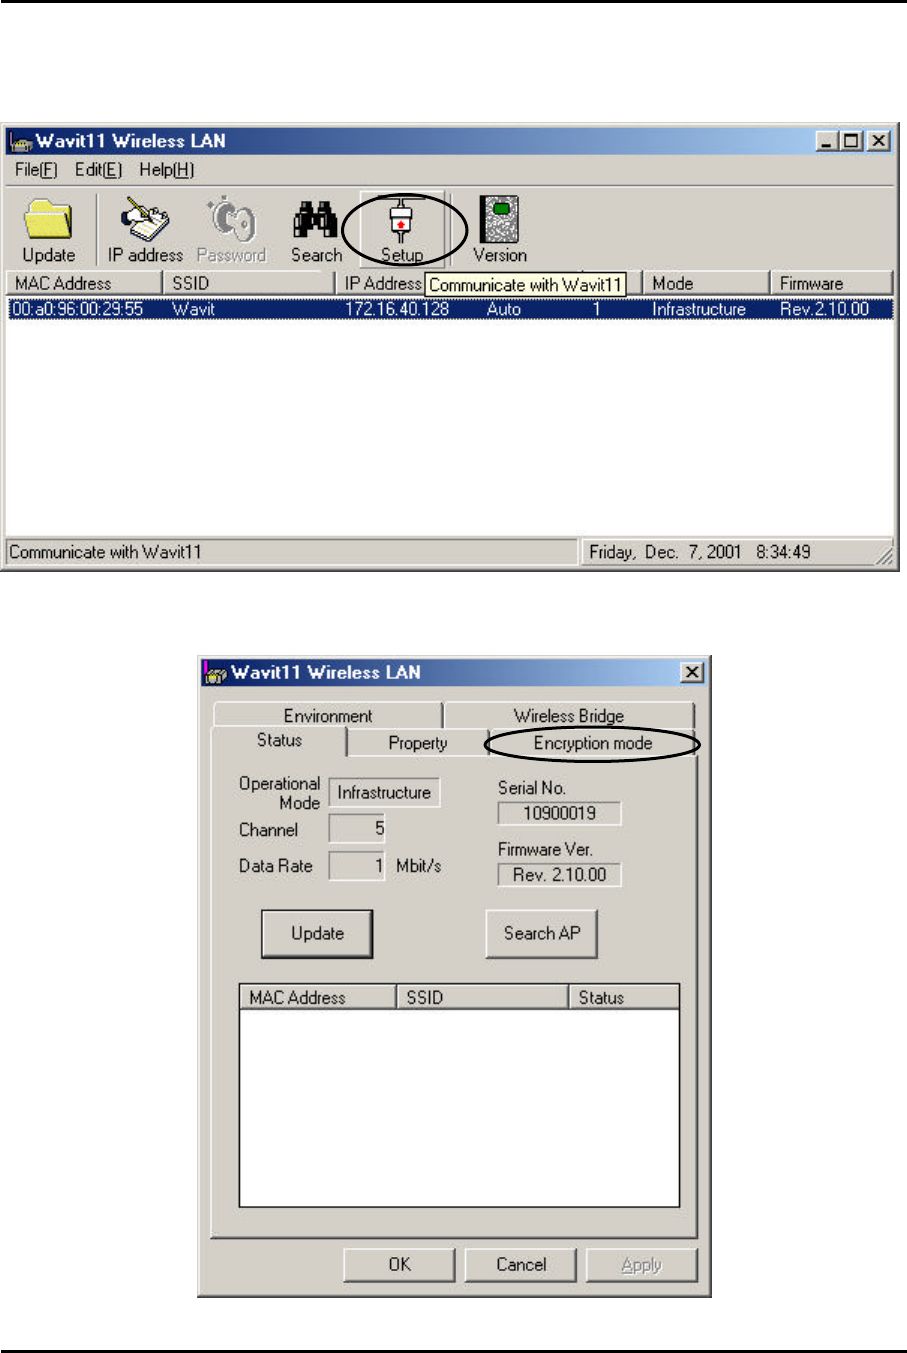
Mitsumi Electric Co., Ltd. Wavit11 User's Manual 8. Encryption Setting 8.1. Encryption setting [STEP1] Click the “Setup” in the “Wavit11 Wireless LAN” window. [STEP2] Click the “Encryption mode” page.
Mitsumi Electric Co., Ltd. Wavit11 User's Manual [STEP3] The “encryption mode” page opens. Select an encryption mode; the encryption mode at the time of factory shipment is “Disable”.
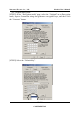
Mitsumi Electric Co., Ltd. Wavit11 User's Manual There are 3 type of encryption mode. 1. Mitsumi proprietary Original Encryption. 2. 40bit WEP Encryption. 3. 128bit WEP Encryption.
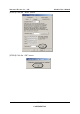
Mitsumi Electric Co., Ltd. Wavit11 User's Manual 8.2. Original Encryption [STEP1] At the “Encryption mode” page, select the “Original” as an Encryption mode, input a Generation string that generates encryption keys, and then click the “Generate” button. [STEP2] Select the “Default Key”.
Mitsumi Electric Co., Ltd. Wavit11 User's Manual [STEP3] Click the “Write” button. [STEP4] Click the “OK” button.
Mitsumi Electric Co., Ltd. Wavit11 User's Manual [STEP5] The Encryption mode and the Encryption keys are written. Click the “OK” button. [STEP6] After returning to the “Wavit11 Wireless LAN” window, end the Wavit11 Configuration Utility.
Mitsumi Electric Co., Ltd. Wavit11 User's Manual 8.2. 40bit WEP Encryption [STEP1] At the “Encryption mode” page, select the “40bit WEP” as an Encryption mode, input a Generation string that generates encryption keys, and then click the “Generate” button. [STEP2] Select the “Default Key”.
Mitsumi Electric Co., Ltd. Wavit11 User's Manual [STEP3] Click the “Write” button. [STEP4] Click the “OK” button.
Mitsumi Electric Co., Ltd. Wavit11 User's Manual [STEP5] The Encryption mode and the Encryption keys are written. Click the “OK” button. [STEP6] After returning to the “ Wavit11 Wireless LAN” window, end the Wavit11 Configuration Utility.
Mitsumi Electric Co., Ltd. Wavit11 User's Manual 8.3. 128bit WEP Encryption [STEP1] At the “Encryption mode” page, select the “128bit WEP” as an Encryption mode, input a Generation string that generates encryption key, and then click the “Generate” button. [STEP2] Click the “Write” button.
Mitsumi Electric Co., Ltd. Wavit11 User's Manual [STEP3] Click the “OK” button. [STEP4] The Encryption mode and the Encryption key are written. Click the “OK” button.
Mitsumi Electric Co., Ltd. Wavit11 User's Manual [STEP6] After returning to the “Wavit11 Wireless LAN” window, end the Wavit11 Configuration Utility.
Mitsumi Electric Co., Ltd. Wavit11 User's Manual 8.4. Encryption Disable [STEP1] Select the “Disable” as an Encryption mode, and then click the “Write” button. [STEP2] Click the “OK” button.
Mitsumi Electric Co., Ltd. Wavit11 User's Manual [STEP3] The Encryption mode is written. Click the “OK” button. [STEP4] After returning to the “Wavit11 Wireless LAN” window, end the Wavit11 Configuration Utility.
Mitsumi Electric Co., Ltd. Wavit11 User's Manual 9.
Mitsumi Electric Co., Ltd. Wavit11 User's Manual 9.1. Connection to personal computer [STEP1] Connect Wavit11 and the personal computer with a straight cable. [STEP2] Connect the DC plug of the AC adapter to the Wavit11 DC jack. [STEP3] Connect the AC adapter to the AC outlet. The setup of Wavit11 must be completed in advance, or the setup can be done after [STEP3]. To connect to a personal computer, the following modes are recommended. Ad-Hoc mode 802.
Mitsumi Electric Co., Ltd. Wavit11 User's Manual 9.2. Connection to Printer [STEP1] Set the Wavit11 appropriately. [STEP2] Connect Wavit11 and printer with a straight cable. [STEP3] Connect the DC plug of the AC adapter to the Wavit11 DC jack. [STEP4] Connect the AC adapter to the AC outlet. The printer to connect to Wavit11 needs the Ethernet port. The setup of Wavit11 must be completed in advance. To connect to the printer, the following operational mode are recommended. Ad-Hoc mode 802.
Mitsumi Electric Co., Ltd. Wavit11 User's Manual 9.3. Connection to Network Equipment Example of the Network equipment is as follows. HUB Cable Modem ADSL Modem Router [STEP1] Set the Wavit11 appropriately. [STEP2] Connect Wavit11 and personal computer with a straight cable. [STEP3] Connect the DC plug of the AC adapter to the Wavit11 DC jack. [STEP4] Connect the AC adapter to the AC outlet. The setup of Wavit11 must be completed in advance.
Mitsumi Electric Co., Ltd. Wavit11 User's Manual 10. Items that can be set with Configuration Utility You can set the following items with the Wavit11 Configuration Utility. Items Operational Mode SS ID Channel Data Rate Roaming Hidden Node Compensation Choice Ad-Hoc, Infrastructure, Both, AP, Wireless Bridge, 802.11Ad-Hoc Within 32 letters (ASCII code: 0x20 - 0x7e) 1-11 1M, 2M, 5.
Mitsumi Electric Co., Ltd. Wavit11 User's Manual 10.1. Operational Mode Select the operational mode for the Wavit11.
Mitsumi Electric Co., Ltd. Wavit11 User's Manual 10.2. SS ID It is a Network ID that indicates whole wireless LAN network. Set any ASCII string: 32 characters max. It will be necessary to set the same SSID to all Wavi11 in case of Infrastructure LAN. It will be necessary to set the same SSID to all Wavit11 in case of IBSS LAN.
Mitsumi Electric Co., Ltd. Wavit11 User's Manual 10.3. Channel Set a channel Wavit11 uses. Channel setting will be required in case of the following operational mode. Ad-Hoc mode Both mode AP mode Wireless Bridge mode To configure several wireless LAN groups within a same area, a unique channel should be set per each group, and it is necessary to set each channel at the place 5 channels apart in order to avoid the interference between the wireless LANs.
Mitsumi Electric Co., Ltd. Wavit11 User's Manual 10.4. Data Rate There are 5 choices: 1Mbps, 2Mbps, 5.5Mbps, 11Mbps and the automatic setting. When the automatic setting is selected, Wavit11 makes communication in the fastest possible rate, and this depends on the equipment at the other end. If the communication environment is degraded and making communication in the present data rate becomes impractical, the data rate will be lowered and the wireless LAN communication will continue.
Mitsumi Electric Co., Ltd. Wavit11 User's Manual 10.5. Roaming This is a way to set whether the Wavit11does a roaming or not. What is Roaming? This function can be activated in an environment where multiple Access Points exist. If the wireless LAN under communication with a certain Access Point moves and fails in receiving the radio wave, the roaming function will enable Wavit11 to change the destination to the other nearby Access Point.
Mitsumi Electric Co., Ltd. Wavit11 User's Manual 10.6. Hidden Node Compensation Depended on the placement of multiple wireless LANs, there is a case that the wireless LAN communication disturbance caused by other wireless LANs takes place and the data rate may be fallen off.
Mitsumi Electric Co., Ltd. Wavit11 User's Manual 10.7. Details Click the “Details” button to enable the Wavit11 detailed setting. Normally you do not need to change these items. Check each item of this manual, when the setting should be modified.
Mitsumi Electric Co., Ltd. Wavit11 User's Manual 10.8. RTS Threshold In the case that the Hidden node compensation is set to Enable, setup of RTS threshold will be possible. The Wavit11 seizes the wireless LAN communication line prior to actual data transmission if the data length is greater than RTS Threshold. When the Hidden node compensation is set to Enable, the initial value is 0, therefore, the Wavit11 seizes the wireless LAN communication line prior to every length of actual data transmission.
Mitsumi Electric Co., Ltd. Wavit11 User's Manual 10.9. Fragmentation Threshold In the case that the transmitted data do not correctly reach the wireless LAN on the partner side, the Wavit11 will retransmit the data predefined times. This retransmission occurs frequently by a communication error under poor communication condition and the performance of the wireless LAN network sometimes deteriorates. There is a way to mitigate the performance deterioration, that is the retransmission of divided frame.
Mitsumi Electric Co., Ltd. Wavit11 User's Manual 10.10. Short Retry Limit In the case that the transmitted data do not correctly reach the wireless LAN on the partner side, the Wavit11 will retransmit the data predefined times and the number of retransmission times is set here. In Short Retry Limit, the number of retransmission is set, for the data frame whose length is below RTS threshold.
Mitsumi Electric Co., Ltd. Wavit11 User's Manual 10.11. Long Retry Limit In the case that the transmitted data do not correctly reach the wireless LAN on the partner side, the Wavit11 will retransmit the data predefined times and the number of retransmission times is set here. In Long Retry Limit, the number of retransmission is set, for the data frame whose length is above RTS threshold.
Mitsumi Electric Co., Ltd. Wavit11 User's Manual 10.12. Beacon Interval The Wavit11 in AP mode periodically transmits special frame called Beacon to information about current setting to another Wavit11 that tries to join the wireless LAN network. Here, is a way to set the Beacon interval. This item can be set only if the operational mode is AP mode.
Mitsumi Electric Co., Ltd. Wavit11 User's Manual 10.13. SSID transmission This is a description to set SSID transmission. It is possible to select whether SS ID should be included in Beacon frame transmitted by Wavit11 in AP mode. This item can be set only if the operational mode is AP mode.
Mitsumi Electric Co., Ltd. Wavit11 User's Manual 10.14. Authentication Algorithm The algorithm that is used for the Authentication between Wavit11 is selected. There are 2 kinds of Authentication Algorithm, Open System and Shared Key, and the checking of the encryption key is carried out mutually in Shared Key. You can set this item in the following operational mode. Infrastructure mode AP mode Both mode 802.11 Ad-Hoc mode You cannot set this item if the encryption mode is set to Disable.
Mitsumi Electric Co., Ltd. Wavit11 User's Manual 10.15. Basic Rate Set The sending speed of broadcast and multicast frame can be set.
Mitsumi Electric Co., Ltd. Wavit11 User's Manual 10.16. Encryption mode The Encryption mode used for the wireless LAN communication between Wavit11 is selected. It is not possible to make communication between Wavit11 with different encryption mode.
Mitsumi Electric Co., Ltd. Wavit11 User's Manual 10.17. Encryption Key It is the Encryption key for the encryption of data transmission. Set the same encryption key to each Wavit11. There are two ways to set encryption key: You set some string and the Wavit11 automatically generate encryption key from string. You set the encryption key directly.
Mitsumi Electric Co., Ltd. Wavit11 User's Manual 10.18. Default Key This is one of the encryption keys Wavit11 use for data transmission. You can set this item if the Encryption Mode is either “Original” or “40bit WEP”. When the different Default Key is set to each Wavit11, the security against the illegal wiretapping is strengthened.
Mitsumi Electric Co., Ltd. Wavit11 User's Manual 10.19. Destination Address Set the MAC address of the Wavit11 on the other side for Wireless Bridge operation. The MAC address is indicated at the label put at the back of the Wavit11.
Mitsumi Electric Co., Ltd. Wavit11 User's Manual 11. Interoperability with third vendor wireless LAN Wavit11 has interoperability with third vendor wireless LAN under certain conditions. If you install intermixed wireless network of third vendor Wireless LAN and Wavit11, refer to User’s Manual enclosed in the package of third vendor wireless LAN. However, Mitsumi does not guarantee that Wavit11 can communicate with non-Wavit11 wireless LAN. 11.1. Confirmed wireless LAN card Table 1.
Mitsumi Electric Co., Ltd. Samsung Symbol SWL-2000N LA4121-1020 OK OK Wavit11 User's Manual OK OK OK(1) OK OK OK OK OK OK OK OK (1) This product does not receive fragmented frame. (2) This product does not support hexagonal encryption key setting. 11.2. Confirmed Access Point Table 2.
Mitsumi Electric Co., Ltd. Wavit11 User's Manual 11.3. Setting The general setup method to connect with third vendor wireless LAN is as follows, for each communication mode. (Ad-Hoc mode) In Ad-Hoc mode, set same channel to both Wavitr11 and third vendor Wireless LAN. (802.11 Ad-Hoc mode) In 802.11 Ad-Hoc mode, set same SSID to both Wavit11 and third vendor wireless LAN. (Infrastructure mode) In Infrastructure mode, set same SSID to both Wavit11 and third vendor Access Point.
Mitsumi Electric Co., Ltd. Wavit11 User's Manual 12. Troubleshooting Situations It does not work It does not communicate in Ad-Hoc mode. It does not communicate in 802.11 Ad-Hoc mode. It does not communicate in Infrastructure mode. It does not communicate in Both mode. It does not communic ate in Access Point mode. Verifying Does Power LED light up? Measures Connect AC Adapter to Wavit11. Connect AC Adapter to the outlet. Does LINK LED light up? Connect 10BASE-T cable properly.
Mitsumi Electric Co., Ltd. Wavit11 User's Manual Are the encryption appropriately set? It does not communicate in Wireless Bridge mode. It does not communicate in all modes. The configuration tool does not start. Setting is not feasible with the configuration tool. Was the unusable IP address set? I have forgotten the password. keys You need to set same encryption keys. Open the configuration tool, and write in encryption keys again.
Mitsumi Electric Co., Ltd. Wavit11 User's Manual 13. Specifications Item Frequency Channel Modulation Interface Data Rate Receive Sensitivity Output Power Temperature Range Standards Supply Voltage Consumption Current Size Weight Specification 2,400 -2,483.5MHz 11 CCK (Complementary Code Keying) 10BASE-T 11Mbps/5.5Mbps/2Mbps/1Mbps -83dBm(11Mbps, FER=8x10⁻²) 15dBm 0-40 Celsius ARIB STD-T66 IEEE 802.11b 5.0V TX: 600mA RX: 330mA 65(W) x88(D) x 29.