Operations Manual Français p.110 Español p.
Table of Contents WARNING: PLEASE CAREFULLY READ THE SEPARATE HEALTH AND SAFETY PRECAUTIONS BOOKLET INCLUDED WITH THIS PRODUCT BEFORE USING YOUR NINTENDO® HARDWARE SYSTEM, GAMES OR ACCESSORIES. THIS BOOKLET CONTAINS IMPORTANT HEALTH AND SAFETY INFORMATION.
Basics
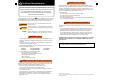
6 5 Health and Safety Information Throughout this manual, you will see this symbol followed by WARNING or CAUTION, or you may see the term IMPORTANT. These terms have different levels of meaning as outlined below. Please read and understand these terms and the information that appears after them before using your DS system: WARNING CAUTION IMPORTANT: Warns you about incorrect use of the Nintendo DSi that could result in serious personal injury.
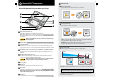
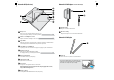
8 7 Nintendo DSi™ Components Indicator LEDs Basics Basics Wireless Indicator LED Lights yellow when wireless communications features are enabled for use. View of the Nintendo DSi system when open (front) Lit Blinking Communication is enabled. Data is being sent. Recharge Indicator LED Lights orange when the battery is being charged. Lit Unlit Upper and Lower LCD Screens Twin backlit color liquid crystal screens display game screens and other SEE PAGE 15 information.
10 9 Nintendo DSi AC Adapter Model No. WAP-002(USA) AC Adapter Plug Plugs into a standard 120-volt AC wall outlet. DC Connector Plug Battery Cover Remove cover to replace the battery. NOTE: Do not remove the cover unless you need to replace the battery or check battery installation. Plugs into the AC adapter connector on the back of the Nintendo DSi. SEE PAGE 17 Volume / Screen Brightness Control Adjust the sound volume or the brightness of the screens.
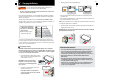
12 11 3. Charging the Battery When fully charged, the recharge indicator LED will go out. Basics Basics Do not use the Nintendo DSi AC Adapter during a lightning storm. t #F TVSF UP DIBSHF UIF CBUUFSZ CFGPSF VTJOH JU GPS UIF öSTU UJNF PS XIFO JU IBT not been used in the last 6 months.
14 13 Using the Stylus and Touch Screen The lower LCD screen, or Touch Screen, is touch sensitive. For games that include this game control feature, operate the screen by using the included stylus. Lightly touch or slide the stylus across the Touch Screen as shown below.
16 15 Adjusting the Volume/Screen Brightness Using SD Memory Cards Basics Basics 5IF /JOUFOEP %4J TVQQPSUT IJHI DBQBDJUZ 4% $BSET PWFS (# JO TJ[F 4%)$ $BSET 8JUI DPNNFSDJBMMZ available SD Cards you will be able to: Adjusting the volume 1. Press the Volume/Screen Brightness Control in either direction to change the volume. t 1SFTT QMVT UP JODSFBTF UIF WPMVNF PS NJOVT o UP EFDSFBTF the volume. t 8IFO UIF TZTUFN JT JO 4MFFQ .PEF UIF WPMVNF DBO CF EFDSFBTFE but not increased.
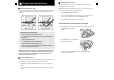
18 17 Battery replacement procedure Replacing the Battery Pack Battery packs become worn with repeated charge/discharge cycles, and the amount of time they can be used when fully charged will decrease gradually over time. If you feel the usage time has dropped off noticeably, replace the battery pack. IMPORTANT: To avoid damage to the screw or threads, use a screwdriver that is appropriate for the screw. t %P OPU VTF BOZ CBUUFSZ PUIFS UIBO UIF /JOUFOEP %4J SFDIBSHFBCMF CBUUFSZ .PEFM /P TWL-003.
Applications and Settings
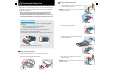
21 22 Application Icons Nintendo DSi Menu )FSF BSF UIF JDPOT ZPV MM TFF PO UIF TPGUXBSF MJTU 5IF /JOUFOEP %4J .FOV BQQFBST BVUPNBUJDBMMZ XIFO ZPV UVSO UIF TZTUFN T QPXFS PO 0O UIJT NFOV ZPV XJMM TFF JDPOT GPS UIF TZTUFN T CVJMU JO BQQMJDBUJPOT BOE GPS BOZ /JOUFOEP %4 PS /JOUFOEP %4J (BNF $BSE inserted into the DS Game Card slot. Tap these icons to play games, use the applications, or enter system TFUUJOHT :PV DBO BMTP QSFTT or to enter camera mode and take photos.
23 24 Camera Mode Top-Screen Photo Display On the Nintendo DSi Menu, press or to enter camera mode. Photos you take will be saved to the Nintendo DSi system memory. t 1IPUPT UBLFO JO DBNFSB NPEF XJMM BQQFBS PO UIF UPQ screen of the Nintendo DSi Menu. SD Cards can save up to 3,000 photos max, regardless of how much space they have.
25 26 Using Game Cards Nintendo DSi Camera Starting a Game IMPORTANT: To avoid damage to the Nintendo DSi Camera, do not point it at the sun or other very intense sources of light. Applications & Settings Applications & Settings Insert a Game Card in the DS Card slot. If you have trouble inserting the Game Card, eject it and confirm that it is facing the right direction. Note: The label should face towards the bottom of the Nintendo DSi.
27 28 Using the Camera Selecting a Lens Tap Camera from the Nintendo DSi Camera menu to view the lens-selection screen. Tap the lens you want to use, and then tap Start to begin using that lens. Tap any point on the Touch Screen UP SFTUPSF BO BSFB T DPMPS UP UIF QIPUP Tap any point on the Touch Screen to alter that color in the photo. Mirror Lens Mischief Lens Apply and adjust a variety of mirror effects.
29 30 Using the Camera (cont.) Normal Lens Graffiti lens This lens adds no special effects to your photos. Using this lens, you can decorate your photos using pens, stamps, and more.
31 32 Using the Camera (cont.) Mischief Lens Colorpad Lens Using this lens, you can change the color of any portion of your photo. The color will change each time you tap. Tapping white, black, or gray areas will not change their color.
33 34 Using the Camera (cont.) Merge Lens Resemblance Lens Using this lens, you can evaluate how similar two faces are. Using this lens, you can blend two faces together. Line up two faces on the screen Once the faces have been identified, they will appear with square frames around them. Capture the second face as you did the first It’s easier to merge faces if the second face is as close as possible in size and position to the first face.
35 36 Using the Camera (cont.) Frame Lens Using this lens, you can capture photos within preset or user-created frames, or you can create your own brand-new frames. Use the eraser to carve out a blank area in the photo. Applications & Settings Applications & Settings Create a new frame Select a different frame Current frame Use eraser Use fill pen Creating Frames Tap Create frame on the Touch Screen.
37 38 Viewing the Album 4FMFDU "MCVN GSPN UIF /JOUFOEP %4J $BNFSB NFOV UP WJFX UIVNCOBJMT PG ZPVS QIPUPT :PV DBO WJFX FEJU or delete any of the photos you have taken. Slide Show Select Slide Show from the Album menu to display photos one after another.
39 40 Other Camera Features Select Other from the Nintendo DSi Camera menu to exchange, copy, or delete photos or frames. :PV DBO BMTP EFMFUF NFNPT IFSF Communicate with other Nintendo DSi systems to exchange photos or frames. Controls for Sending Side Controls for Receiving Side Tap Receive. Tap Send. Tap a location to save to. Copy photos and frames between the Nintendo DSi system memory and an SD Card Delete photos, frames, and memos Wait for the receiving side.
41 42 Other Camera Features (cont.) Copying Photos/Frames Deleting Photos/Frames/Memos :PV DBO DPQZ TBWFE QIPUPT BOE GSBNFT GSPN ZPVS /JOUFOEP %4J TZTUFN UP BO 4% $BSE PS WJDF WFSTB :PV DBO EFMFUF QIPUPT GSBNFT BOE NFNPT TBWFE JO UIF TZTUFN NFNPSZ PS PO BO 4% $BSE Select where you want to delete from. Applications & Settings Applications & Settings Select where you want to copy from. Select the data you want to delete In this screen, the user has selected to delete from System.
43 44 Nintendo DSi Sound Calendar Select Calendar from the Nintendo DSi Camera menu to access the calendar on the Touch Screen. With Nintendo DSi Sound, you can record sounds using the internal microphone and then play with them to DSFBUF OFX TPVOET :PV DBO BMTP QMBZ NVTJD TBWFE PO an SD Card.
45 46 Recording and Playing with Sounds Tap Record and edit a sound from the Nintendo DSi Sound menu. Note: Sound data will be saved in the Nintendo DSi system memory. No data will be written to or read from your SD card. Recording Tap an empty balloon Tap Record. Empty sound balloon Applications & Settings Applications & Settings Filled sound balloon Volume slider Tap to begin recording. If the mic detects a loud enough noise, it will begin recording automatically.
47 48 Recording and Playing with Sounds (cont.) Playing with Sound Choose the sound balloon you want to use by tapping it , then tap Play. Changing Playback Speed and Pitch and alter the speed and pitch of the sound. Higher Pitch Change the sound however you like. Slower Playback Parakeet – If you UBQ IJN IF MM HJWF you tips on what you can do.